
Here are the most frequently asked questions about iPosters and PDF+ that come into our support desk. You will find the answers to most of your technical questions about creating your presentations in this FAQ section. Please keep in mind that this is a general FAQ page used by iPoster authors across many different conferences. There may be some features that your conference organizer has decided not to use and so they may not be available to you in your editor.
You can also check out our Quick Guide, which provides a written overview of the system and available multimedia tools. Or if you prefer to watch an overview, we have video tutorials. For a little inspiration about how you can design your presentation, take a look at some sample iPosters. Still need help? Contact our support team – don’t forget to tell us which conference your are creating a presentation for.
Logging in and getting started
Why should I make my presentation accessible?
Making your presentation accessible is not just about compliance; it’s about inclusivity and reach. By utilizing accessibility tools, you ensure that your work is available to a broader audience, including individuals with disabilities. This not only amplifies the impact of your research but also demonstrates a commitment to social responsibility and equality in knowledge sharing.
What are the benefits of adding Alt text and captions to images?
Alt text and captions provide a textual alternative to visual information, which is crucial for individuals who rely on screen readers or have difficulty interpreting images. This enhances the understanding and retention of your poster’s content, ensuring that your message is conveyed effectively to all viewers.
How does adding a prerecorded video presentation enhance my poster?
A prerecorded video presentation allows you to personally explain and elaborate on your research, creating a more engaging and personal connection with your audience. It also caters to different learning styles, making your research more accessible to those who prefer auditory or visual learning over reading text.
Why should I include subtitles and text transcripts?
Subtitles and text transcripts are essential for viewers who are deaf or hard of hearing, as well as for those who may be viewing your poster in a noisy or sound-sensitive environment. They also aid in comprehension for non-native speakers and can improve the overall accessibility of your content.
What is the advantage of adding narration or audio snippets?
Narration and audio snippets can provide additional context or explanations that may not be easily conveyed through text or visuals alone. They offer an alternative way to engage with your content, particularly for those with visual or learning disabilities.
Please take advantage of the accessibility tools available to you within the iPoster Editor.
Please explore the instructions under ‘Accessibility Features’ to find out how to utilize these tools. Don’t hesitate to reach out to our support team if you have any questions or would like any assistance. Send us a request using our support desk contact form and we will get back to you as soon as we can.
Remember, by making your research accessible, you’re not only reaching a wider audience, but you’re also fostering an inclusive academic community that values and respects diversity in all its forms. Embrace these tools to ensure your research makes the maximum impact.
Why can’t I log in to my iPoster editor?
If you’re having trouble logging in, the issue could be your operating system, browser, network, or router.
Please check the following:
You have the latest updates for your operating system: Windows, Mac or Linux.
You are using the latest version of your web browser: we recommend Chrome, Edge, Mozilla Firefox, and Safari. Please note, we do not support Internet Explorer.
If you are still having issues logging in:
- If you’re having problems at a workplace, university, library etc…: It may be that you are being denied access because of a firewall set up on the organization’s network. To test this, try logging in to the iPoster editor from another computer in another location and see if you are still experiencing the issue. Alternatively you can use your phone’s data to check this.
- If you’re having problems while trying to connect from home, you might have a slow internet connection that is making it difficult to access the template.
I have lost my login details, what should I do?
Reach out to our support team; send a support request or go to iPosterSessions Support. Don’t forget to let us know which conference you are creating a presentation for.
How do I access multiple presentations?
When you are logged into your editor and selected your first template you will see the following bar at the top of your screen.

Simply click on this box and you will be able to select a poster to work on.
Working with text
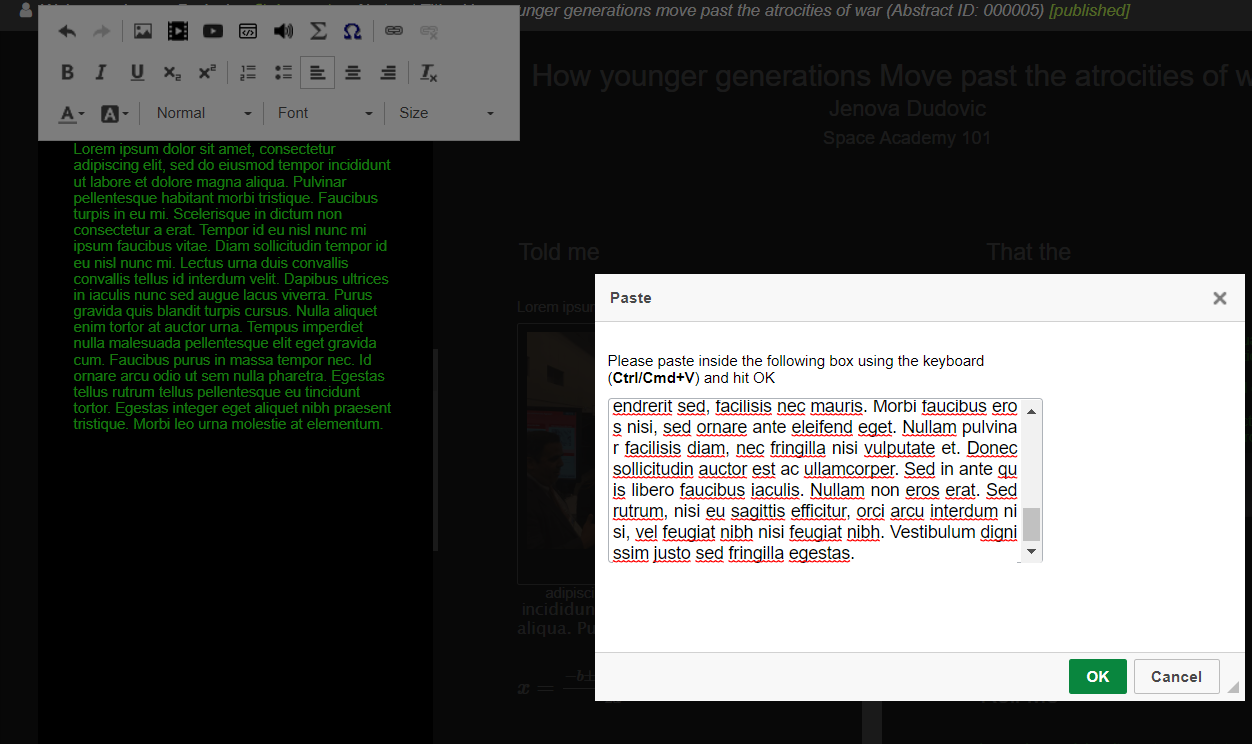
How do I copy/paste text from external resources into my iPoster?
The iPoster system will not allow any preformatted or code rich data to be directly pasted into it. When text from such a source is pasted in a pop up box will appear. After you have pasted your text in here and clicked ‘Ok’, any previous formatting will be removed and the text inserted into the content box. You can then format it using the tools available.
Place the curser in the text box where you would like the pasted text to start and right click on the mouse and select the Paste option or click ctrl+v.
a box will pop up. Paste the copied text into this box and Click the ‘Ok’ button. Your text should appear on your poster.
You can now continue to format the text as desired using the tools available in the tool bar.
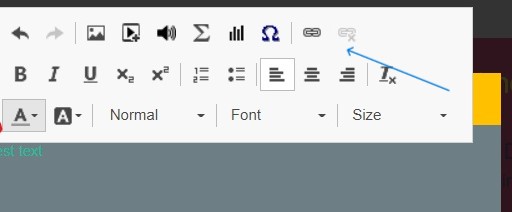
Can I add links to web pages in my presentation?
Yes you can. Use the ‘Insert Link’ tool in the content box tool bar. Then add the URL and the display text as required.
Can I edit the font in the title fields?
You can edit the title’s font type and font color. Simply click on the DESIGN button in the right hand menu. Then select the font type and color from the options provided. The title’s font size is fixed and therefore cannot be edited.
The author and author institution fields fall under the ‘Subtitle’ option and you can edit them in the same way under DESIGN.
Why can’t I see the names of affiliated institutions on my presentation?
The reason you can’t see this field is because you’ve used up too much space in the fields above. The space allotted to the ‘Title’, ‘Subtitle’ and ‘Affiliated Institutions’ fields is fixed. If these fields are too long then some or all of the text in the institution field won’t be visible.
The solution:
keep your titles and subtitles as short as possible. If you have a very long abstract title, try to abbreviate it in your presentation. Your full abstract title will be displayed on the search screen at the conference.
Likewise, try to keep your list of co-author names and institutions brief. If you must include several authors on the presentation, use the ‘Author Info‘ button on the main toolbar. This section is an annex to your presentation screen. Visitors will see an ‘Author Info’ button on your presentation. When they click this button they can view the additional author information.
You can view the Author Info section for yourself, simply go into preview mode and select the ‘Author Info’ button at the bottom of the page.
How do I adjust font sizes?
The size of the text in the content boxes can be adjusted using the font size button in the toolbar. Simply highlight the text, click on the ‘font size’ button and select your preferred size.
Please note that the font sizes for title, authors and affiliations are fixed.
Can I adjust line spacing?
There is no button in the toolbox for line spacing, but you can have a tight line space by holding Shift and then Return/Enter on your keyboard. You can create double line breaks by pressing Return/Enter twice.
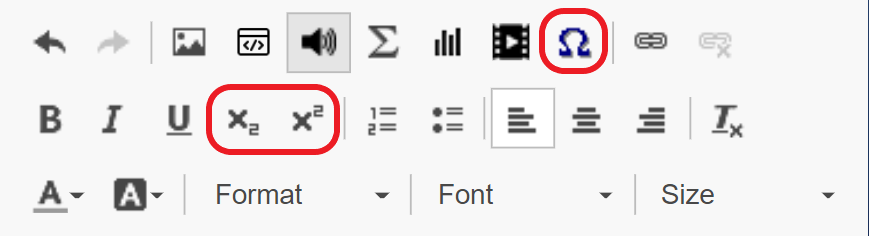
How do I add special characters: superscript, math symbols etc…?
For Content Box texts:
Place the cursor where you want to insert the special character in the text.
Click on the appropriate button in the Tool Bar.
For Title and Subtitle fields:
To add special characters into the title and subtitle fields you can use copy-and-paste. Here are super and subscript numbers and commas that you can use:
Superscript:
¹ ² ³ ⁴ ⁵ ⁶ ⁷ ⁸ ⁹ ⁰ ⸴
Subscript:
₁ ₂ ₃ ₄ ₅ ₆ ₇ ₈ ₉ ̦
You can also use any one of a number of online super- and subscript generators that can be found on the web. We recommend the following easy-to-use generators:
If you’re a Mac user and you’re having trouble seeing any of the super or subscript characters above, try the below:
- Go to: https://fontlibrary.org/en/font/symbola
- Download and then install the font Symbola by double-clicking the file Symbola.ttf
- Restart the browser
How do I create nested lists?
A nested list is just a list contained within a list. For example, you might have a numbered list but then want to include sub items within it using roman numerals. Or, you might want to have a bulleted list and change up the bullet style for your nested list.
1. Start with your basic bulleted or numbered list – use these options on the tool bar to create one.
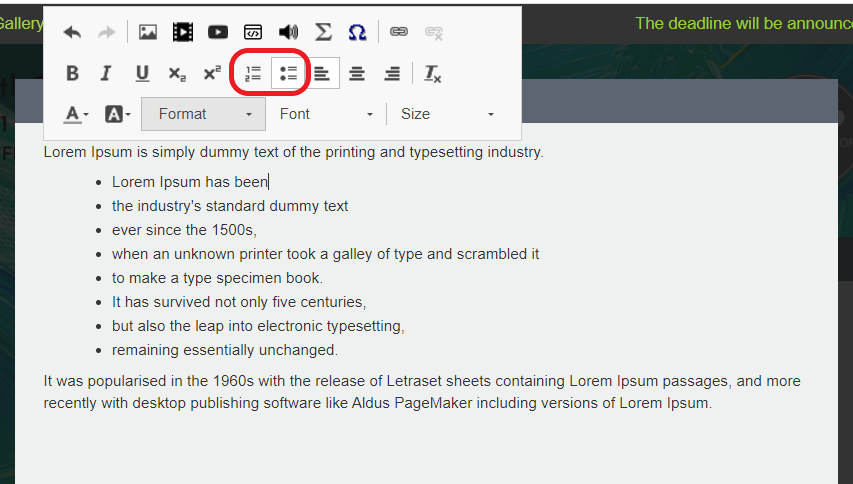
2. Select the text that should be part of the nested list
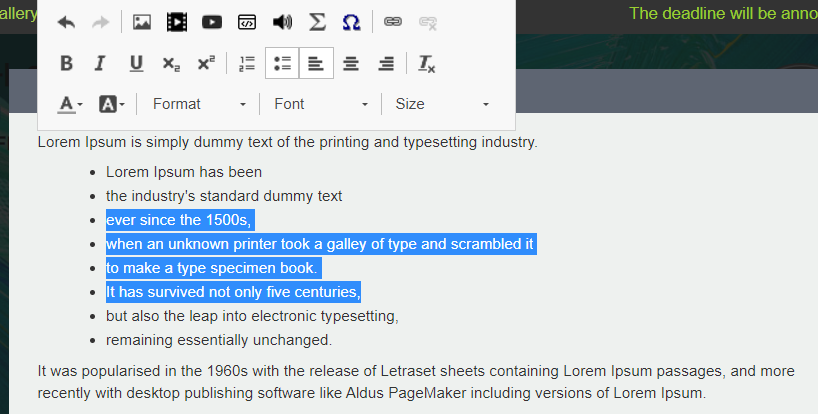
3. Click the ‘tab’ button on your keyboard. This will indent the highlighted text and apply a different bullet type.
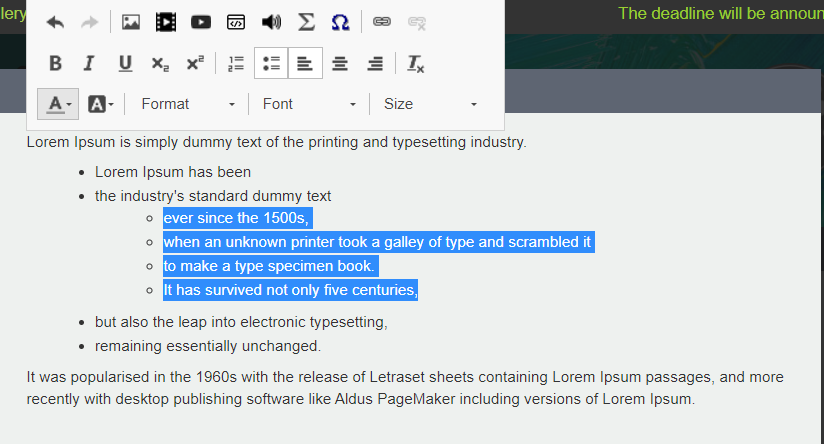
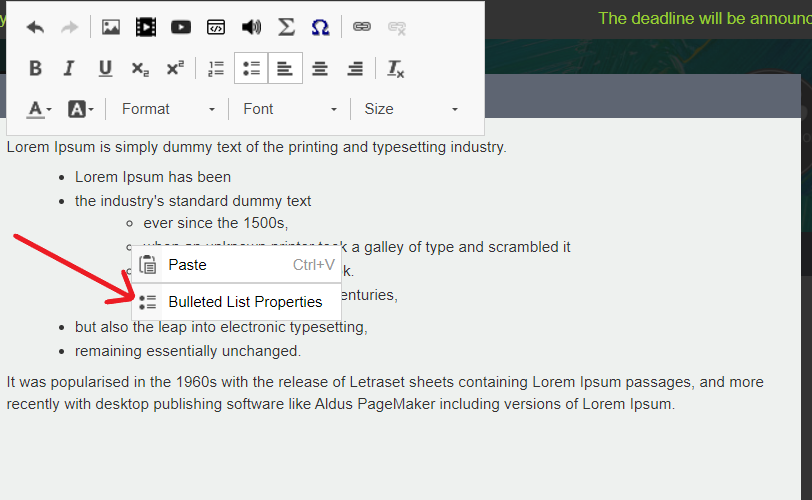
4. Change the bullet types by right clicking on each list of bullets. Click on the ‘Bulleted List Properties’ option.
5. Select a bullet option from the list. This can be edited on the main list as well.

6. I have selected the disc option to match that of the main list
Working with media
What file formats can I use?
The iPoster system accepts the following file types for uploads:
Audio:
- mp3
- ogg
- aac
- webm
- aiff
- mp4
- m4a
Video:
- flv
- mkv
- mov
- mp4
- ogv
- webm
Image:
- jpg
- png
- gif
- jpeg
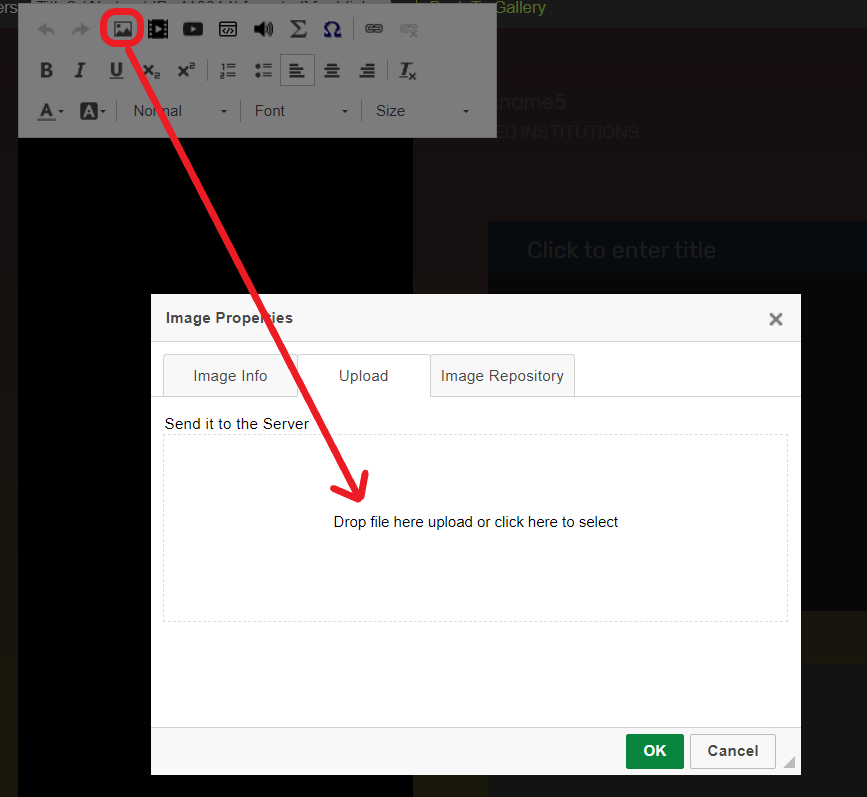
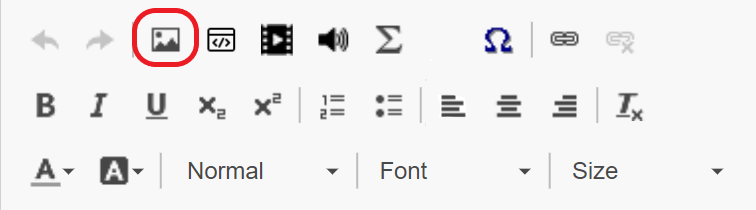
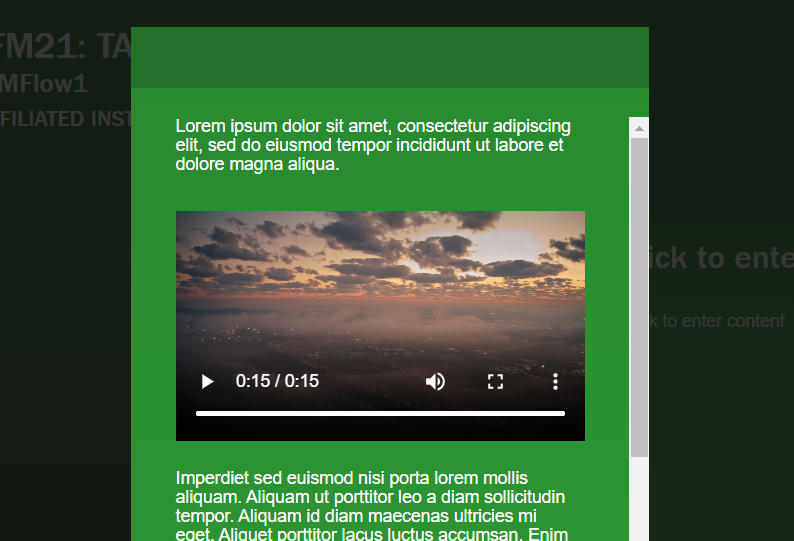
How do I add images to my poster?
Add images to an iPoster in a couple of clicks using the Insert Image tool. You will find this tool on the toolbar of each content box as shown below.

General Image tips
The size of your images is important because it will impact the quality of your overall presentation. Ensure that your images are as large as possible so that they have maximum impact for the end viewer.
Images must be in JPG, PNG or GIF format. When inserting images, remember that they will expand to their full size when tapped or clicked on by visitors or by you during your presentation. So, make sure your images are as large as possible – up to 1920 x1080 pixels. And if available, use the original images for best quality. If they are not available, take screen shots of your images, but zoom in before you take them so that, again, they are as large as possible.
As you proceed, save your progress then check your work by clicking on the Preview button. You’ll get a close approximation of how your presentation will look on the HD screens, and can test all of the functionality: content boxes and images expand when clicked, videos play correctly, external links connect, etc…
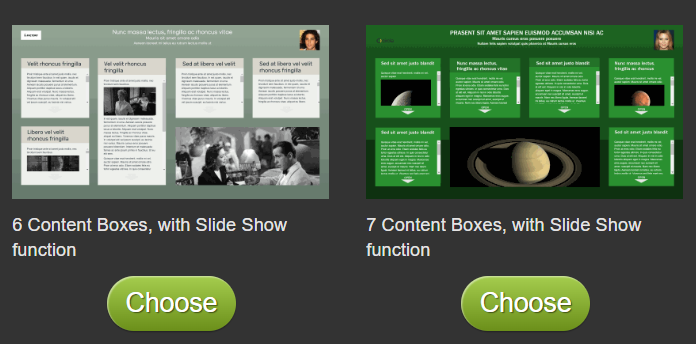
Slideshow Images
The slide show window (available in some templates) has a minimum image size requirement of 960×360 pixels, but we recommend that you insert images up to 1920×1080 pixels.
When you look at the slide show in the condensed view any images larger than 960×360 will be cropped. However when you or an end viewer click or tap on the slide show in preview mode or at the conference, it will open up as an overlay and show all images at their full size.
Conference participants will then be able to flick through the slideshow as they wish. Having larger images will provide a more enjoyable and better quality viewing experience for them.
Diagrams, charts and tables
Diagrams, charts, tables, etc. need to be inserted as images. Either export them from their source program as JPG or PNG, or take a screen shot. Make them as large as possible, and then import them into your content boxes. That way they will expand to make it easy for your visitors to view them.
Remember that an iPoster can contain so much more than an upload of a PDF or PowerPoint, so try to take advantage of this by including:
- Videos
- Sound files
- Links to dynamic external information (e.g. online data sets, visualizations, etc…)
- As much content as you feel is necessary to present your research with the detail it deserves. There are no content limits. As soon as you exceed the apparent physical space of a content box, it will scroll.
Adding an image to an iPoster content box
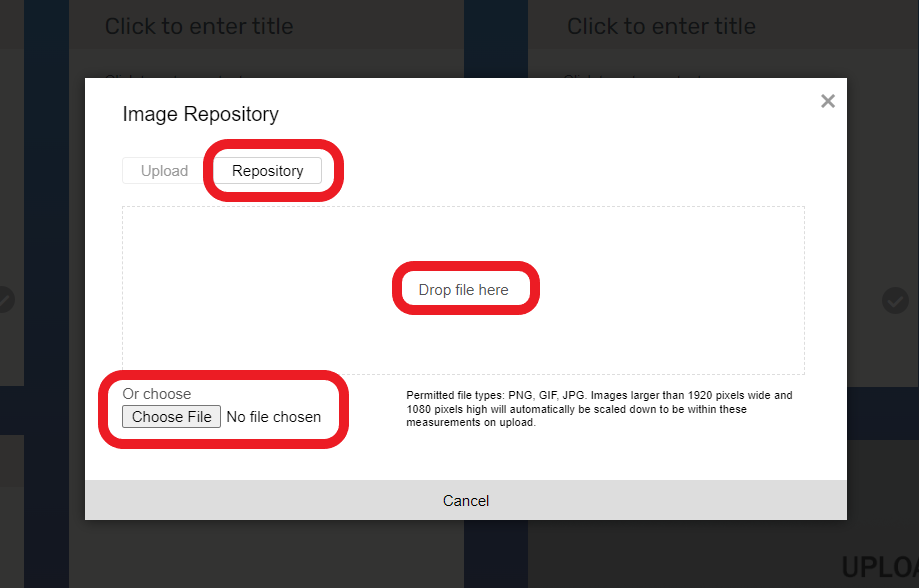
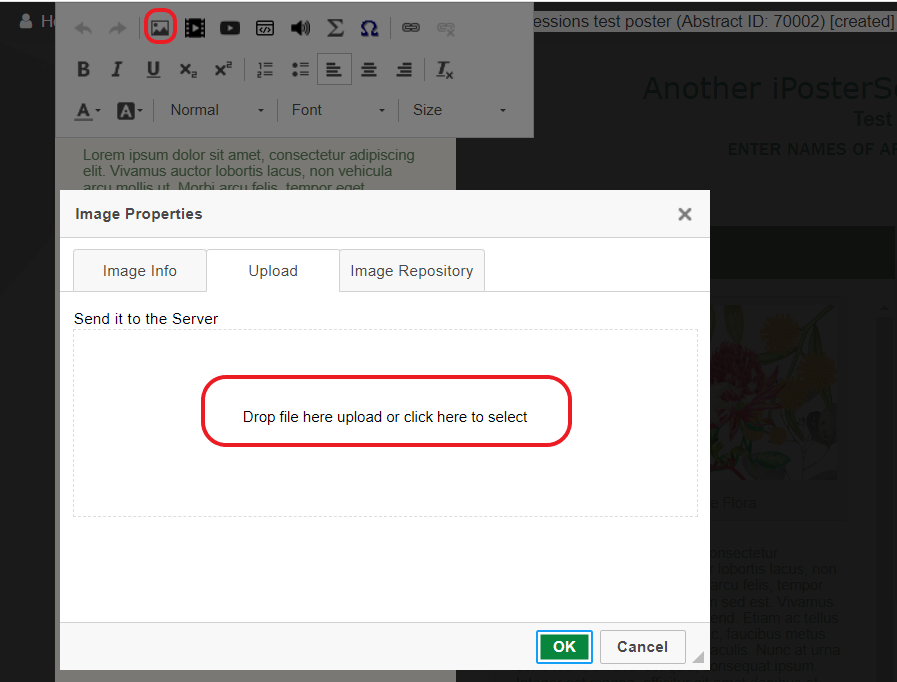
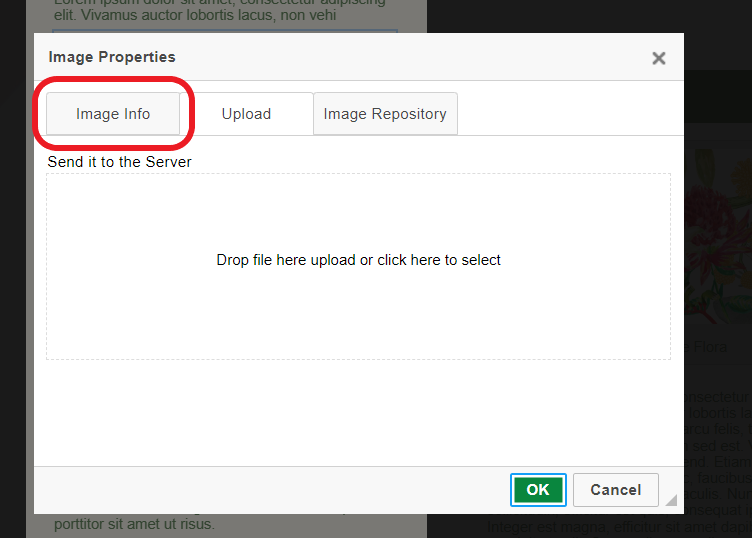
1. Either drag and drop your image into the upload box or click on the box to choose an image from your files. If you have previously uploaded images click on the ‘Image Repository’ tab to browse and select an existing image.
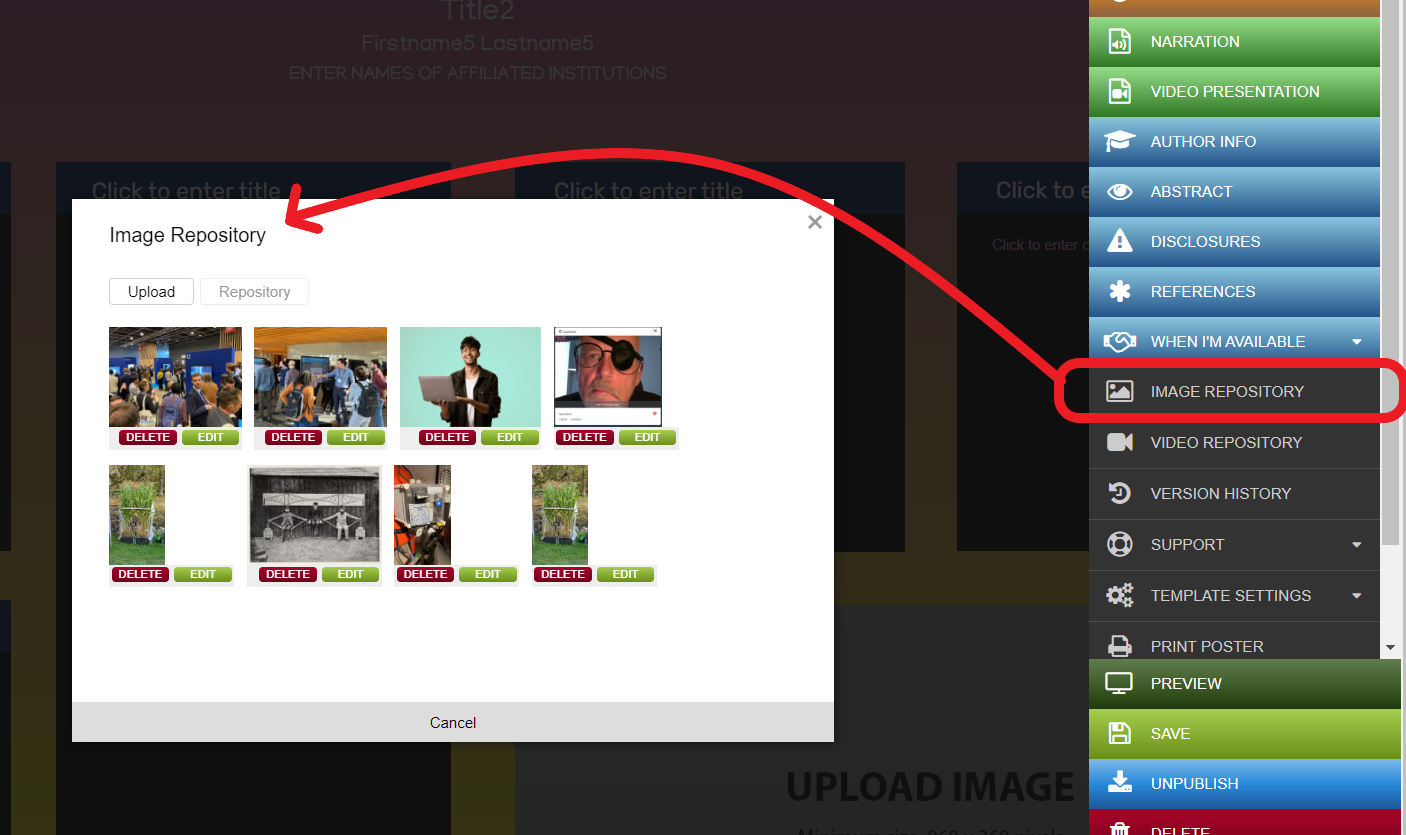
Editing images
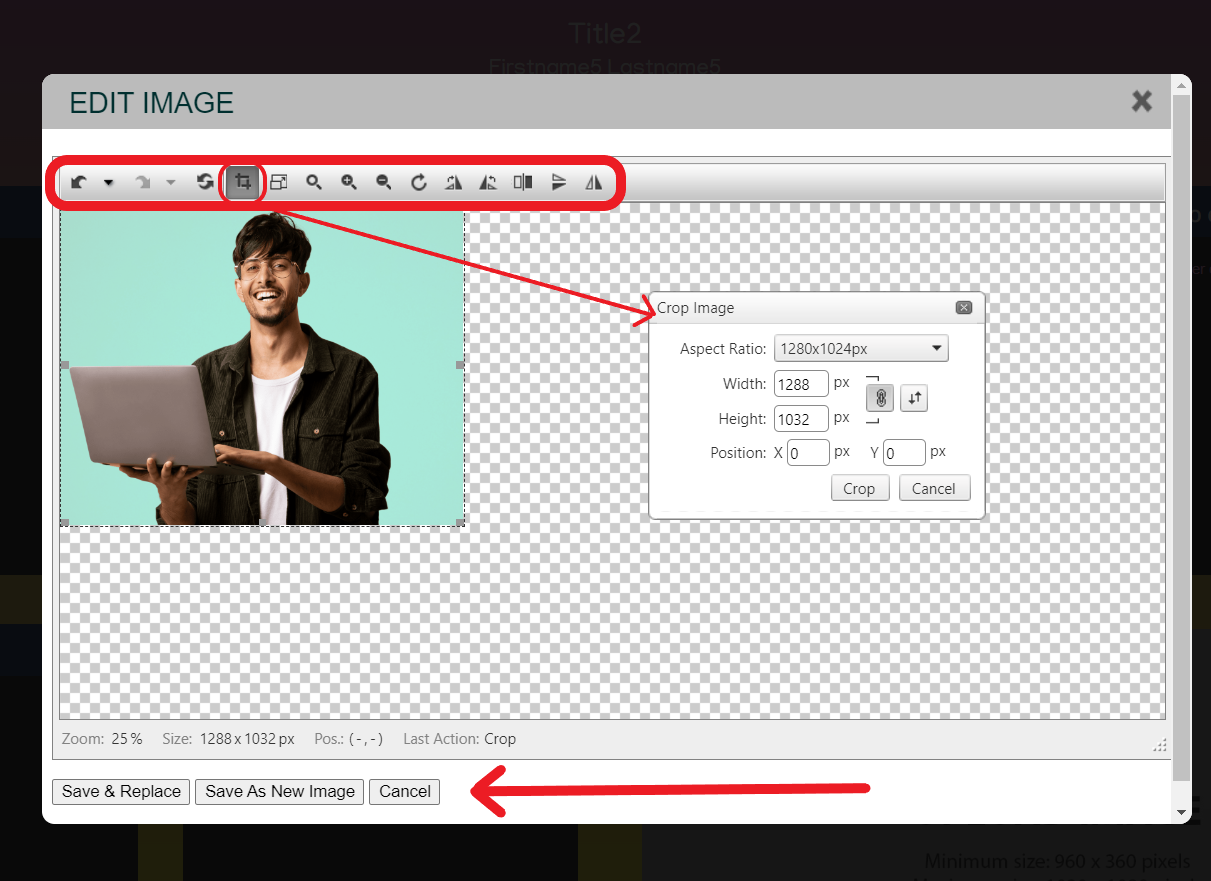
Images can be edited to some degree within the iPoster system. From the Image Repository click on the green edit button under the relevant image. You can crop, re-size, rotate, or flip the image using the controls in the top menu. The below example shows the cropping tool. You can also zoom in or out on the image to make it easier to see the edits you’re making.
When you’ve completed your edits you can either save the edited image as a new image or replace the original image with the edited one.
Be sure to view our tutorials, which will give you a broad overview of the how to create your presentations.
What is the best way to add tables or graphs to my poster?
You can add tables and graphs into the content boxes as images. Creating images of your tables and graphs will allow conference visitors to tap or click on them and expand them to their full size for easy reading.
Ensure that your images are as large as possible (up to 1920×1080). See the FAQ, How do I add images to my iPoster? for more details.
To make an image of your table or graph:
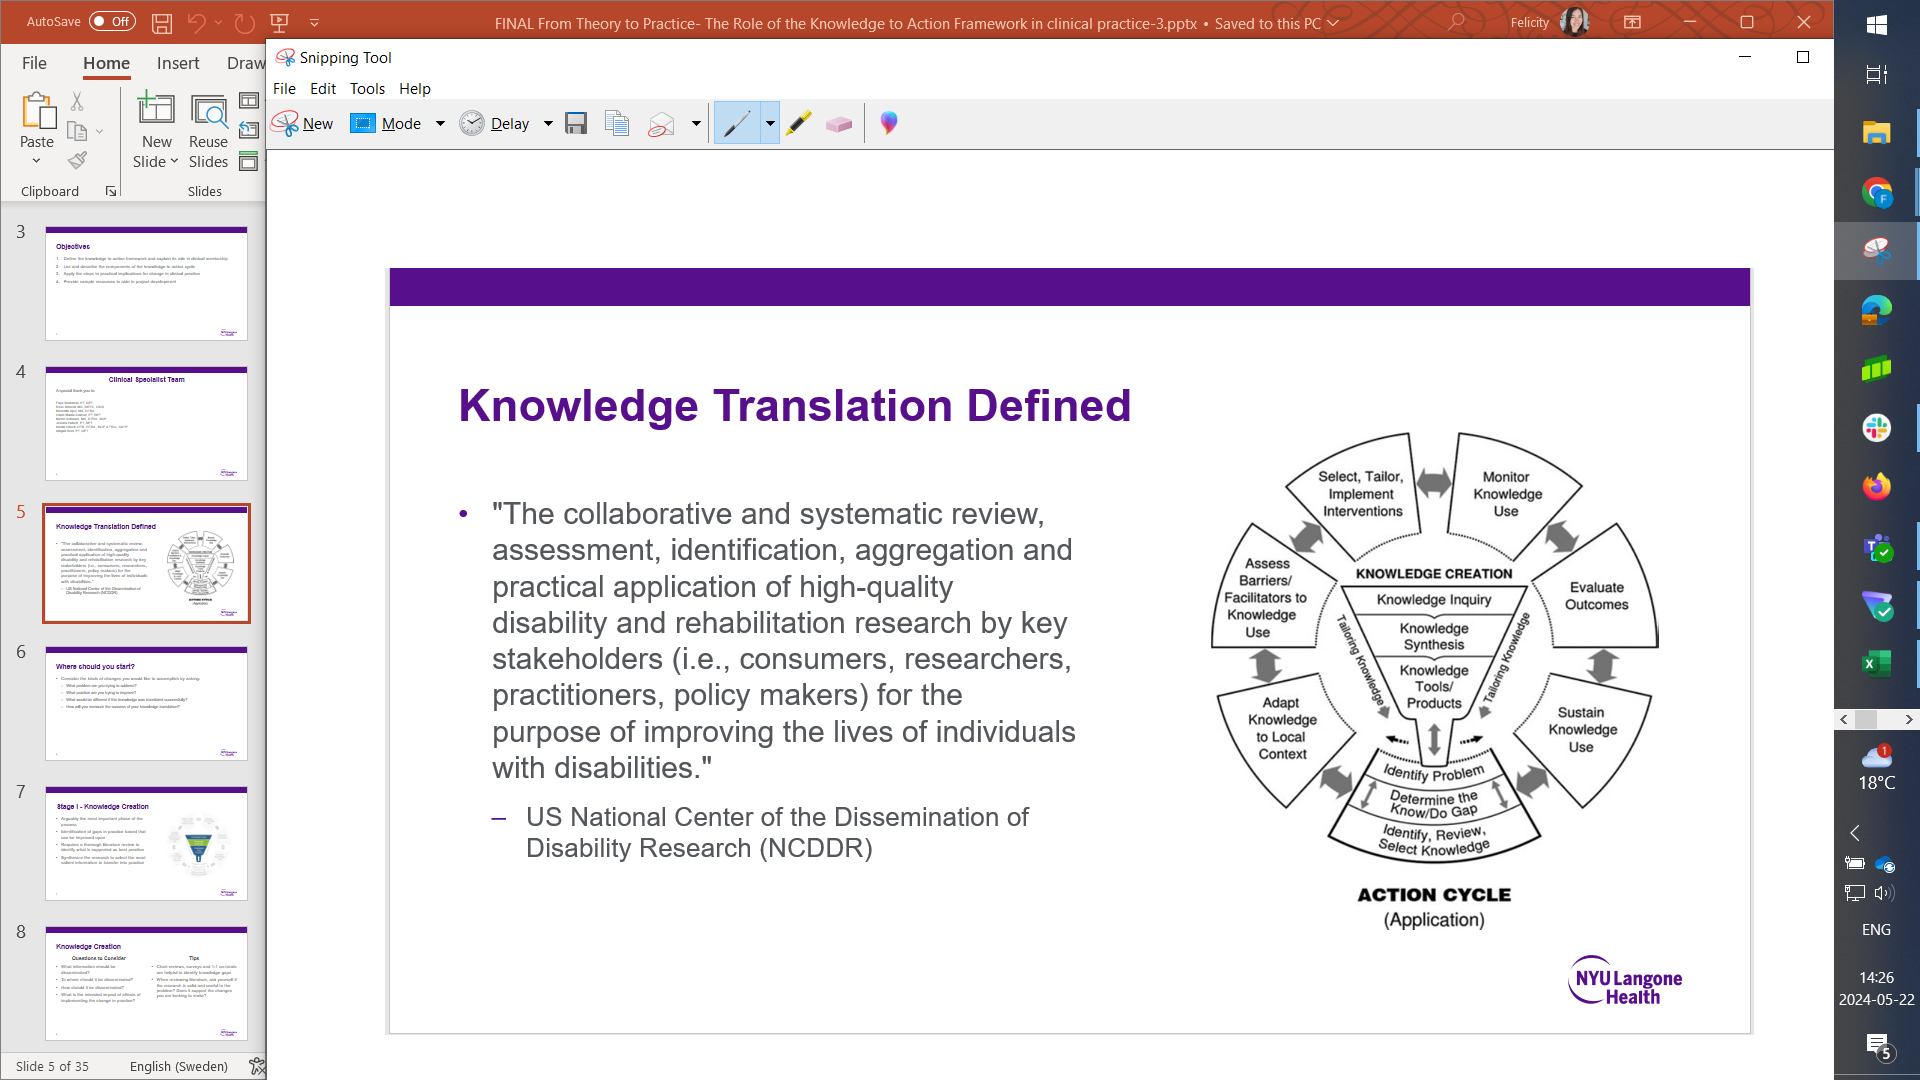
Create your table or graph in a spreadsheet, presentation, or word-processing program. Here is an example of an image within a PowerPoint presentation. I’m going to use the Microsoft snipping tool to take a ‘snip’ of this image – this tool is available if you use Microsoft. If you’re on a Macbook use the following keyboard shortcut to take a screenshot: shift+Command+4.

Another way to do this…
1. Right click on the image and save it as a PNG or JPEG. Do not try to copy and paste the image directly from the source into the iPoster editor.
2. Click inside the content box where you want the graph/table to sit. Use the INSERT IMAGE button to upload your image of it.
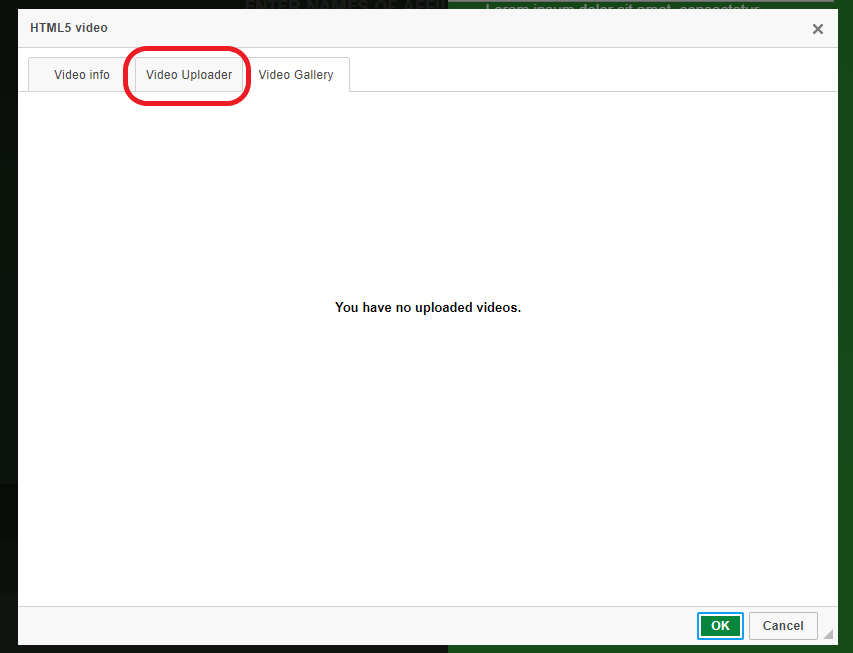
How do I upload a video file onto my poster?
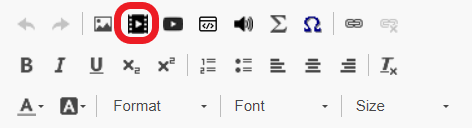
1. Place your curser in your content box where you want to insert the video.
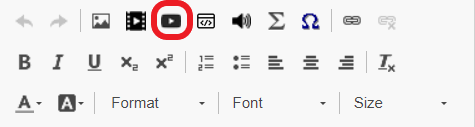
2. Click on the Insert HTML5 Video tool in the content box tool bar.
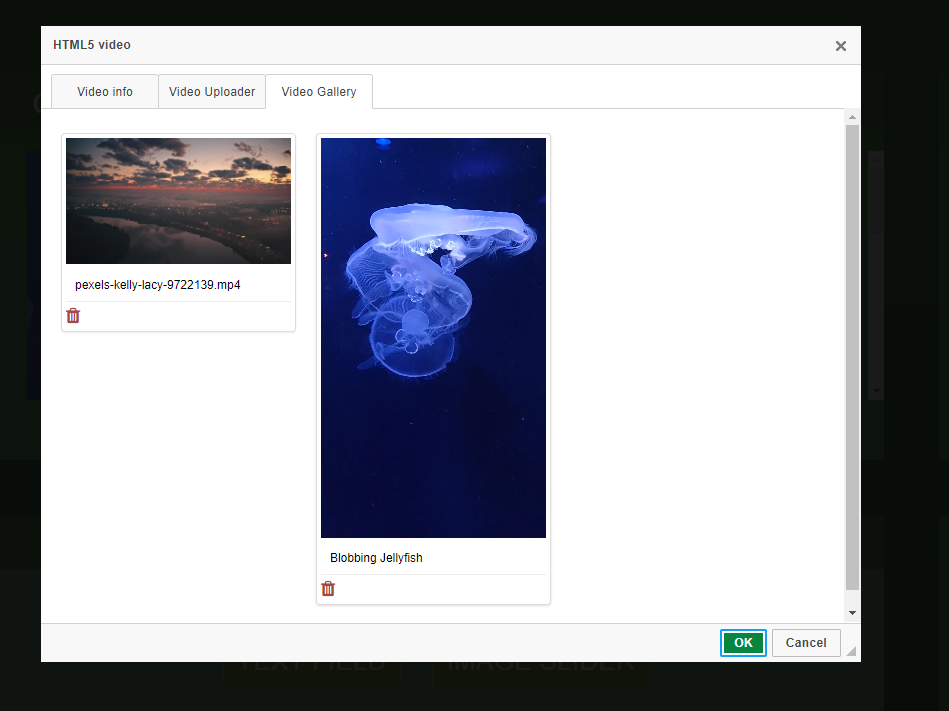
3. The following screen will come up. If you don’t have any videos uploaded in the repository it will be blank. Click on the Video Uploader tab.
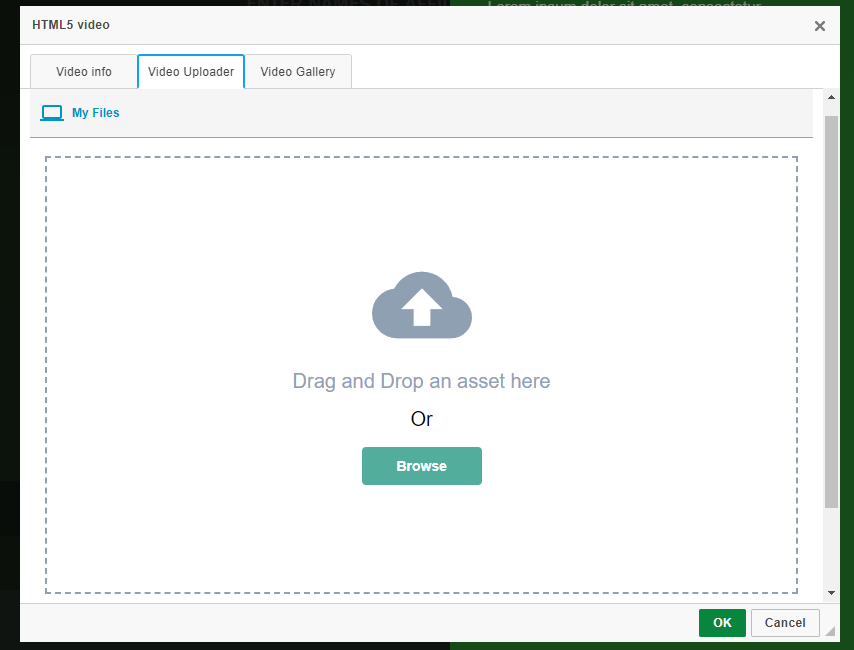
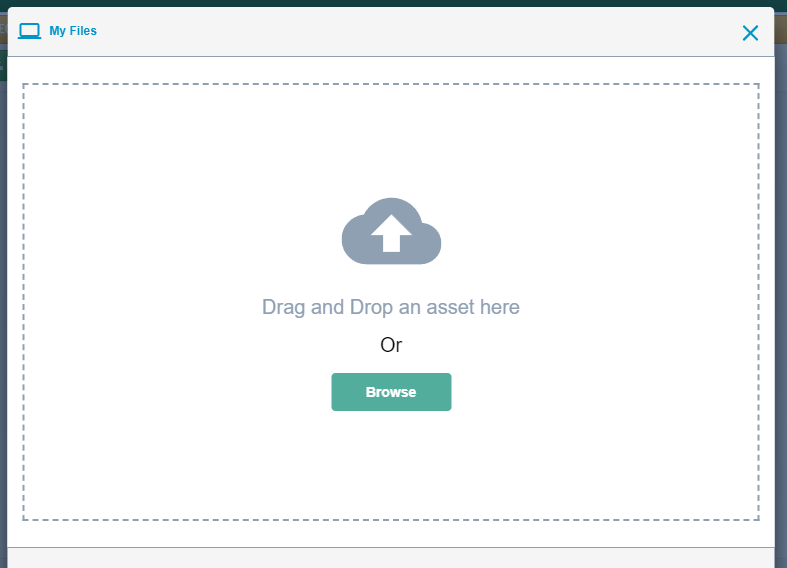
4. Upload your video from your computer. You can either drag and drop the file, or click Browse to search through your files.
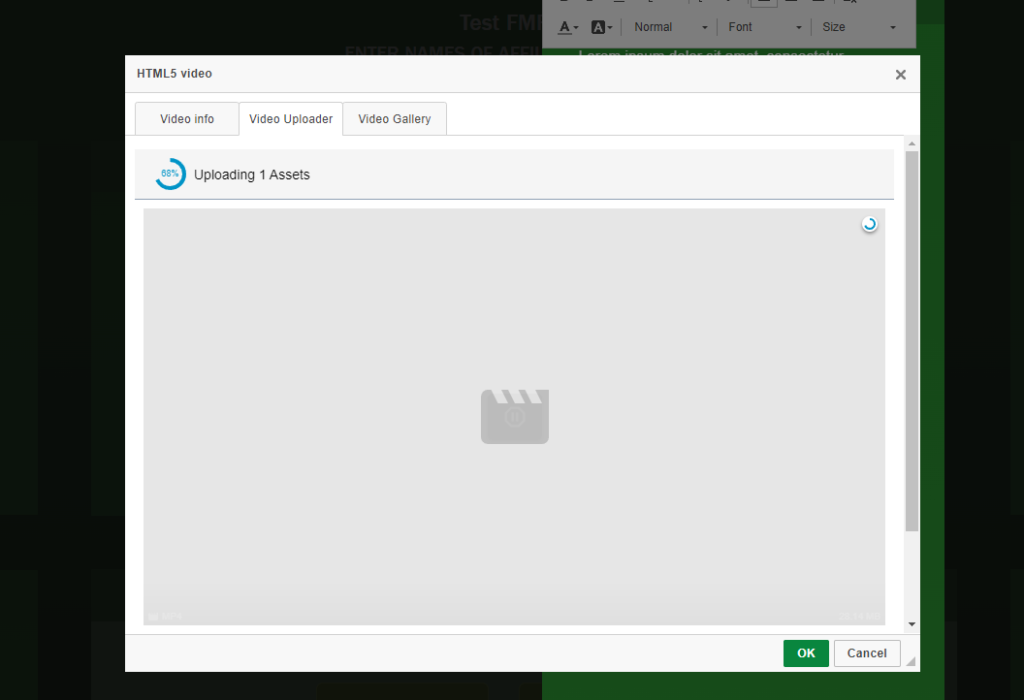
5. Wait for your file to finish uploading. Be patient, this may take a minute or so.
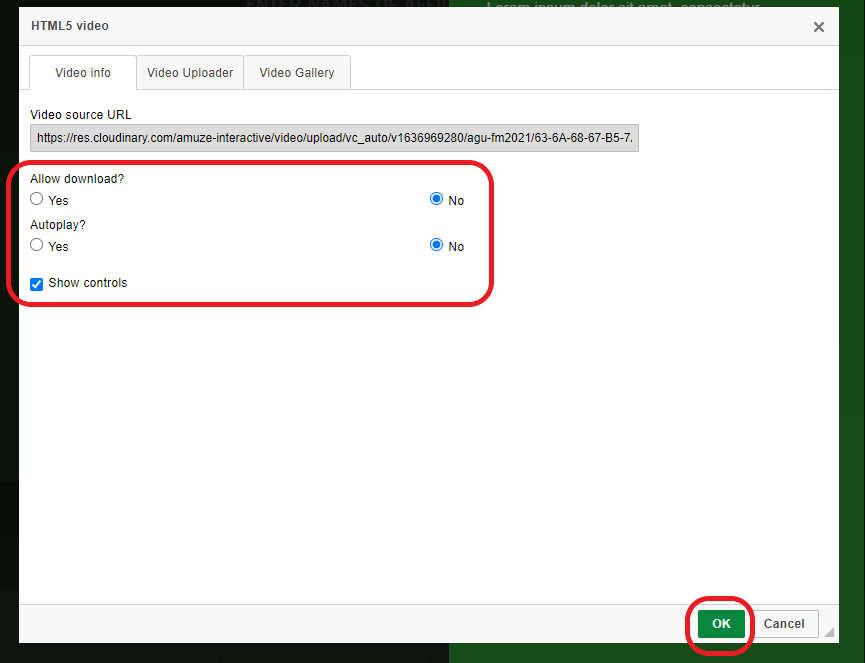
6. When the upload is complete you’ll be taken to the Video Info tab. Here you can adjust some settings on your video as shown below. When you are ready to insert the video click on the OK button.
7. Your video should now be inserted into your content box and will be visible in the video repository.
8. Test it in Preview mode, by clicking on the PREVIEW button in the main menu. Make sure you are happy with how it functions.
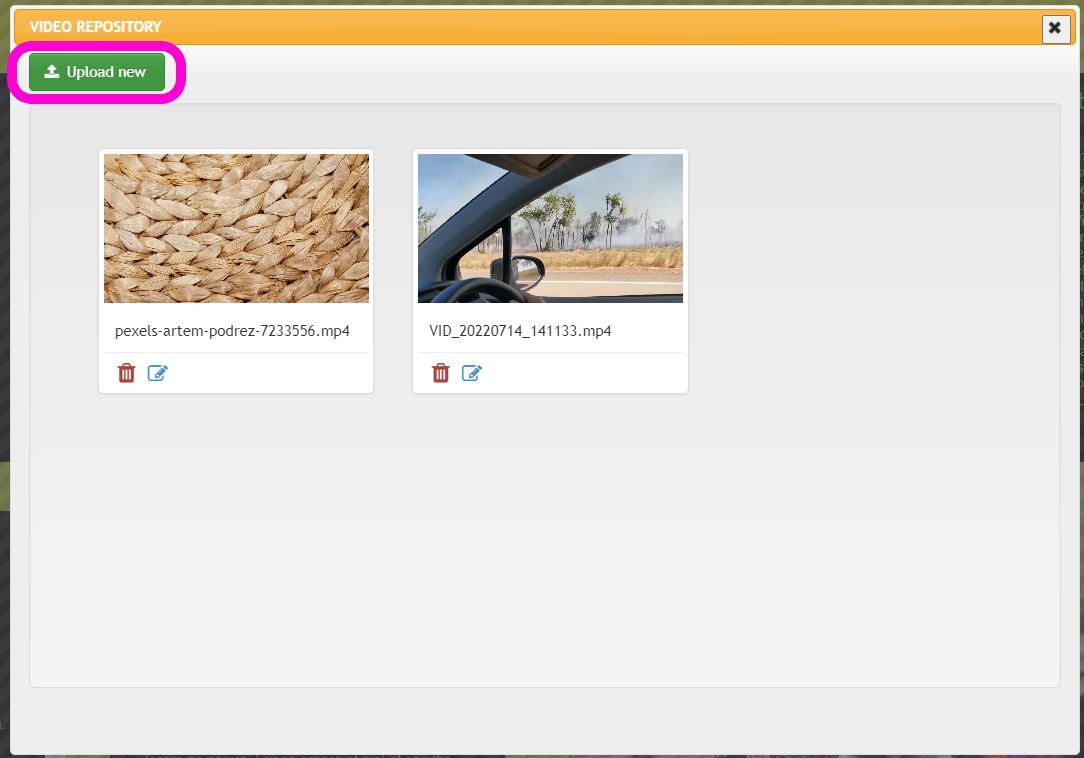
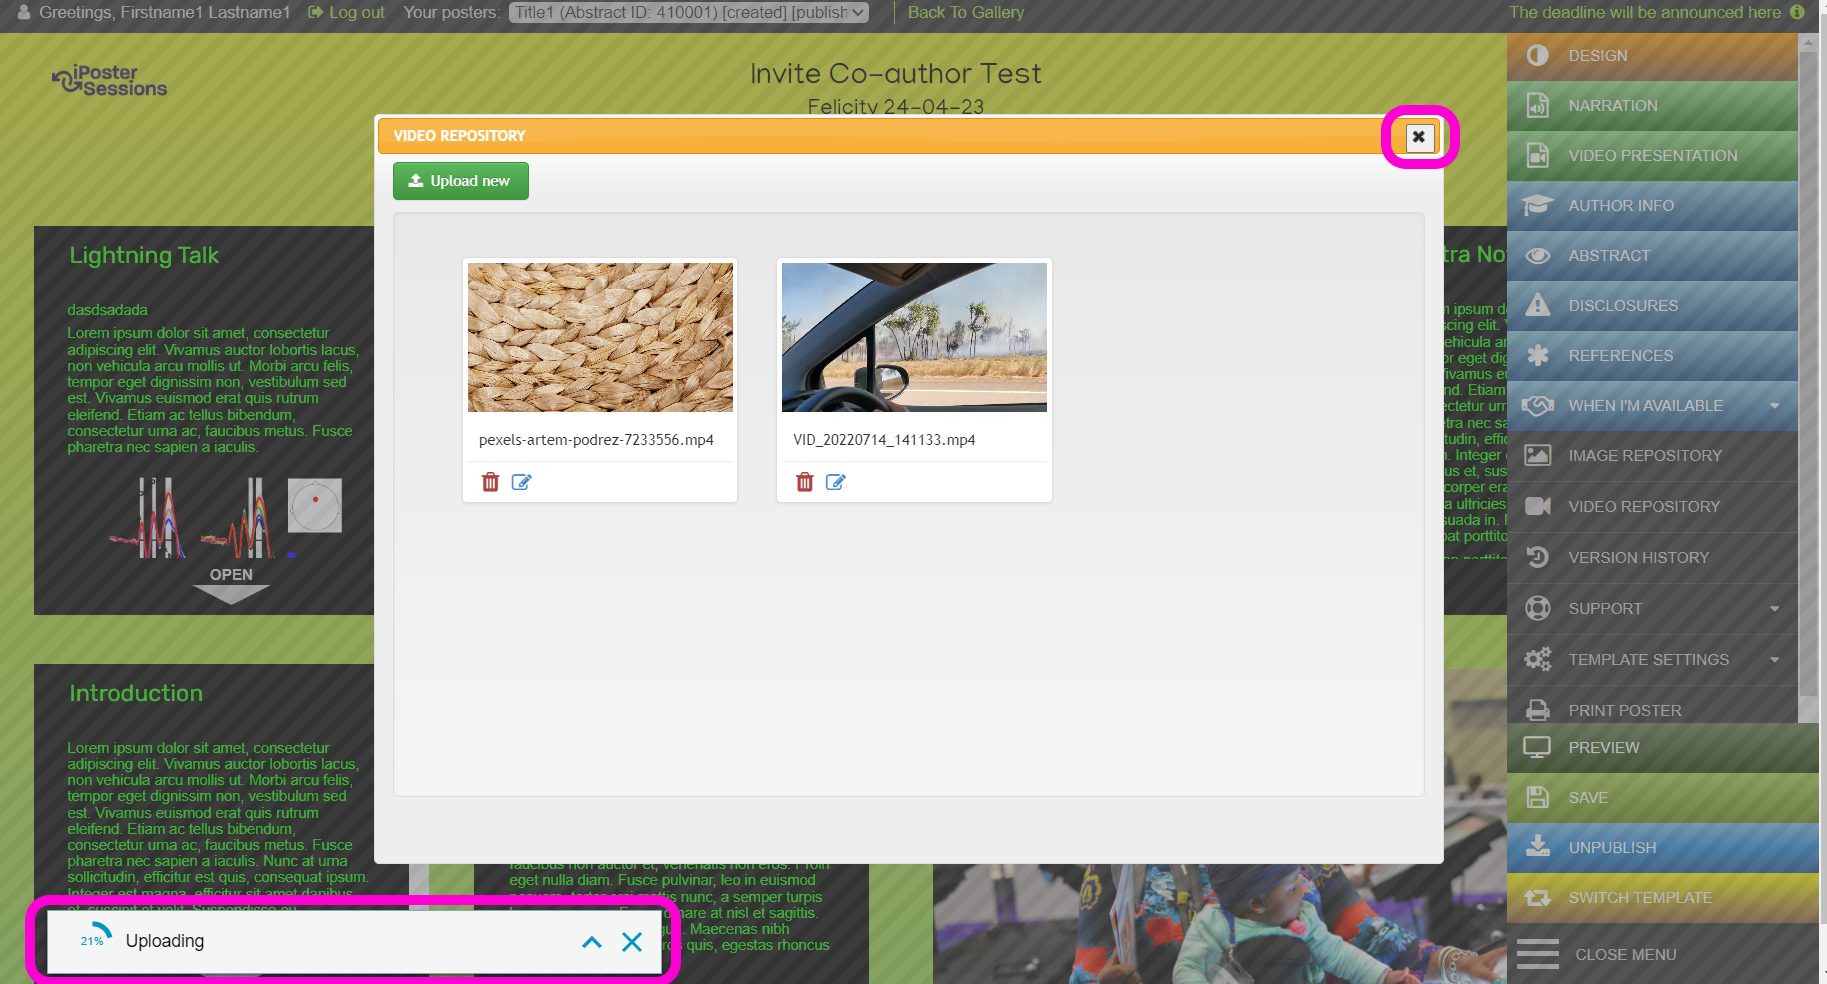
All of your uploaded videos will be stored in your VIDEO REPOSITORY, which you can access from the main menu. You can also upload your videos directly to this repository by following the below steps.

2. The following dialogue box will open. If you have already uploaded videos within your poster they will be shown here.
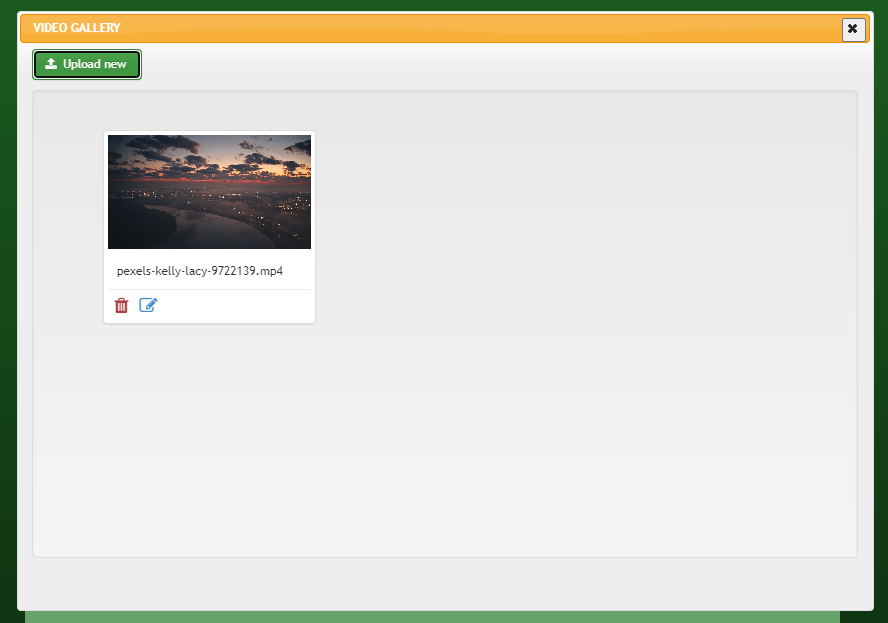
3. Click on the green Upload New button at the top left of the video repository screen.
4. Upload your video from your computer. You can either drag and drop the file or click Browse to search through the files on your computer.
5. Wait for the upload to complete. If it is successful you will see your newly uploaded video appear in this screen.
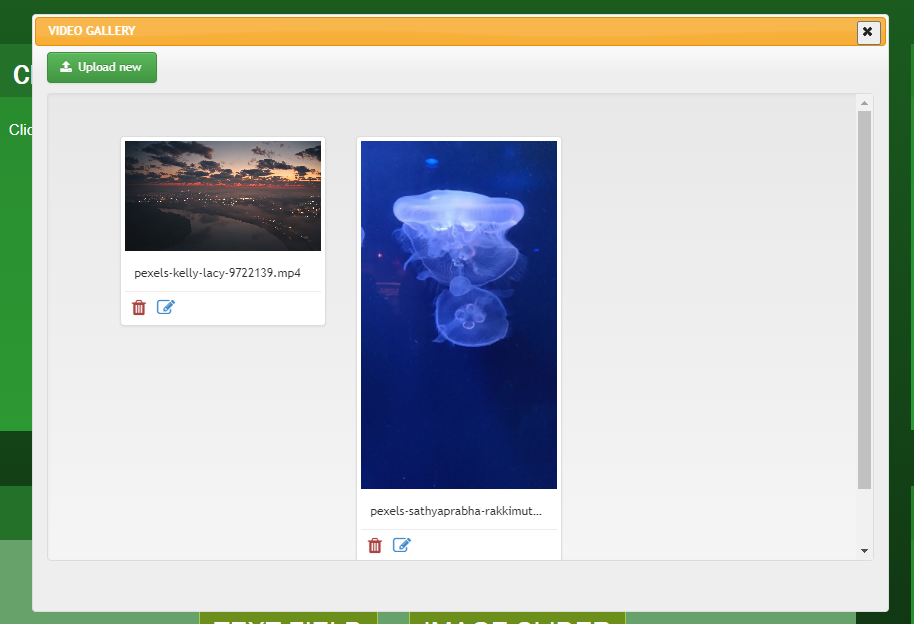
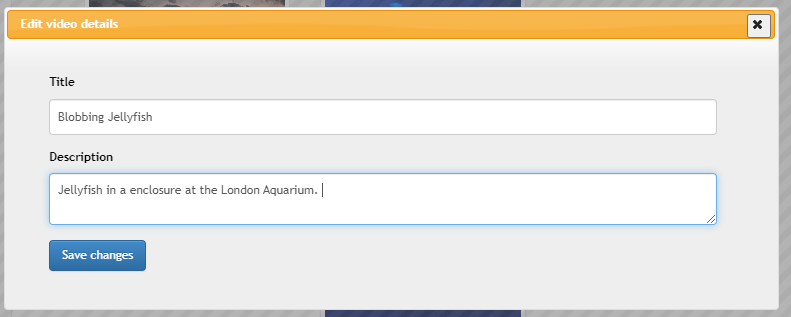
6. Use the below buttons to edit the title of the video or delete the video. You can enter a video title and description using the edit button. These are for your reference only and won’t be visible to viewers.

7. To insert an uploaded video from the video repository use the Insert Video button on the content box toolbar and select the video.
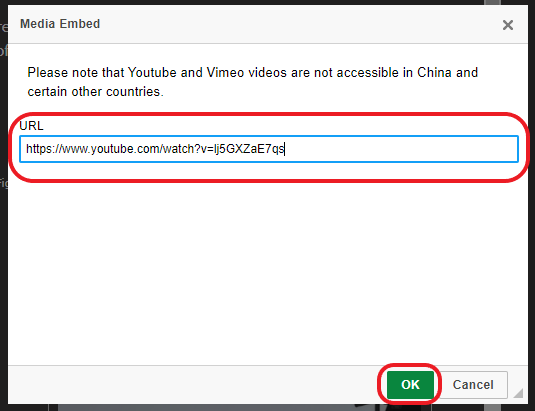
How do I embed a video from YouTube or Vimeo into my poster?
1. Place your curser in your content box where you want to insert the video.
2. Click on the Insert Video Link button.
3. The following screen will come up. Insert the video’s URL from Vimeo or YouTube and click ok.
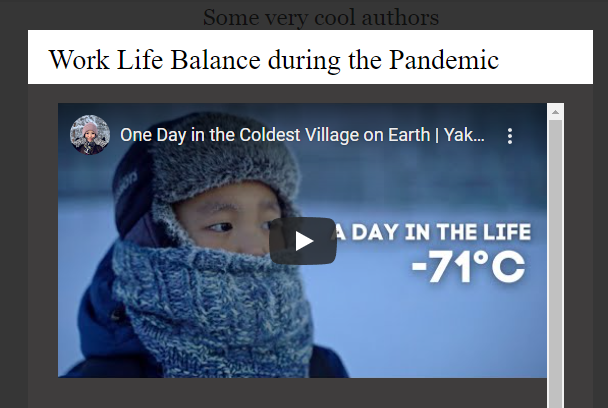
4. The video should be embedded within the content box as shown in the image below. Click on the Preview button from the main menu to check the video in presentation mode.
How do I add a pre-recorded video presentation to my poster?
Increase the accessibility, reach and engagement of your research by adding a pre-recorded video presentation.
You can create your own recorded presentation using your computer’s built-in recording functions. Alternatively you can use tools like, Zoom, WebX or Microsoft Teams, or even your phone.
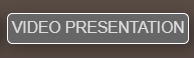
A video presentation can provide a general summary of your research or explore a particular theme in more depth. If this option is available for your conference, the ‘Video Presentation’ button will be visible on the Main Menu of your iPoster Editor screen.
Please note that there is a file upload size limit of 100MB. If you need to compress your file you can use a free online service such as:
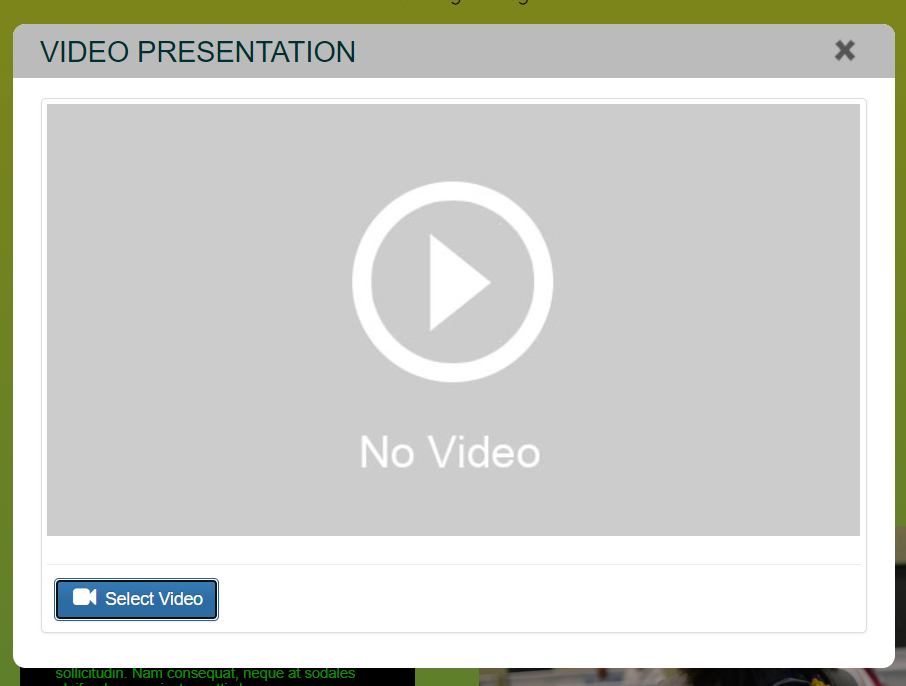
1. Click on the green VIDEO PRESENTATION button in the Main Menu.
![]()
2. The Video upload box will pop up. Add your video file in here. You can either click ‘Select Video’. The Video Repository will open and you can choose to select a previously uploaded video or upload a new one.
3. To upload a new video click on ‘Upload New’ and search through your files on your computer, or you can drag and drop the file into this box.
4. Your video will then load into the system and you’ll see a status bar in the bottom left of your screen. The upload can take a couple of minutes depending on the size of the file and your current internet upload speed. You can close out of the video repository and continue to work on your poster while you wait for your video to upload.
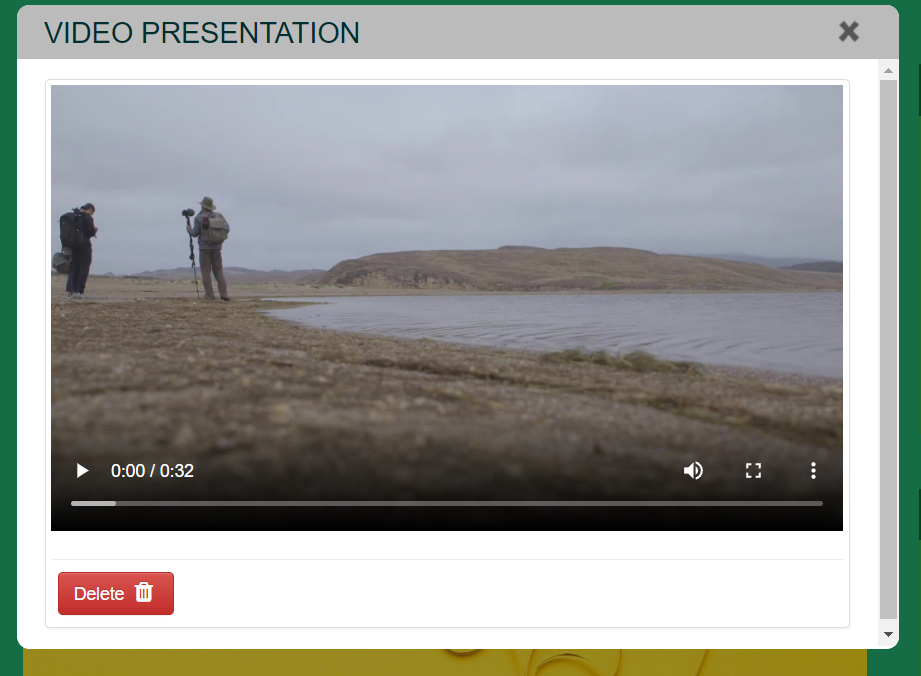
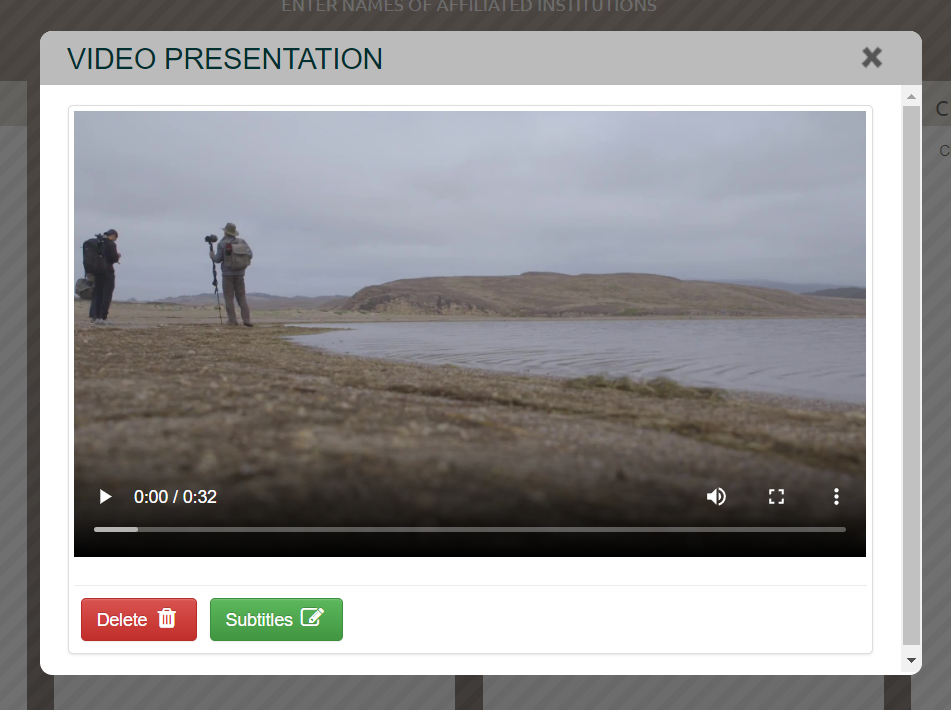
5. Once your video is uploaded It will be available in the Video Repository. To delete the uploaded video at any time, simply click on the red ‘Delete’ button. You can return to the video presentation screen at any time and select your newly uploaded video.
If your conference organizer has enabled AI subtitle generation you will see a green ‘Subtitle’ button next to the ‘Delete’ button. See the FAQ: How can I generate subtitles for my videos? for more details.
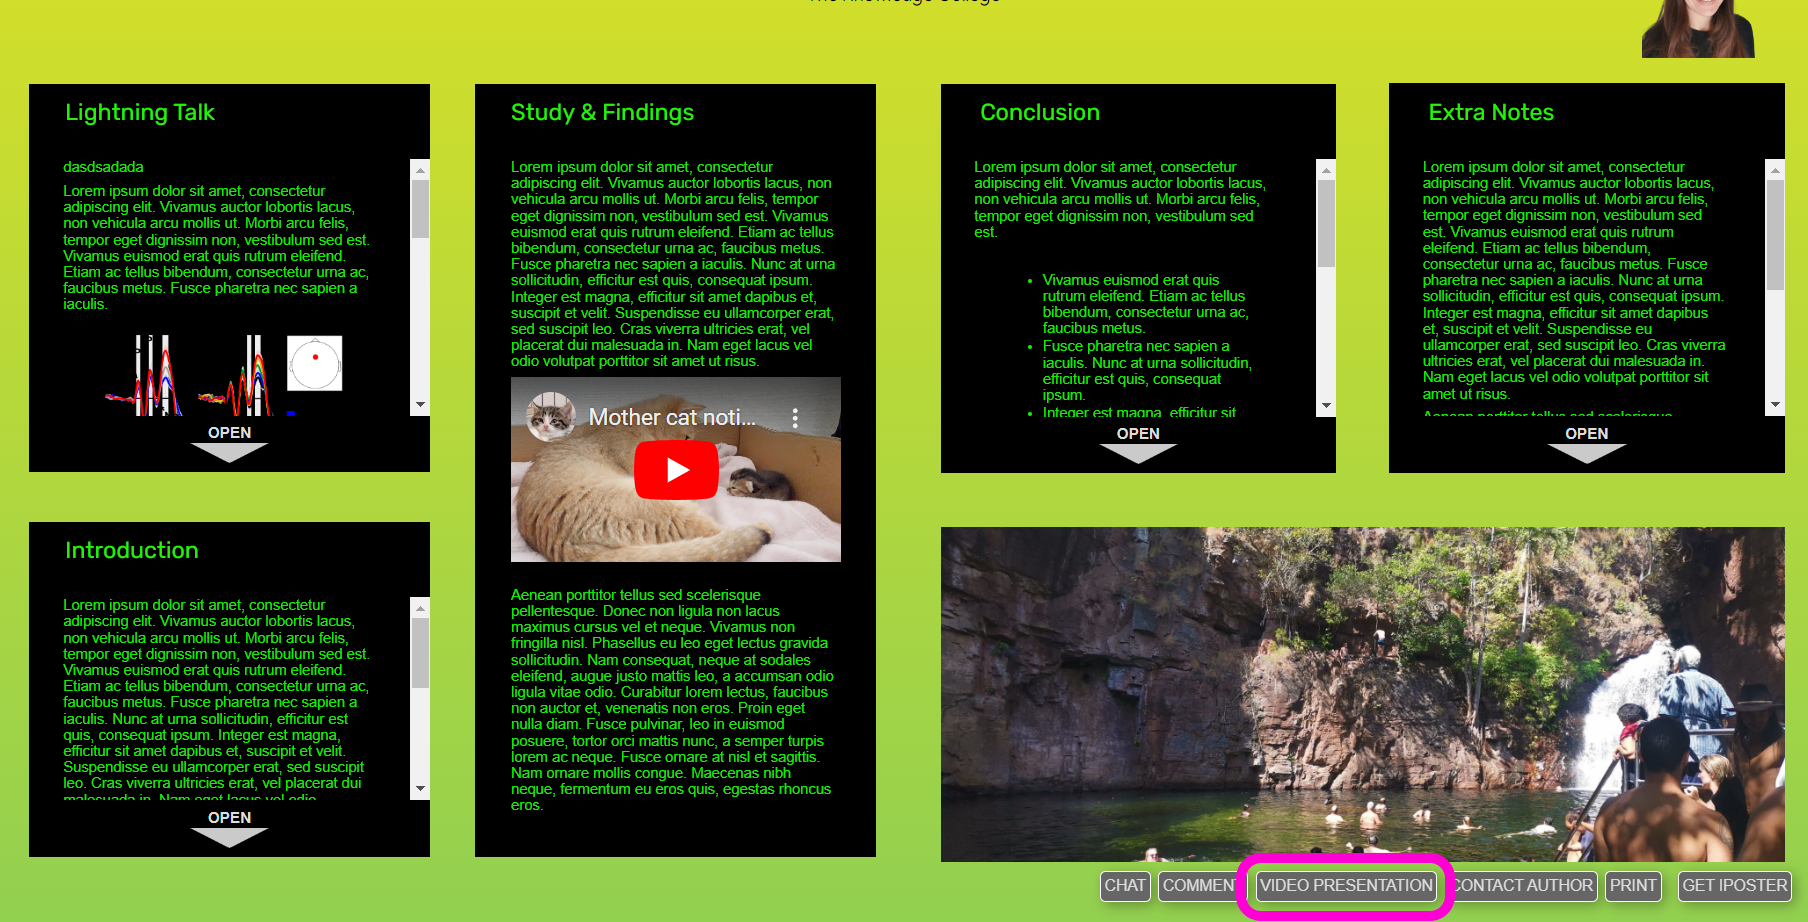
5. Check your video in Preview mode. Click on the preview button in the main menu. There should be a button at the bottom of your poster called ‘Video Presentation’. Click on this button and play your video to check it.
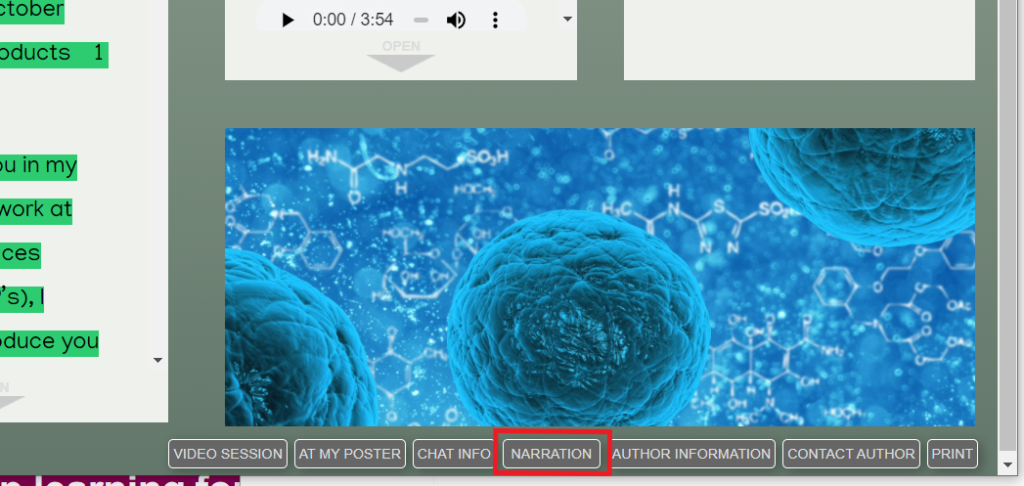
How do I add an overall narration to my poster?
You can present an overview of your work or take visitors on a guided tour, by using the NARRATION button on your template’s Main Toolbar. Visitors will be able to explore your iPoster as they listen to your presentation.
Here are some general tips on how to best use the built-in recording and MP3 upload tools. Please keep in mind that your conference organizers may have provided more specific instructions on the length of any required narrations that may differ from the below.
- We recommend that overall audio narration be no longer than 6-8 mins at the most. The size limit for audio file uploads is 50MB. The quality as well as the length of an audio file will determine its size. If your file is too big please compress it – you can google many free online file compressors for this purpose. Here is one we have used before.
- The recommended internet speed for uploading audio files is 5mbps.
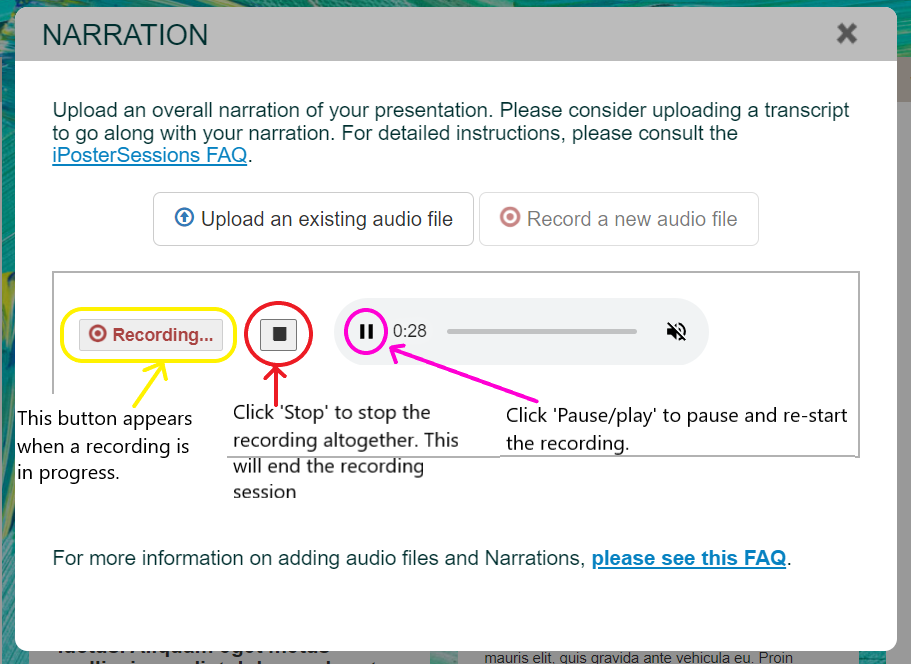
- You may record directly into the system or you can upload an existing audio file. When recording directly into the iPoster system you can use the ‘Pause’ button to take a break. When you click the ‘Stop’ button the recoding will stop for good. Don’t forget to download your recording once you have finished so that you have a copy of it.
- When recording your audio file: You can use your mobile device or a more sophisticated system. It’s a good idea to rehearse your readings before recording and review them after you’ve recorded! Are they clear and easy to understand?
- If you need to convert an existing file into MP3 format you can do so using an online service like the one linked above.
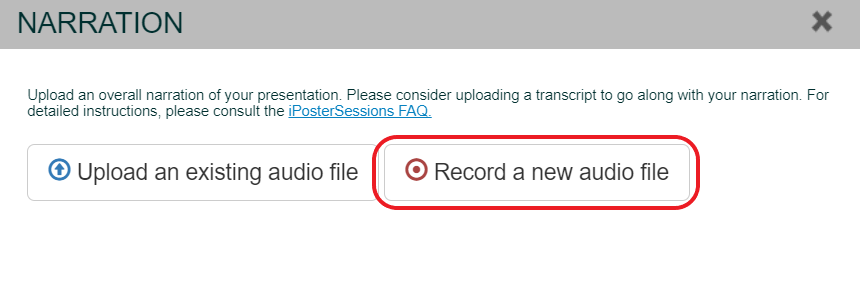
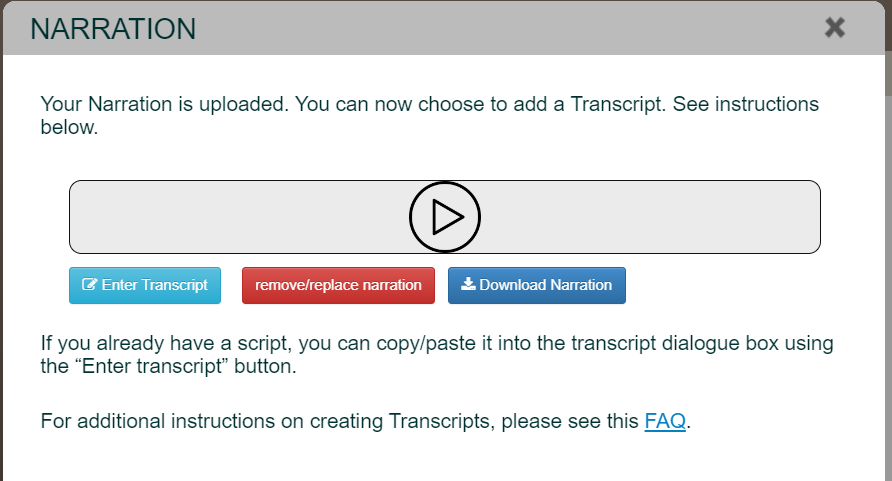
1. click on the NARRATION button on the Main Toolbar. An upload dialogue will open up.
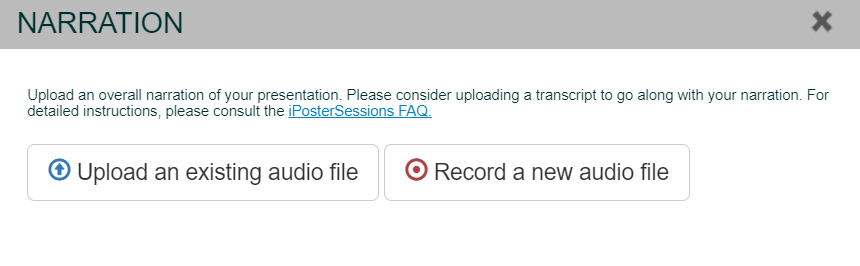
2. To record a new audio file directly from your computer: click on ‘Record a new audio file’. You may need to ‘allow’ the microphone on your computer before you can start recording. e.g.
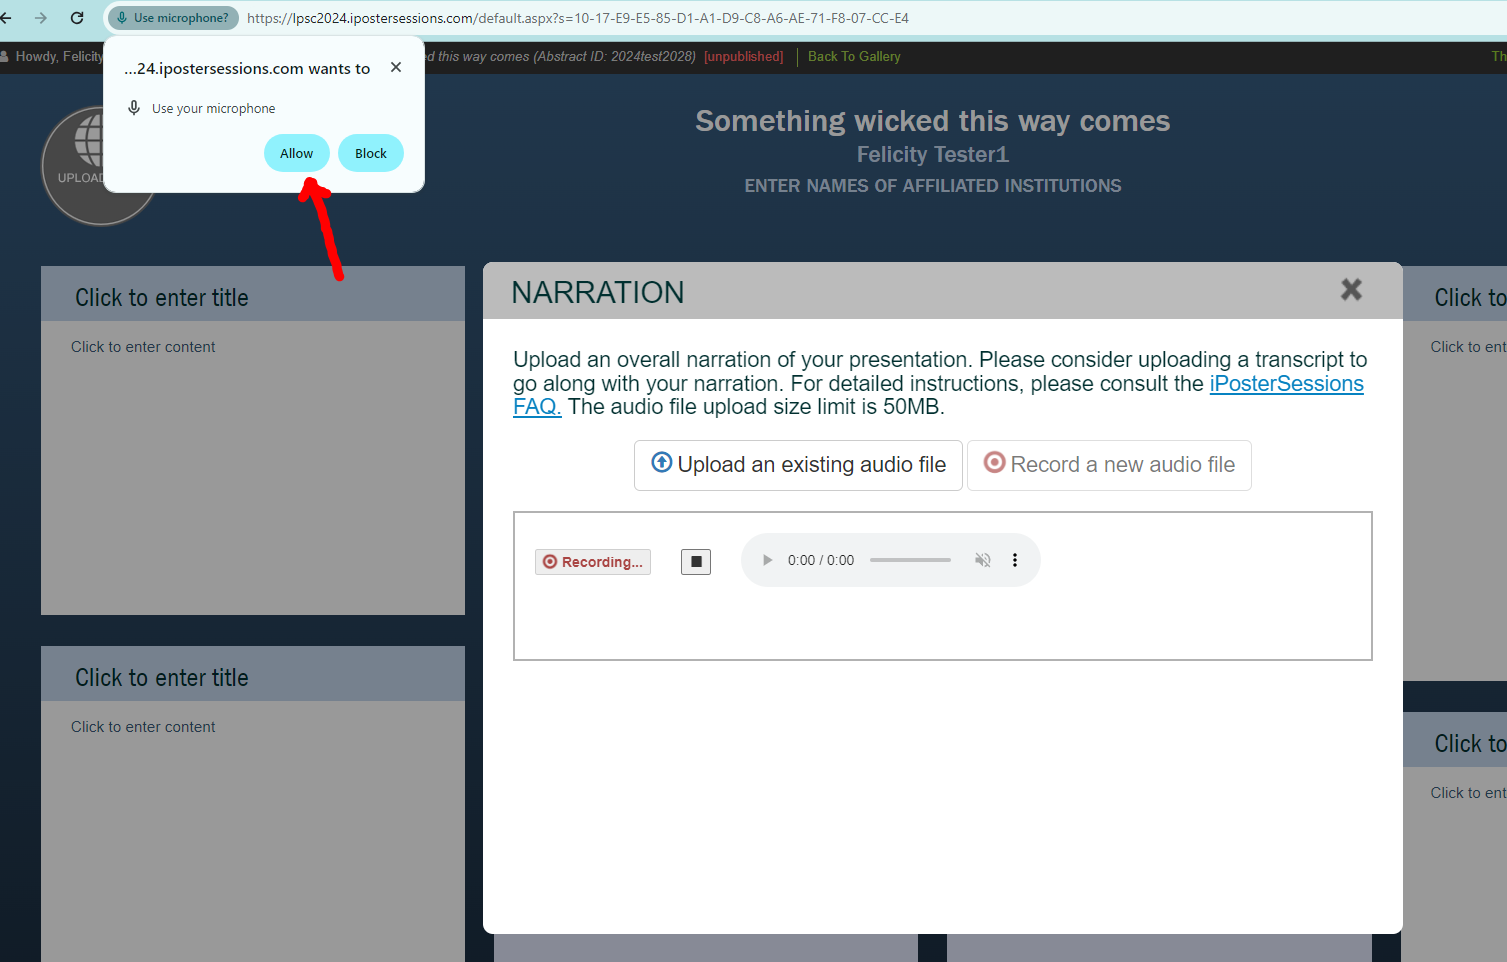
To pause the recording, click on the pause button. You can then click play again to continue recording when you are ready. When you have finished recording click the ‘Stop’ button. Your recording will then be uploaded to your presentation.
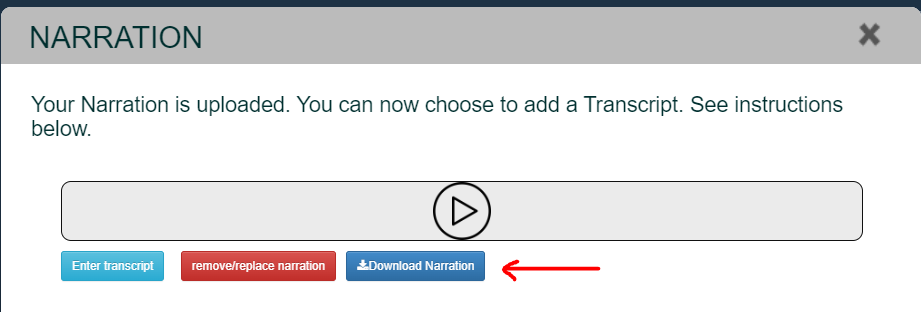
3. When you have finished recording don’t forget to download a copy of your narration by clicking on ‘Download Narration’.
4. Test your file in Preview. Click on the Preview button on the right hand menu. You should see a button for NARRATION at the bottom of your iPoster. Click on this button and check that the recording plays.
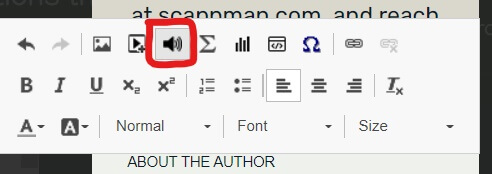
How do I add an audio file within a Content Box?
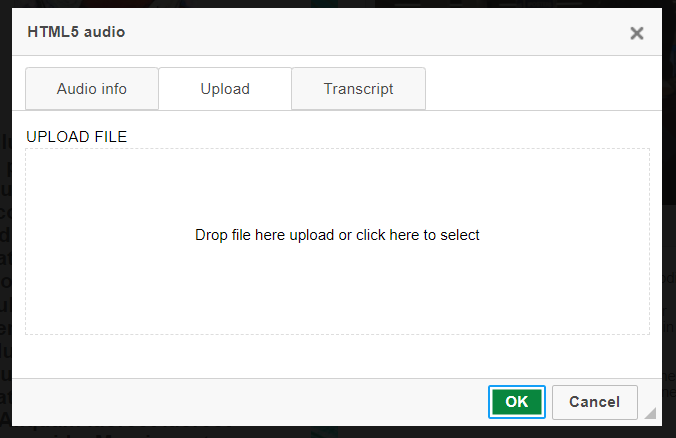
1. In the content box place your cursor in the position you want the audio file to display. Click on the INSERT AUDIO button in the formatting menu at the top of the Content Box.
2. An upload dialogue will open up. You can either browse your computer by clicking in the UPLOAD FILE box, or you can drag and drop the audio file into this box. Remember that audio snippets need to be under 50 MB in size and the bigger the file the longer it will take to upload.
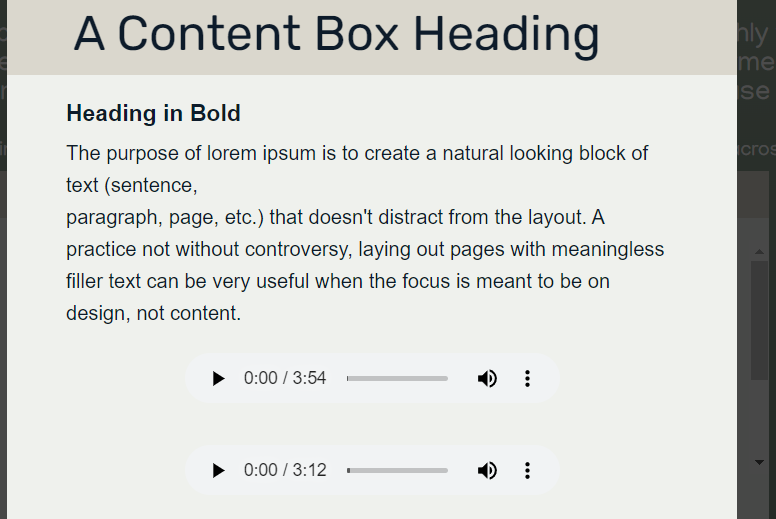
3. Once uploaded, check your file in Preview mode. Click on the Preview button on the right hand menu. Click on the play arrow in the content box.
How can I create a slideshow within my iPoster
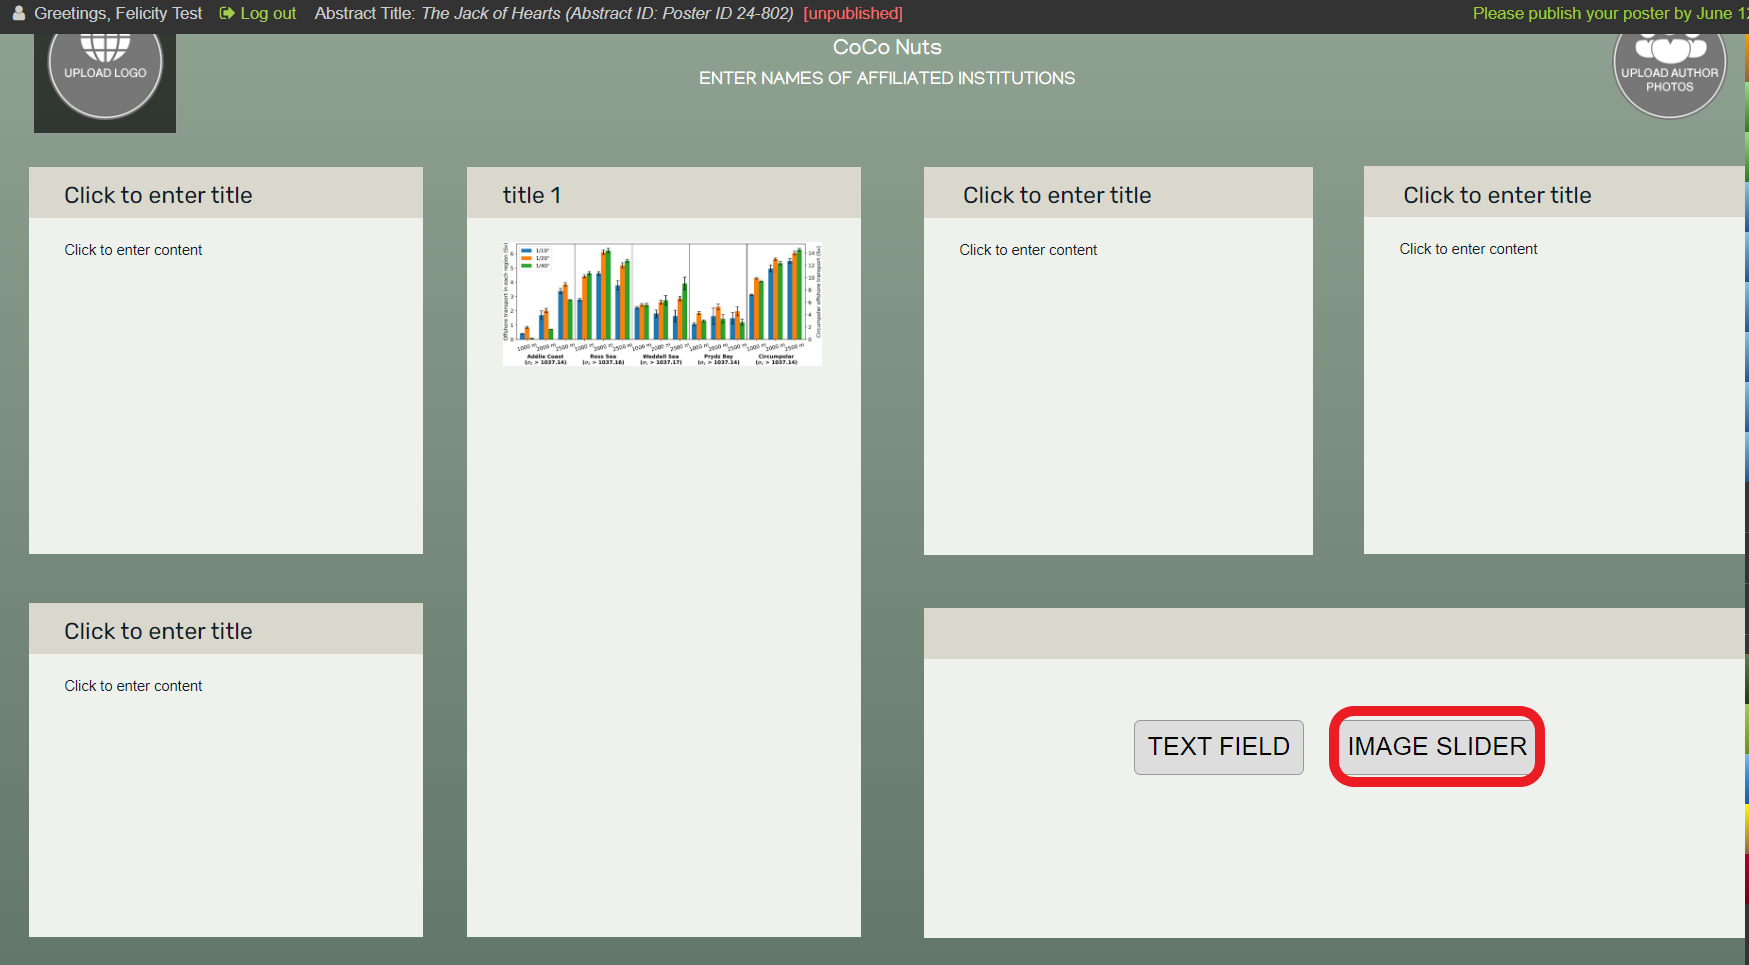
1. On the Slideshow content box choose ‘Image Slider’.

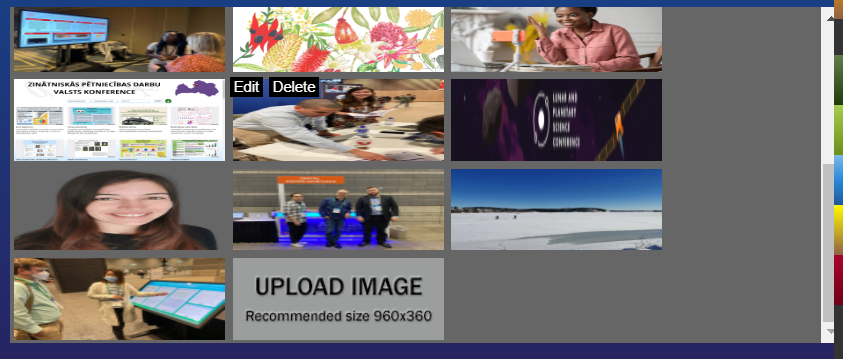
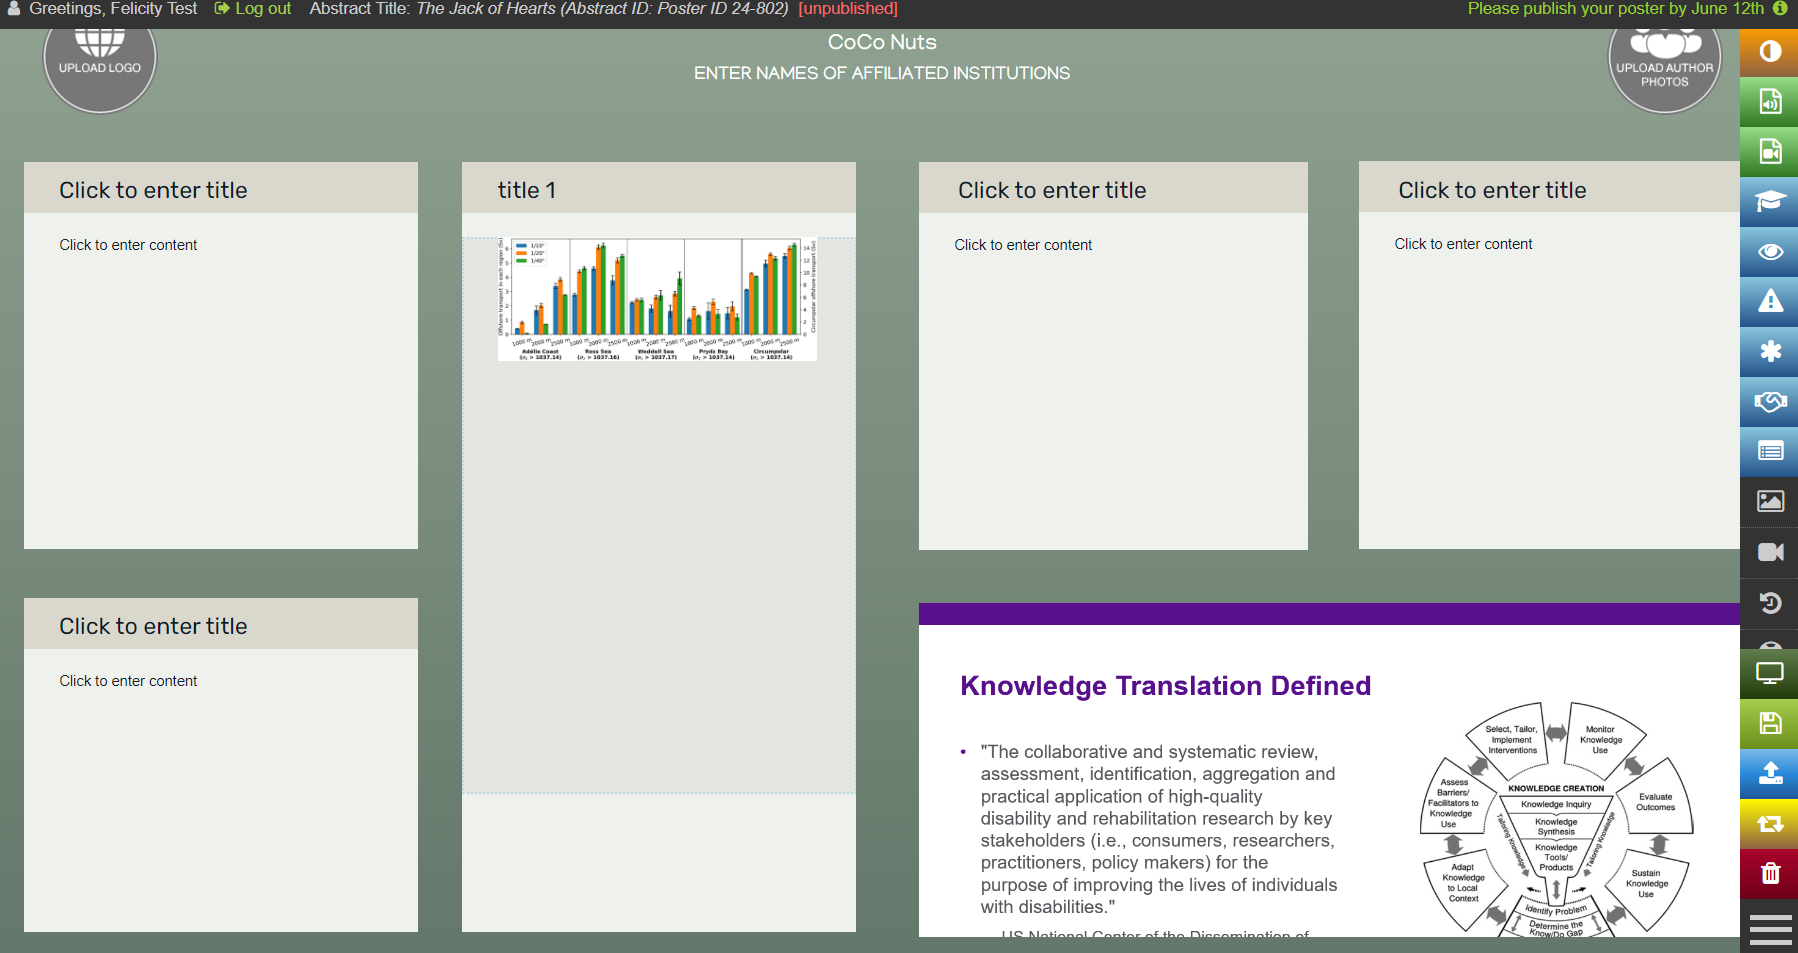
2. The UPLOAD IMAGE button will be visible. Click on this button.
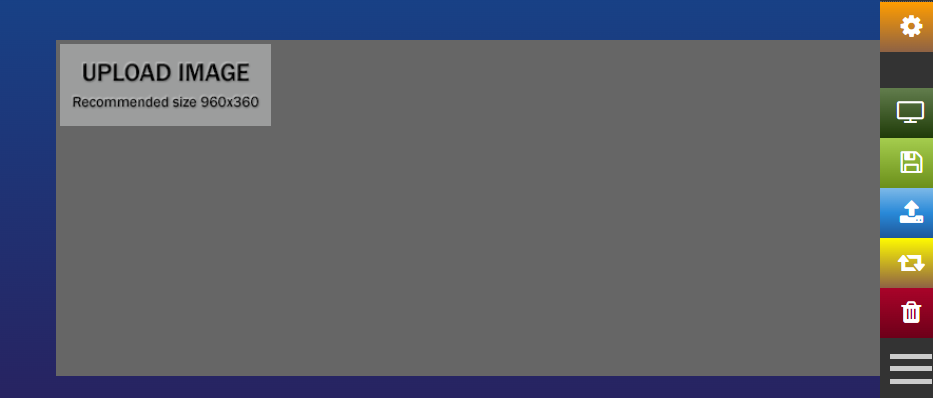
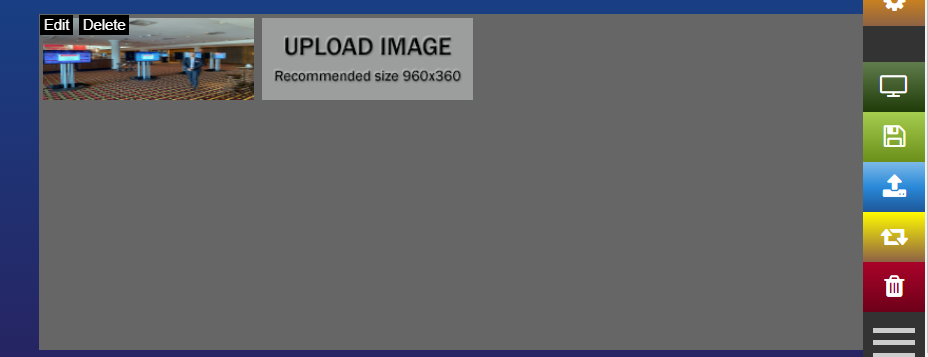
3. The Image Upload tool will open. You can either drag and drop your image or browse through your files to select the image you want to upload. If the image was previously uploaded to your poster you can find by clicking on Image repository. Simply click on the image in the repository that you want to add to the slideshow.
4. The Image you chose will appear in the slider. Click on the UPLOAD IMAGE button again to add a new image into the slider.
5. Repeat the steps above to add more images to your slider.
6. You can drag and drop the images to re-order them.
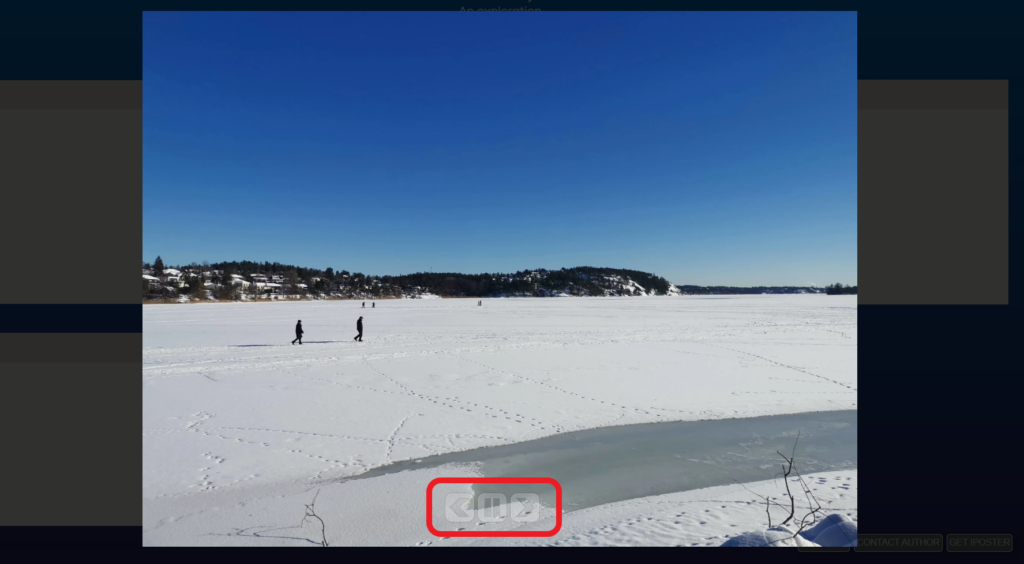
7. Make sure to check how your slideshow will look when viewed by conference participants. Click on the preview button on the main menu, then click on the slideshow box to expand it. You can use the 3 control buttons at the bottom over the slideshow overlay to pause or go forward or back through the images.
Why are my images small in preview mode?
If your images are still small when you click on them in preview mode it’s probably because of their original upload size.
When your images are displayed in preview mode or on the screens at a live event, they will only be as large as the file you have uploaded. The full display screen size is 1920×1080 pixels. If you want an image to fill the screen, you must insert an image that is 1920×1080 pixels. If your image is only half the width and half the height of the maximum, (e.g. 960×540 pixels) it will fill only a quarter of the screen.
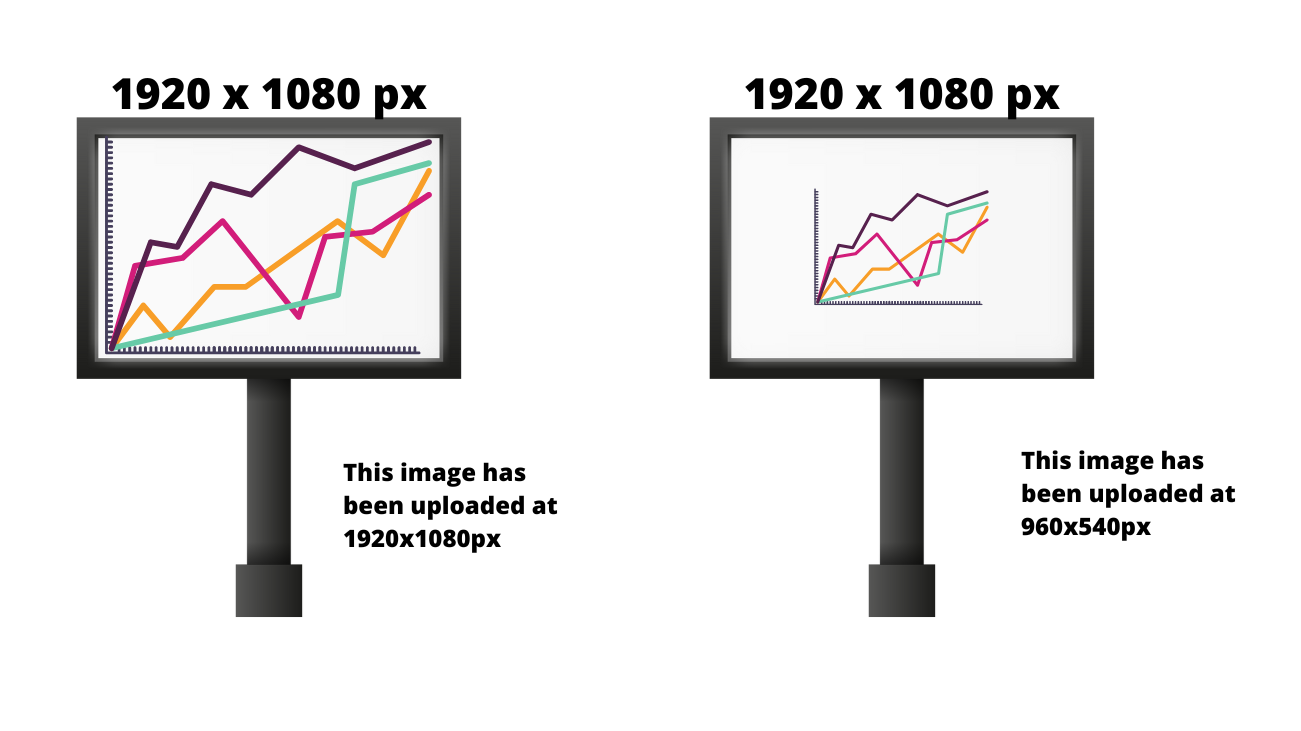 We recommend that your images are at least 600 pixels wide for a better quality viewing experience. However, don’t make your image any bigger than the original. This will only cause it to be blurry and hard to read.
Try to find an original image that is larger. The larger the original image (photograph, table, diagram) the more detail you can show and the better quality your end result will be.
PDF+ uploads
What is PDF+?
PDF+ is our solution for a static PDF presentation that can include so much more! It’s a template that can be selected If enabled for your conference.
You can select this template to upload a copy of your in-person paper poster to the digital poster gallery. It allows you add video presentations, hyperlinks, audio narrations, transcripts and more.
If you are presenting a paper poster on site, creating a PDF+ poster enables your research to be available to all conference attendees. Many galleries are kept open for some time after a conference so that attendees can re-visit any posters that they may have missed when they were on site at a conference.
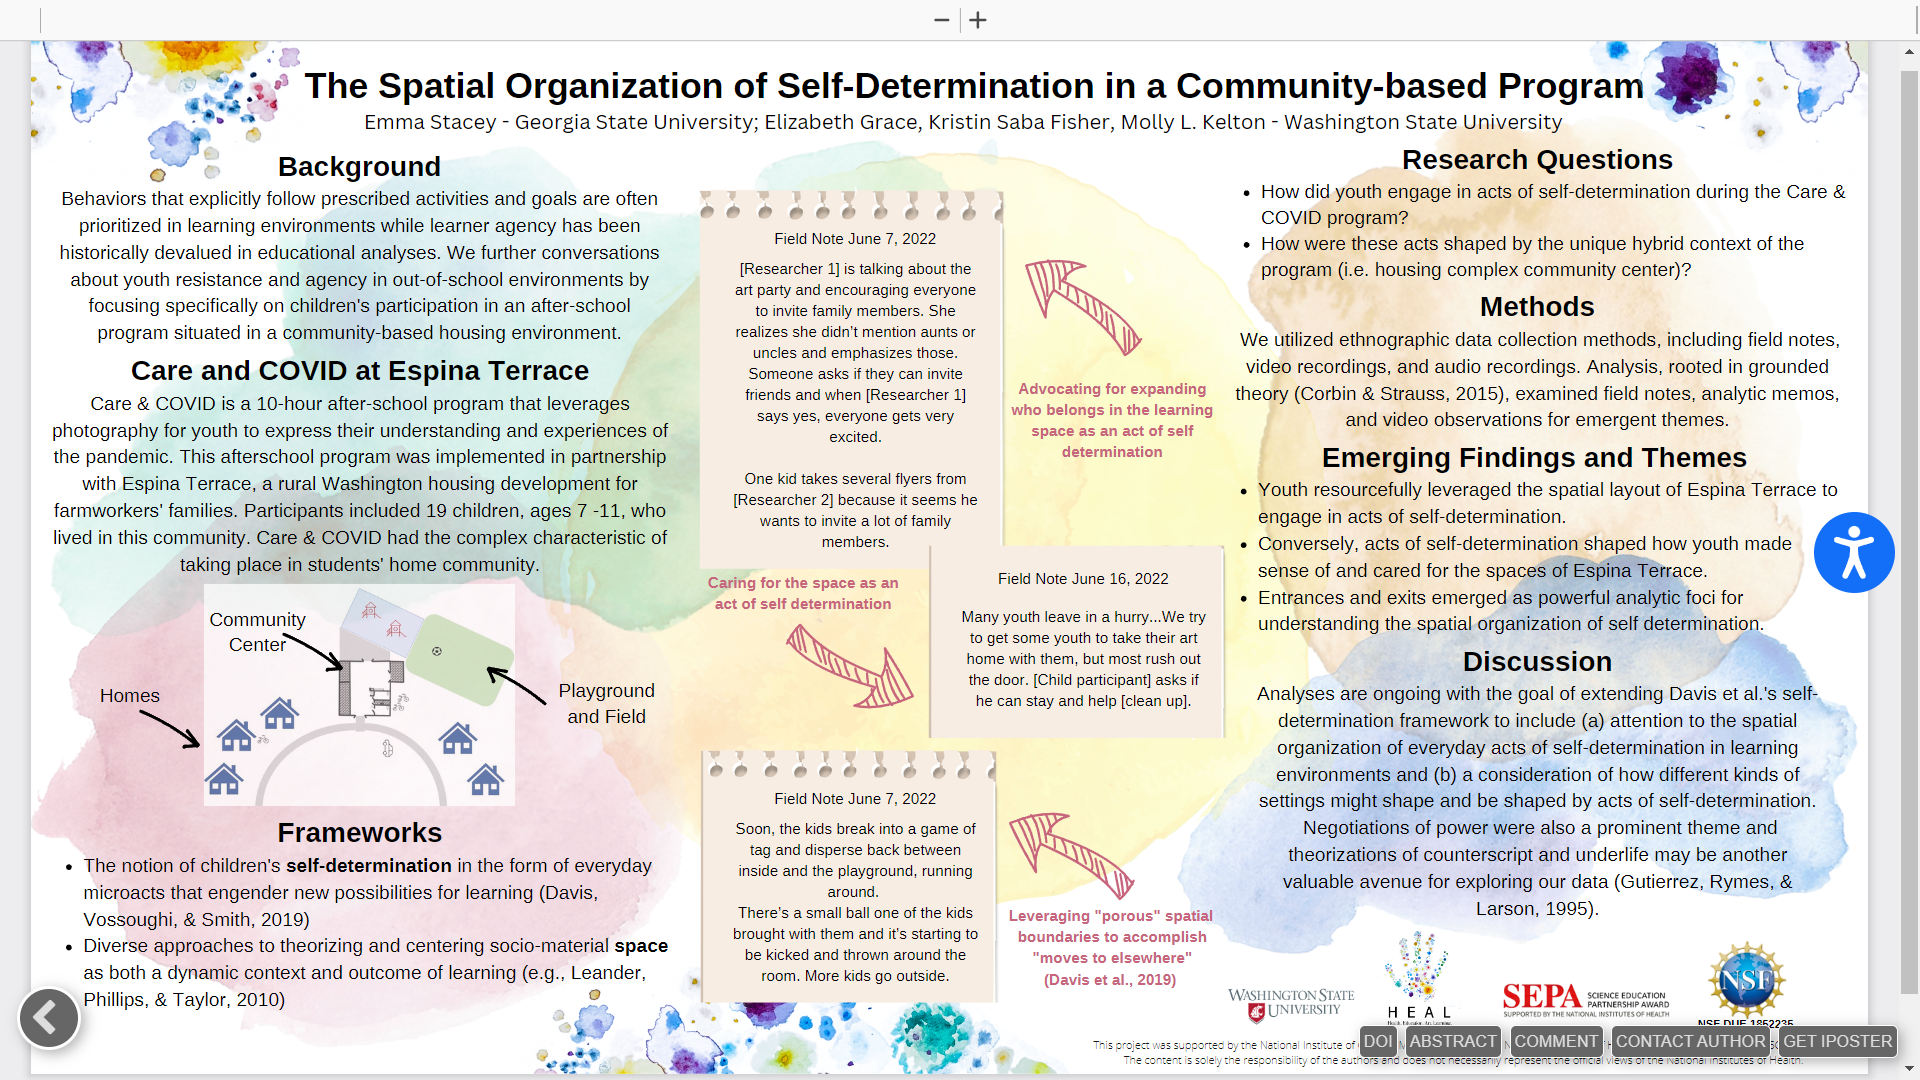
Click on the below image to view a PDF+ poster
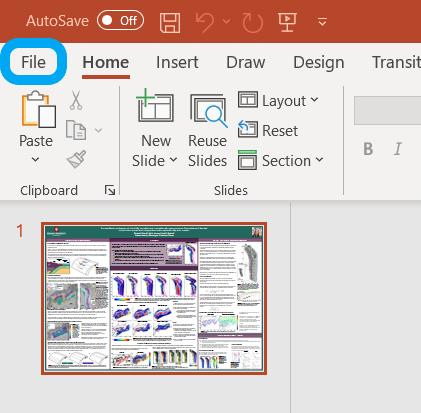
How do I create a PDF version of my existing presentation?
You can upload an existing presentation into the iPoster system e.g. one that was created in another platform like PowerPoint, Keynote or Canva.
Firstly you will need to convert your existing presentation into a PDF document. You can do this by saving it as a PDF. Here’s an example of how to do this in PowerPoint:
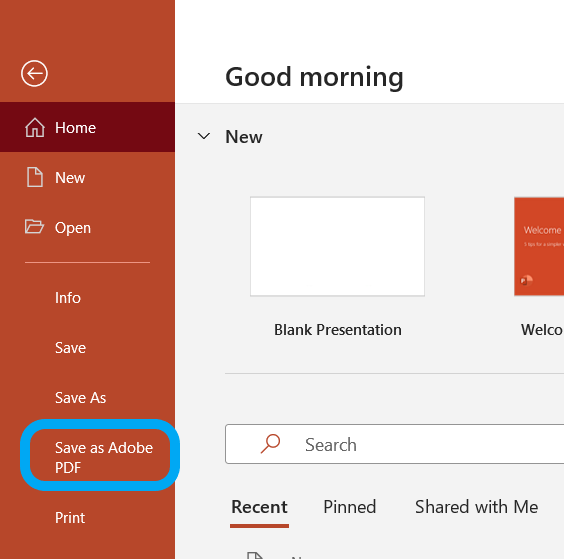
Click on ‘File’ then click on ‘Save as Adobe PDF’ then save it. Your file should now be saved as a PDF and you can follow the below instructions to upload it into the iPoster system.
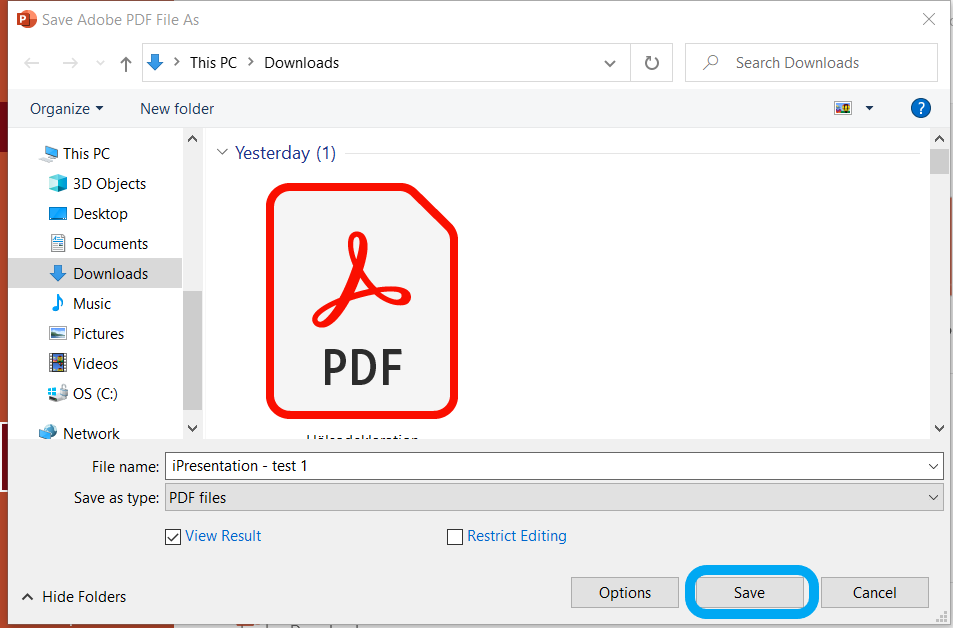
1. Ensure that your PDF file is as small as it can be. The file size limit is 50 MB. However the smaller it is, the quicker it will load when visitors click on it. You can use an online file compression service to make your file smaller. Here are some that we have used and like:
- Free (no login required): https://tools.pdf24.org/en/compress-pdf
- Free (login required after 2nd use): https://www.adobe.com/acrobat/online/compress-pdf.html
2. Log in to the iPoster editor using your assigned credentials.
3. On the choose template screen scroll until you come to the Upload a PDF poster button. Click the Choose button underneath this.
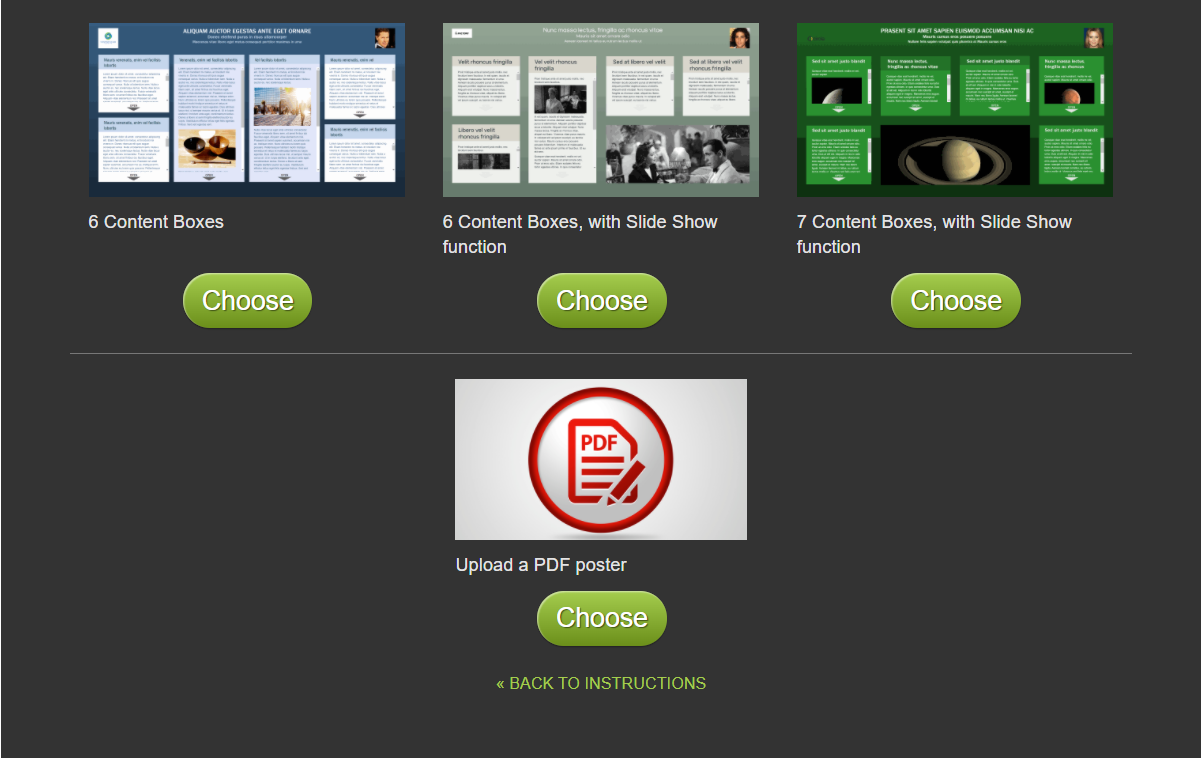
4. Drop you PDF file onto the white banner or click on the banner to choose the file from your documents.
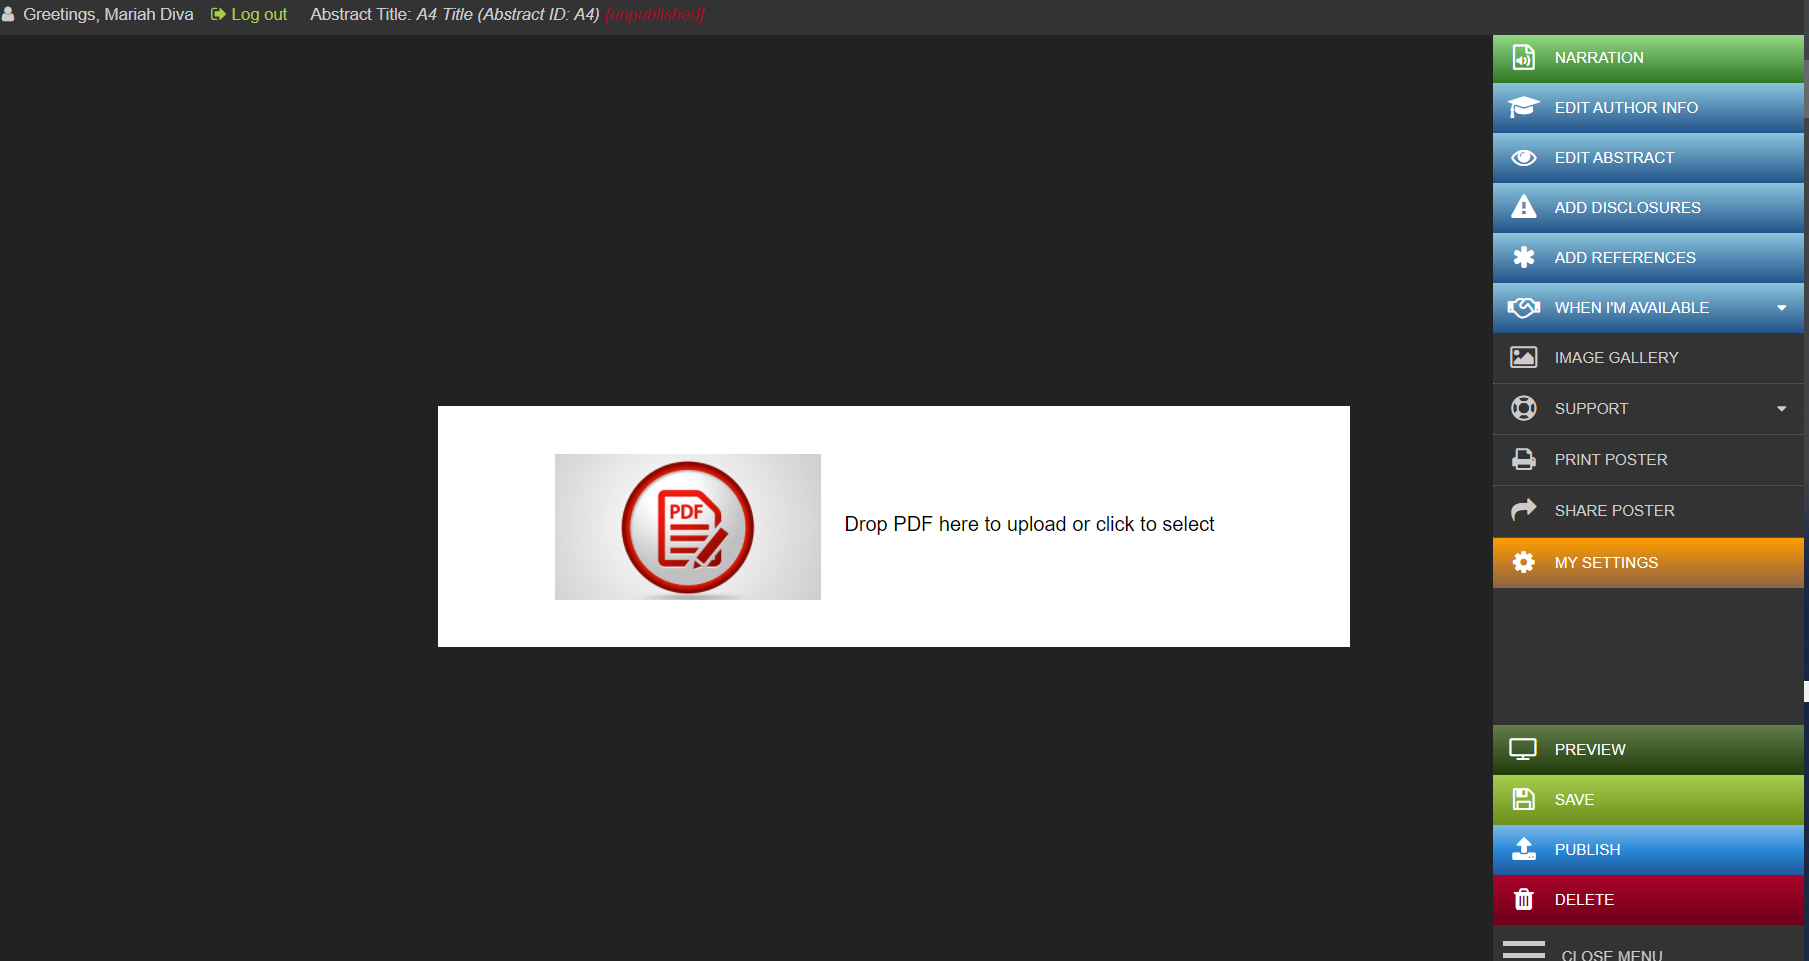
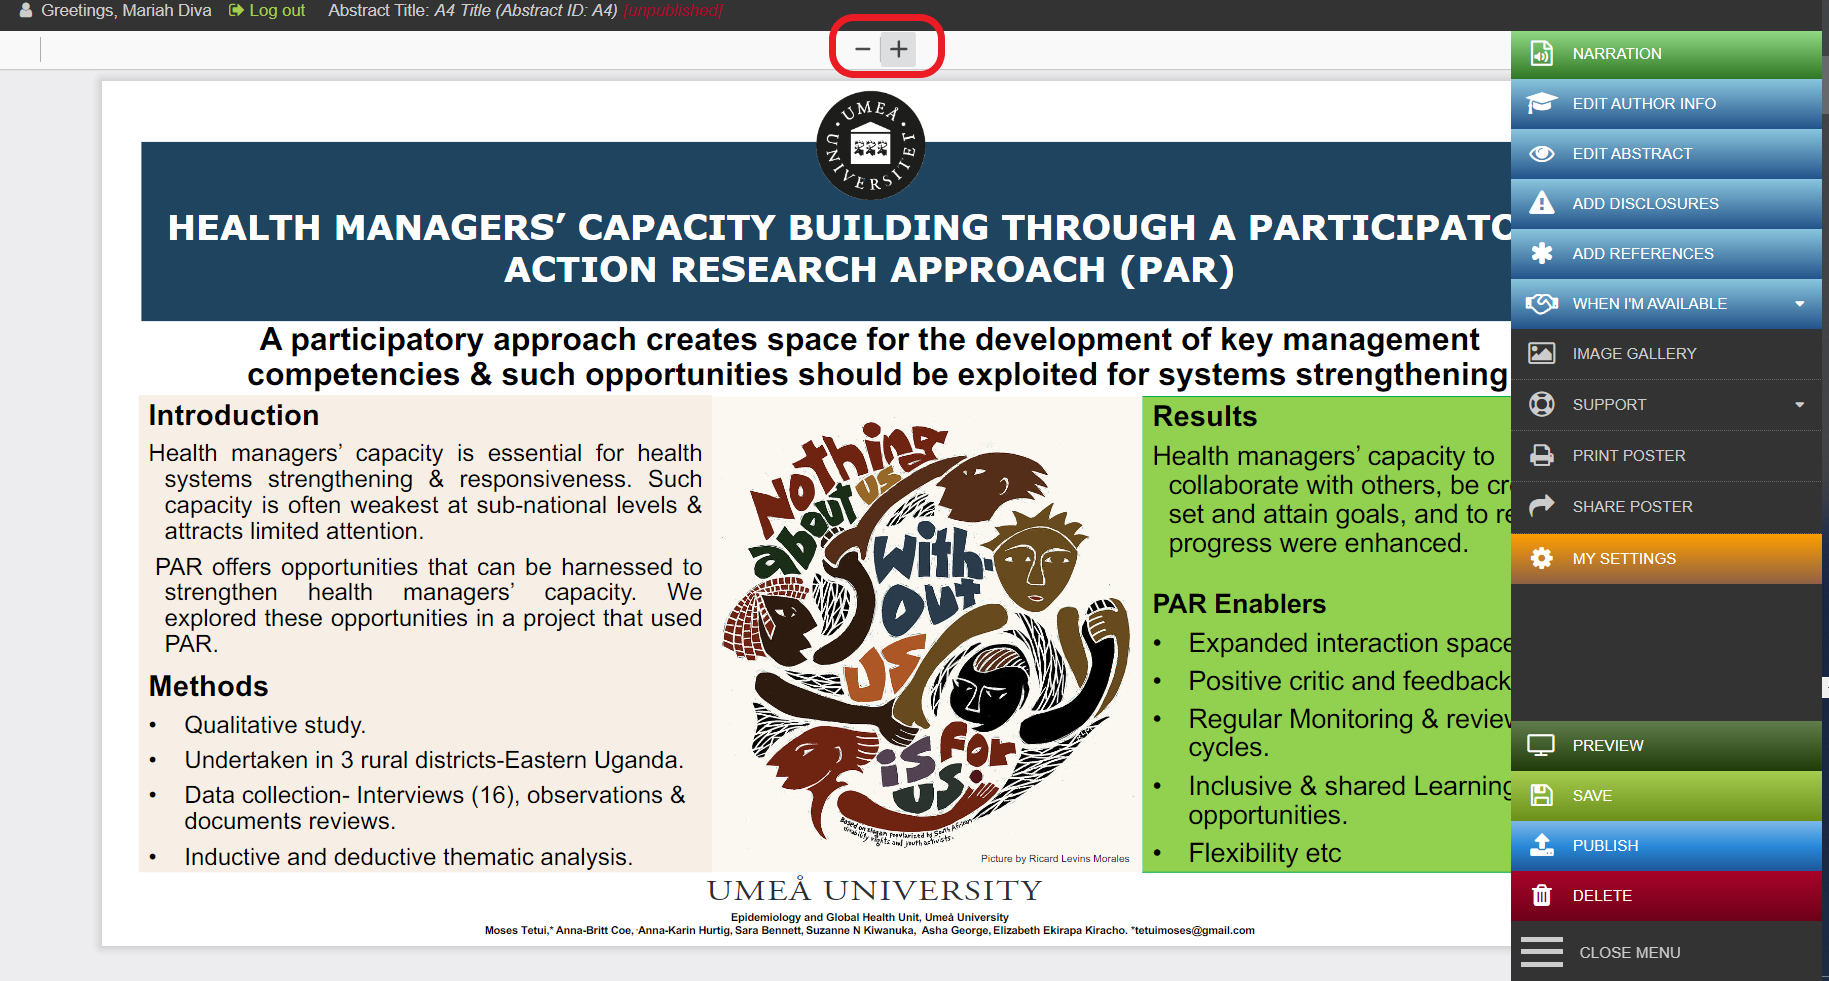
4. Your PDF file should now be loaded into the editor screen. Use the + – keys at the top of the page to zoom in and out.
Is there a file size limit for a PDF upload?
Yes there is.
The maximum upload size of PDF file is 50MB. As a general rule we recommend that your file be as small as possible because it improves the loading speed when visitors click on it from the poster gallery.
To compress your file we recommend using one of the following file compression services:
Free (no login required): Compress PDF
Free (login required after 2nd use): Adobe Acrobat – Compress PDF size
Your PDF file should consist of a single page . Please upload it in landscape orientation with a 16:9 Aspect ratio.
Following the above instructions will ensure that your poster looks it’s best on most screens and that it will load quickly when visitors click on it.
What media can I add to my PDF+ poster?
Because the PDF upload is a static document you can’t add any multi media within the poster itself once it’s uploaded in the iPoster system. You can however add an overall audio narration or a video presentation within the PDF+ editor.
Any hyperlinks included in your PDF will be accessible to viewers and will open in a new window when viewed at a conference or online.
You can also add media into the author information button on the right hand menu. If you click into this button you will see the multimedia toolbox options.
If your conference offers both iPoster and PDF+ template you can change at any point from a PDF+ template to an iPoster template. You will need to first delete your poster which will return you to the Template selection page.
How do I create an iPoster from a PDF, PowerPoint or other source?
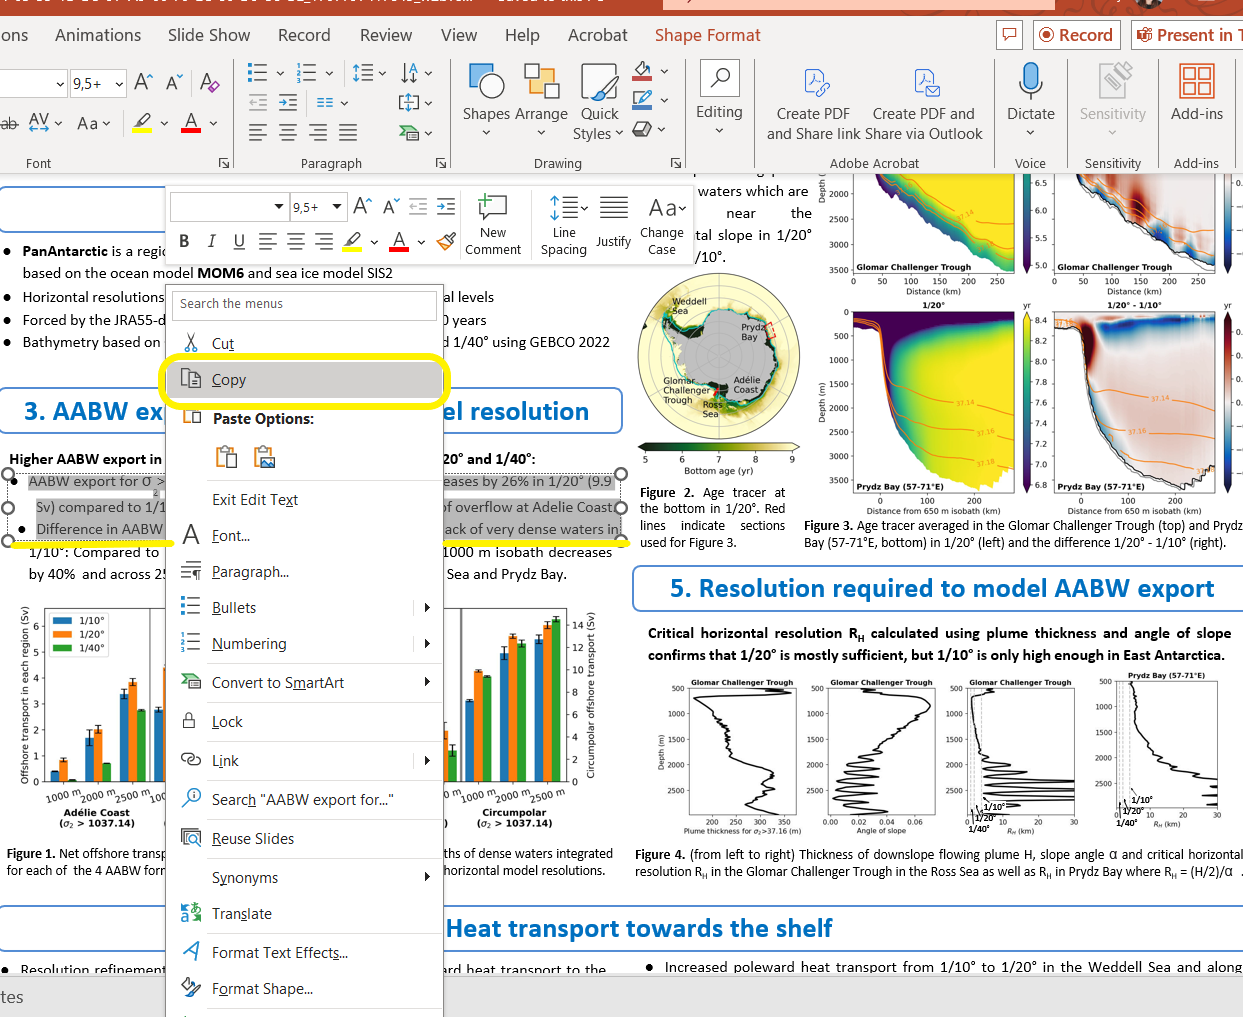
Copy paste your texts from a PDF, PPT or other source directly into the iPoster system. Transfer tables and graphs over by saving them as image files on your computer, then uploading them using the ‘Image Upload’ tool.
Adding text:
1. Copy your text from your PDF, PPT or other source document. You can either right click and select ‘copy’ from the menu or use the keyboard controls (Ctrl+c) Then click in the content box where you want the text to be added. Right click to select ‘Paste’ from the menu or use the keyboard controls (Ctrl v).
2. After clicking on ‘Paste’ or Ctrl + V, the following dialogue box will show up. You need to paste your copied material in here again. This box will strip any code from the text so that it can be formatted within the iPoster system.
3. Click the ‘Ok’ button at the bottom of the pop up and your text will appear in the content box.
Adding diagrams, charts and tables to your iPoster:
Either export the charts, diagrams and tables from your PPT or PDF, or take a screen shot of them and save them to your files. This will enable you to upload the item as an image in the iPoster editor.
Remember that they will expand to their full size when tapped or clicked on by visitors or by you during your presentation.
So, make sure your images are as large as possible – up to 1920 x1080 pixels. And if available, use the original images for best quality. If they are not available, take screen shots of your images, but zoom in before you take them so that, again, they are as large as possible.
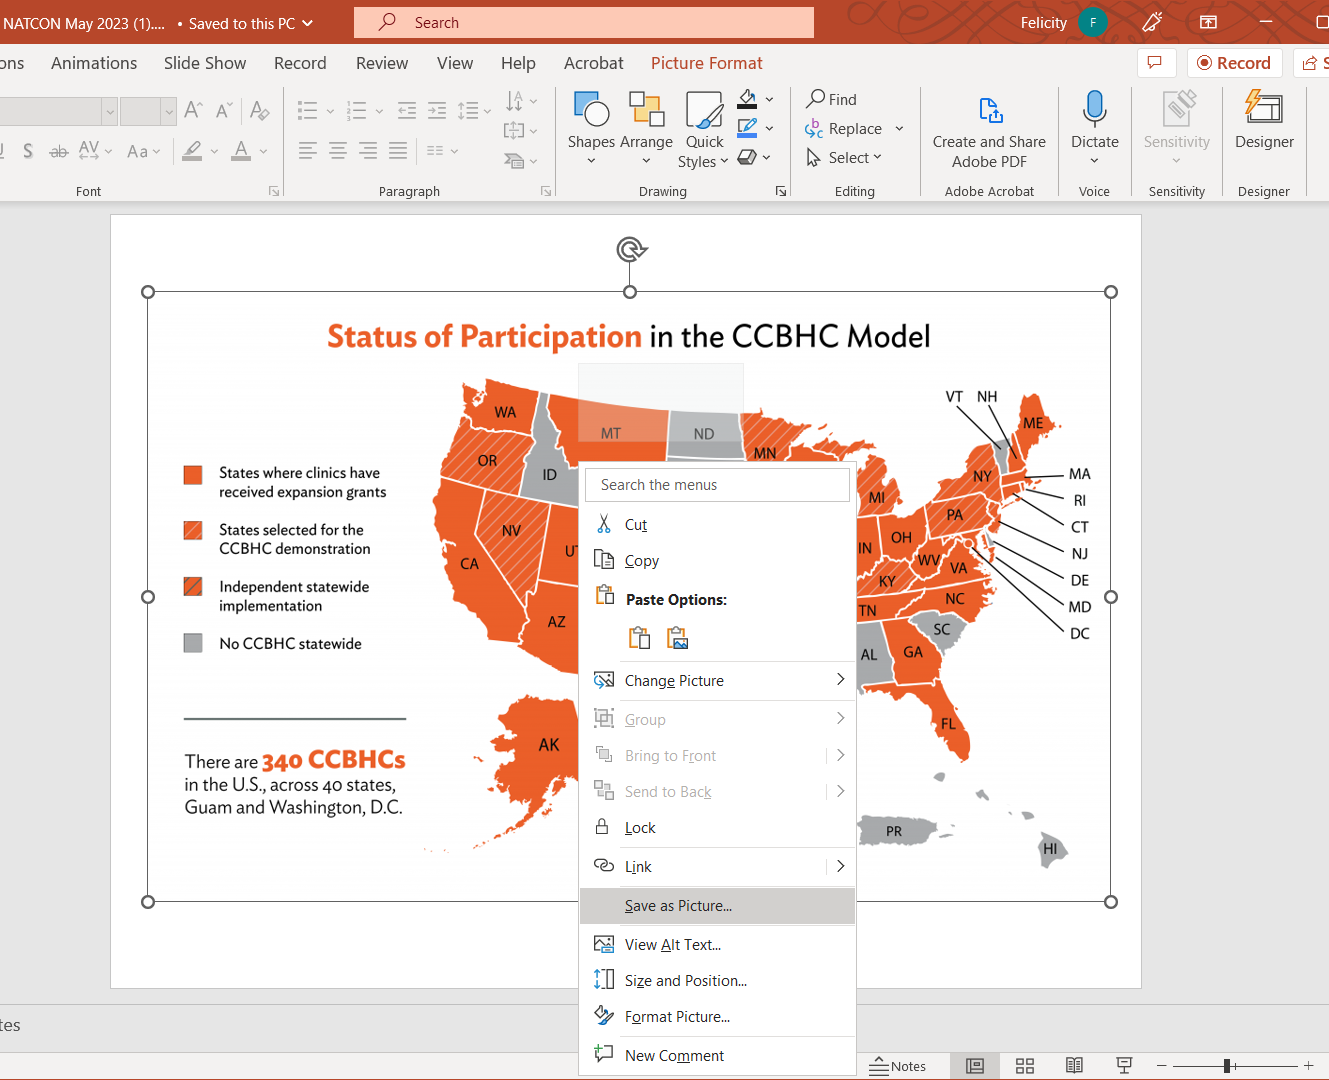
Save an image from a PPT file:
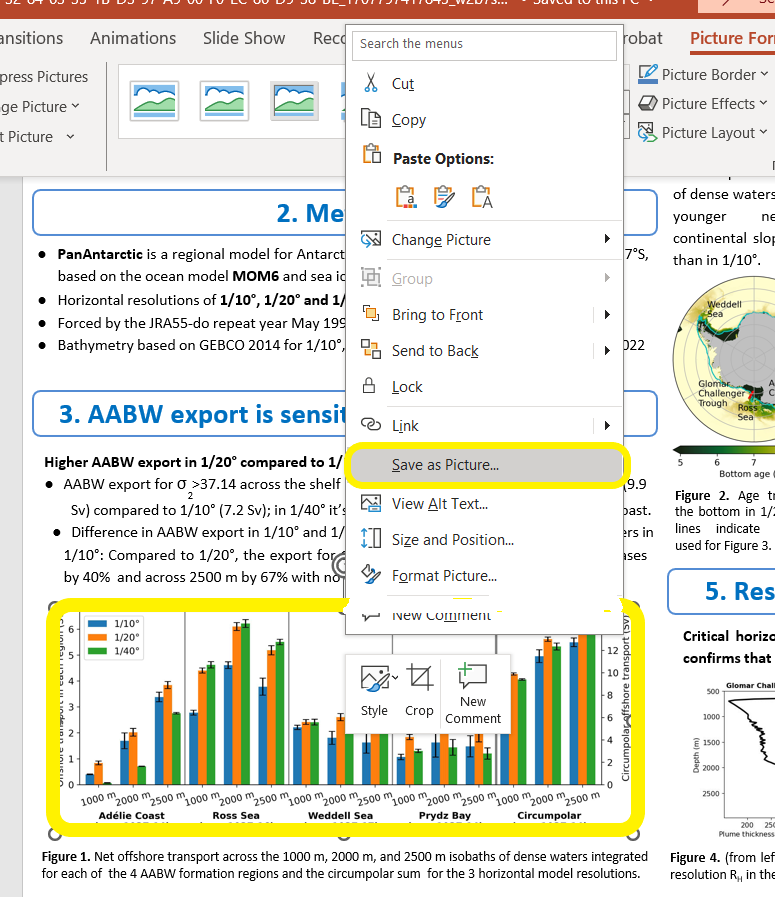
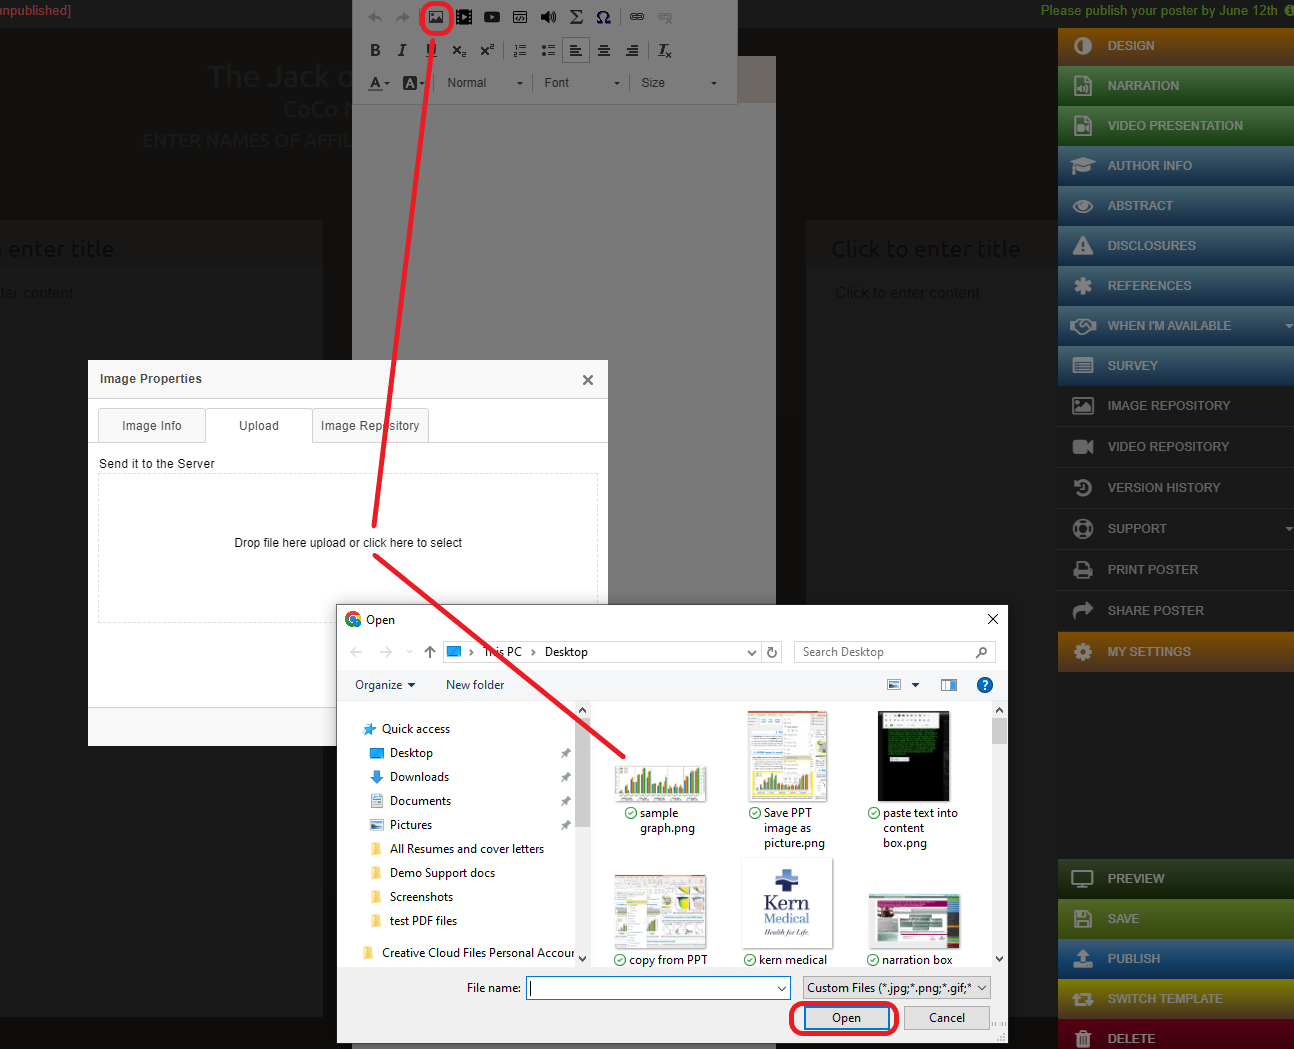
1. Right click on your PPT image then click on ‘Save as Picture…’ Save the image to your desktop as either a JPG or PNG.
2. Click on the Insert image tool in the iPoster editor and select the saved image from your files.
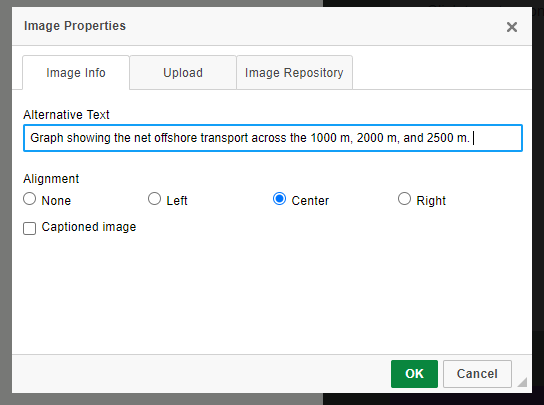
3. Add alternative text and update any settings using the options pictured. then click OK.
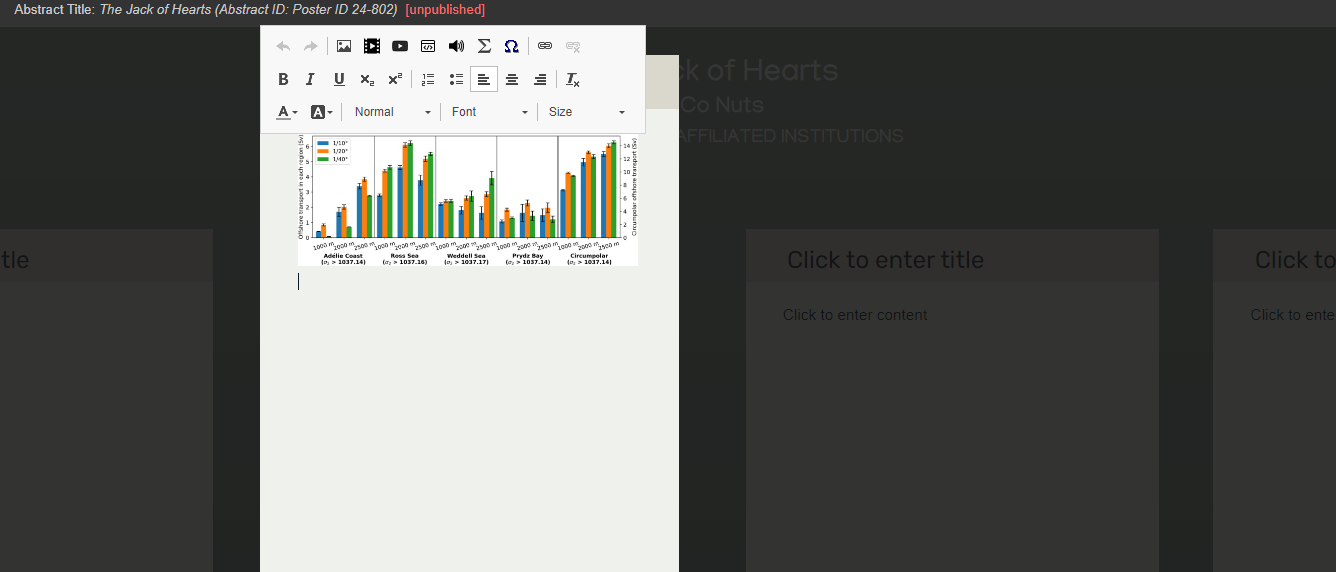
The image is now uploaded in the content box
Adding full slides to an iPoster:
You can add your PPT slides as images to your iPoster either in a content box or in the image slider box that is available on two of the interactive templates.
When you or an end viewer click or tap on the slide show in preview mode or at the conference, it will open up as an overlay and show all images at their full size. There are controls to pause and play as well as to skip back and forth through the slides.
1. Open your PPT and take a screenshot on the biggest available screen of each slide that you want to include on your iPoster. On a windows PC you can use the Snipping Tool. On a Mac click Cmd + shift+ 4.
2. Click ‘Image Slider’ in one of the iPoster templates with the slideshow box available.
3. Click on the grey box and insert the slideshow screenshots that you have saved. You will need to upload them one at a time.
4. Open Preview mode from the main menu and click on your slide show to check that the slides are appearing as uploaded and that the controls are working.
Accessibility Features
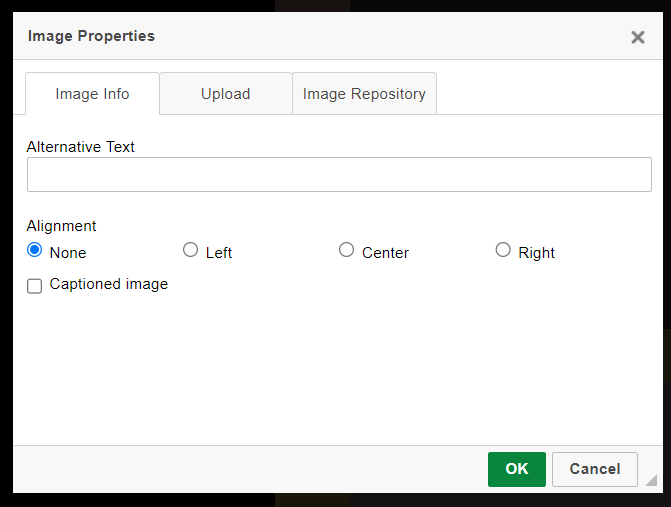
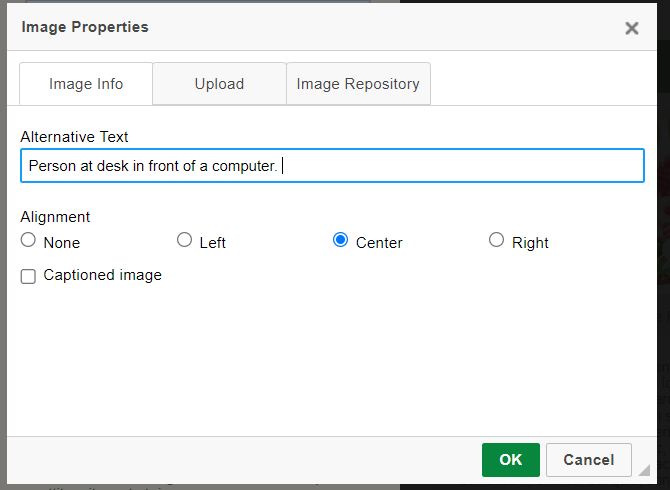
How can I add alternative text to images on my poster?
Alternative text, often shortened to ‘alt text,’ is a short and succinct written description of an image. Well written alt text is important to increase your presentation’s accessibility. Screen readers will read aloud alt text in place of images which means this content will be available to viewers who are blind or low vision.
1. Click on Insert Image in the content box tool bar. Upload the desired image.
2. Once the image has finished loading the ‘Image Properties’ screen will be displayed. Add the Alt text in the box provided.
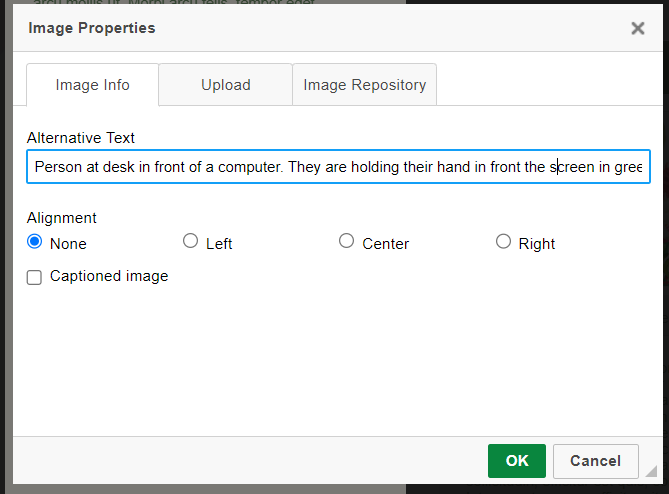
3. Alt text has now been added to this image.
4. If you need to edit the alt text, or add alt text onto an existing image simply double click on the image to bring up the ‘Image Properties’ screen again. Click on the Image Info tab and you will see the Alt text box.
5. Simply edit the existing text or add in alt text here as per above steps. Click ‘OK’ and the alt text has now been added to your image.
How can I add a transcript to a narration?
You will always be able to add a narration transcript manually and some users will be able to generate the transcript automatically using an integrated AI component – this option isn’t available on all conferences.
Please Note: You will first need to have an uploaded audio file in your poster to be able to follow the below instructions. See the FAQ on adding a narration if you need help with this process.
Part 1: Manually generate a transcript
1. Click on the Narration button in the Main Menu. Click on the Enter Transcript button under your uploaded recording.
2. An empty content box will pop up. Add your narration transcript in here. You can either copy/paste it from another source, or you can type it in directly. You can then format the text as you like afterwards.
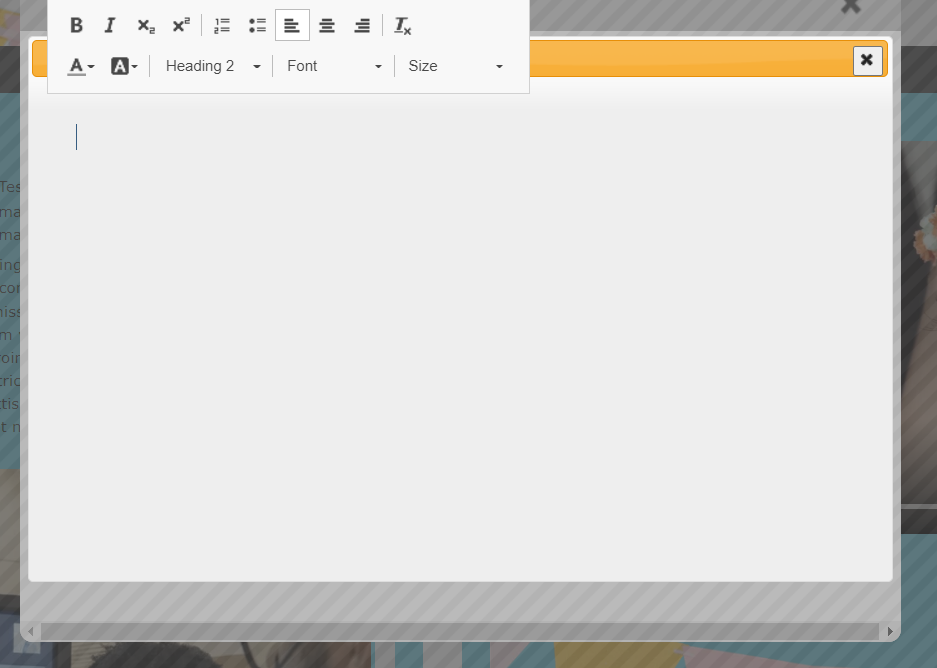
3. Edit your transcript text as required using the tools in the tool bar. i.e. add headings, change the font style/size, change the text color etc…
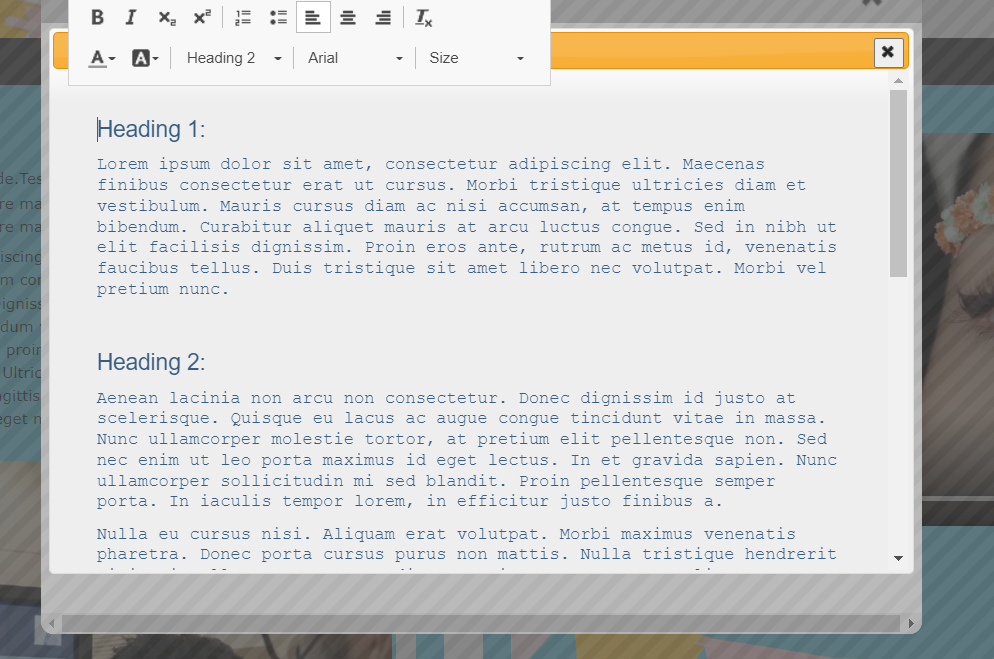
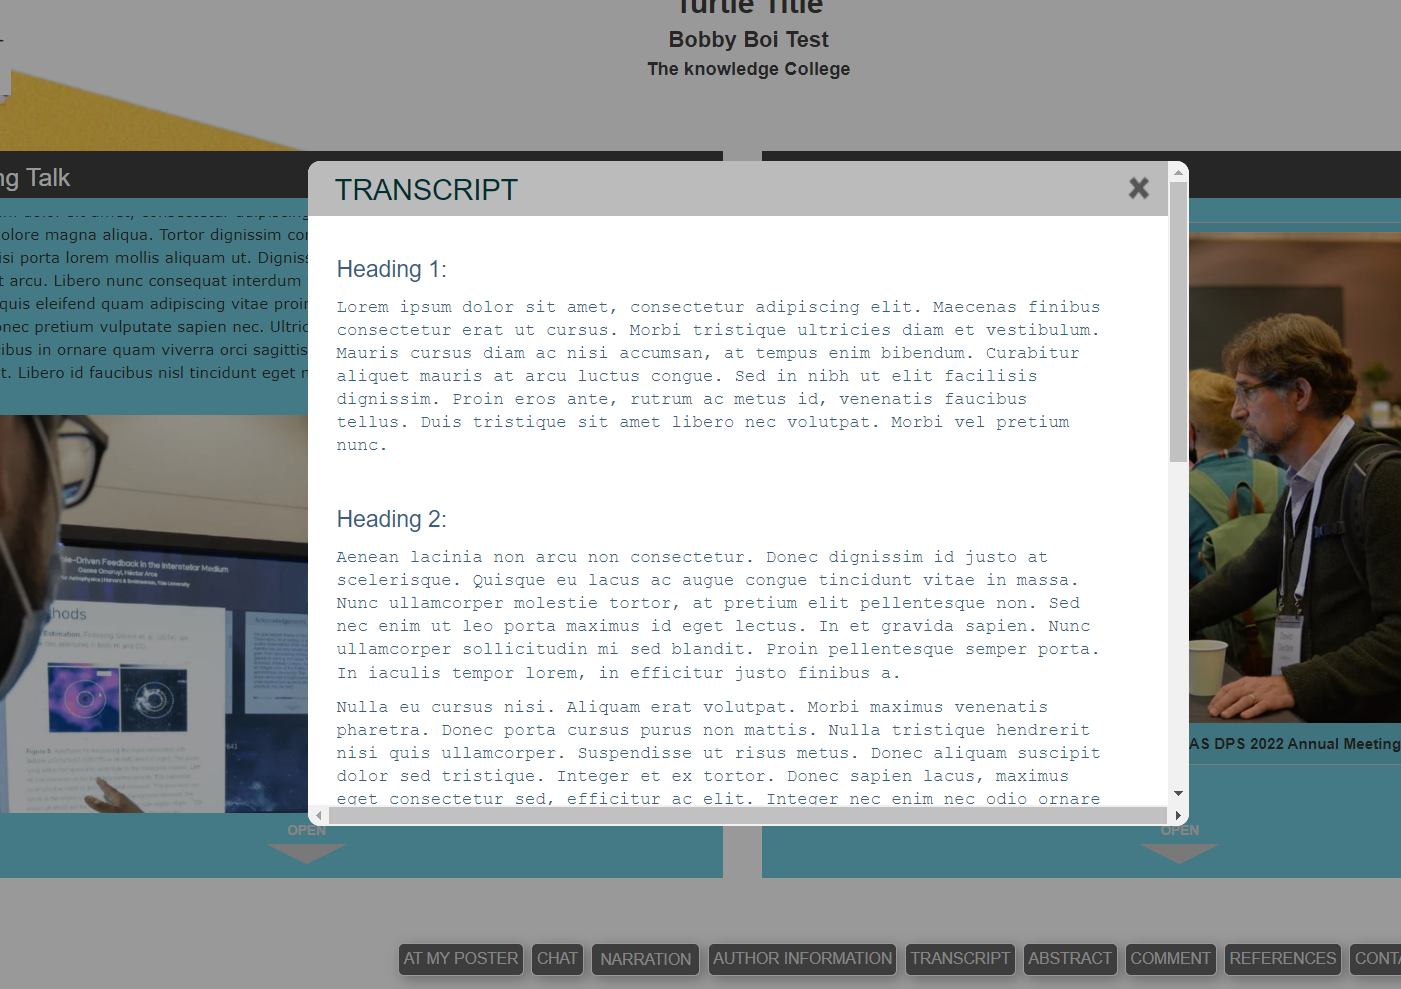
4. Click on Preview to check that the Transcript button has appeared at the bottom of your poster. Click on this button to view the transcript as visitors would.

Part 2: Auto generate a narration transcript
1. Click on the Narration button in the Main Menu. If your conference allows for auto generation of the transcript you will see a ‘Generate AI Transcript’ button as well as an Enter Transcript button.
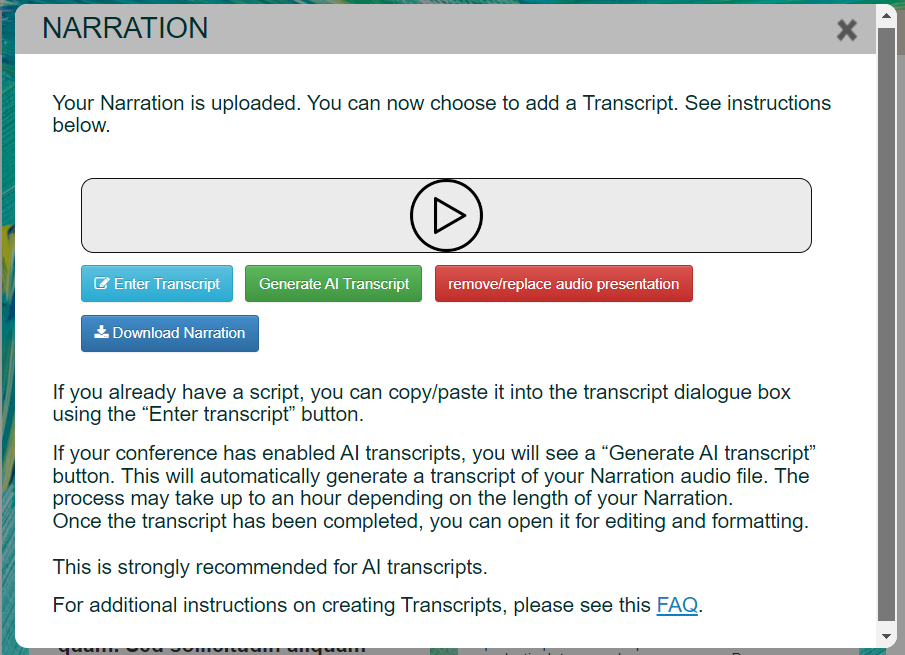
2. Click on the Generate AI Transcript button. You must now wait for the transcript to generate. This usually doesn’t take more than 30 mins However it may take more or less time depending on the size/length of the recording.
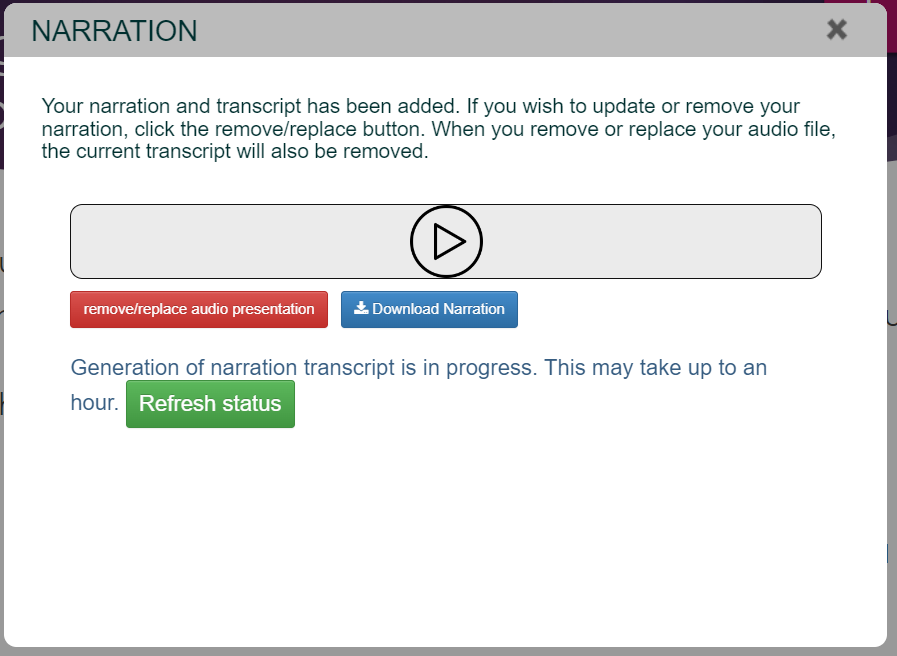
3. You can use the ‘Refresh Status button to check if your transcript has finished generating. If your transcript still hasn’t finished generating after an hour or so. Please contact our support desk and we can check on this.
If the transcript is ready you will see a button called Edit Transcript. You can click on this at any point to edit the text in your transcript. The AI may have made mistakes with some words and it is always a good idea to check this. You can also format the text as required here. i.e. add paragraphs, or change the color of the text etc…
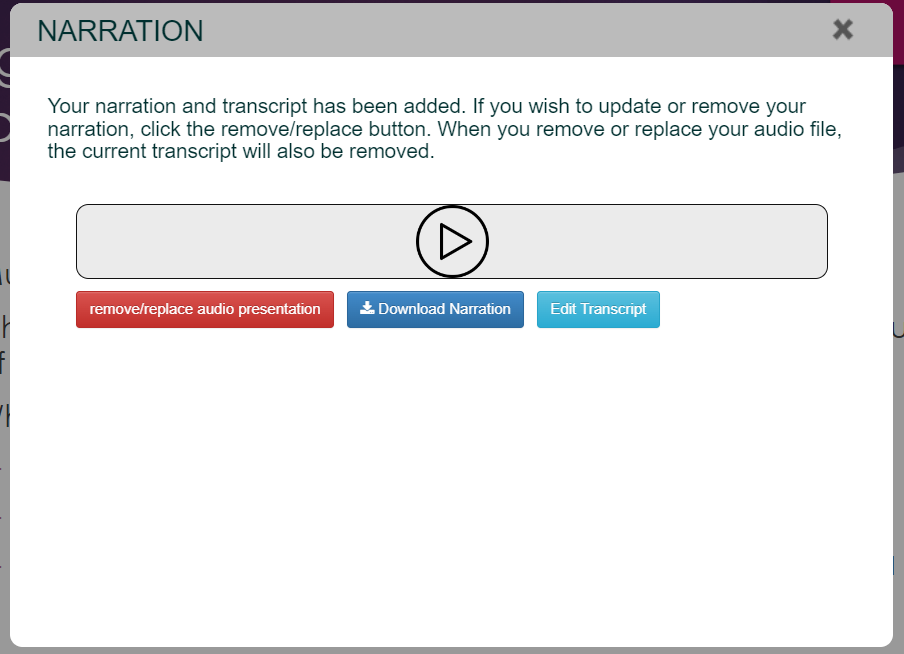
4. After editing your text, click on ‘Preview’ and check that the Transcript button has appeared at the bottom of your poster. Make sure your transcript is displayed as edited.
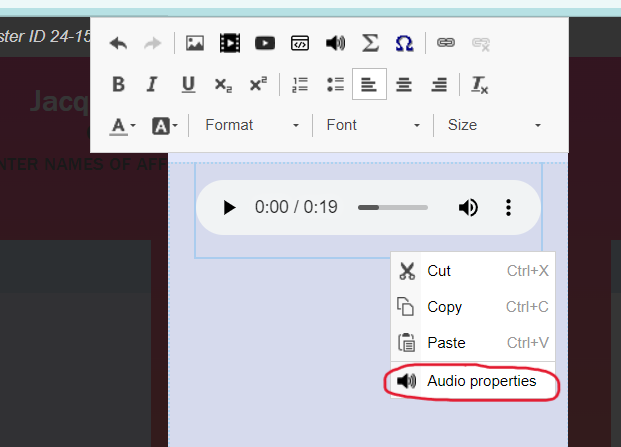
How can I add transcript to audio files within content boxes?
To access your audio file transcript settings hover over the audio snippet in your poster. When you see the yellow or blue bounding box appear right click within this box and select Audio Properties.
Part 1: Manually generate a transcript
1. Click on the ‘transcript’ tab then click on ‘Enter transcript’.
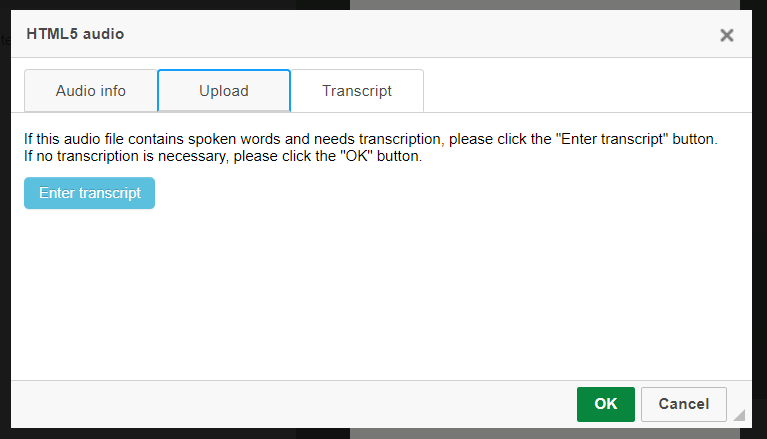
2. An empty dialogue box will pop up. Place the curser at the top of the box and type or copy/paste in your text. You can then format the text as you like afterwards. Close out of the transcript editing box by clicking on the X in the right corner.
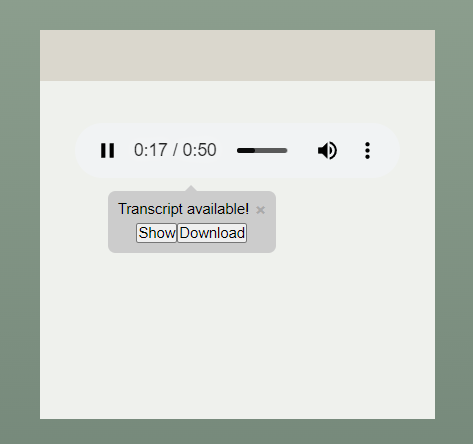
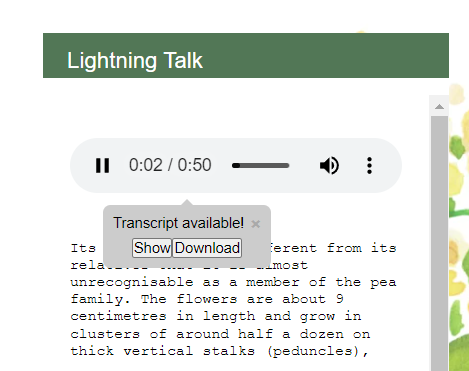
3. Click on Preview and click the play button on the snippet. A pop-up will show advising that there is a transcript available. Click on ‘Show’ to view the transcript or ‘Download’ to download it.
Part 2: Auto generate an audio file transcript
1. After you have uploaded an audio snippet file in a content box you will see a tab called ‘transcript’. Click on this tab then click on ‘Generate transcript’.
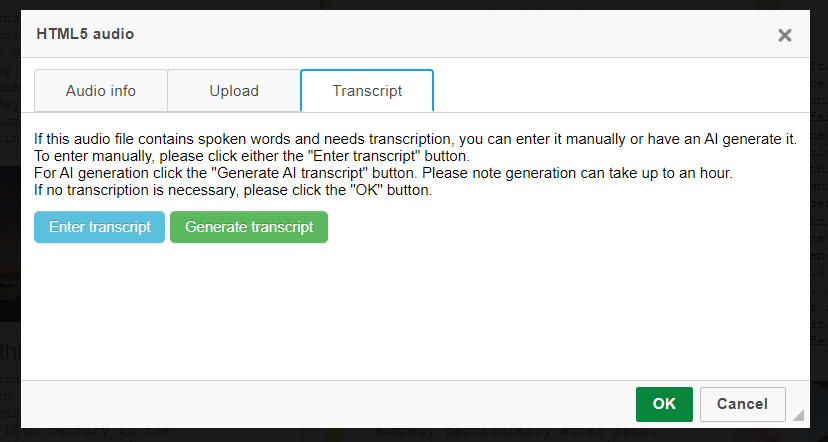
2. You must now wait for the transcript to generate. The time it takes will depend on how long the recording is and how big the file is. In this example my recording was 50 seconds and it took less than 5 minutes to until the transcript was ready. You can check if the transcript has finished generating by clicking on the refresh status button.

3. When the transcript is done the following screen will be shown. Click on ‘Edit transcript’ to make any adjustments to the text.
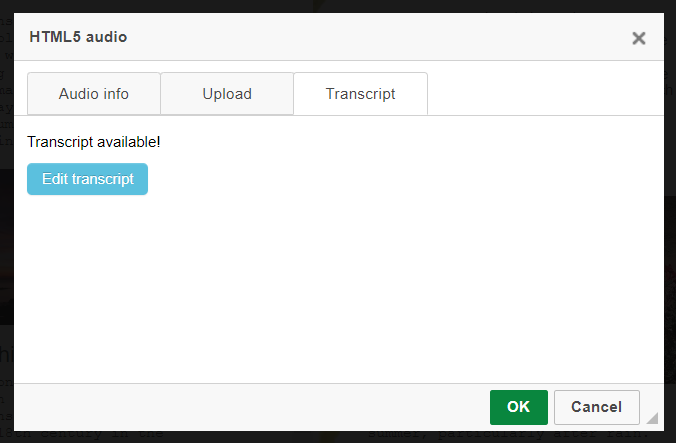
4. To check on your audio snippet transcript click on ‘Preview’ and click the play button on the snippet. A pop-up will show advising that there is a transcript available. Click on ‘Show’ to view the transcript or ‘Download’ to download it.
How can I add subtitles to my videos on my poster?
Please note that this tool is not available on all conferences.
If your conference organizers have chosen to enable subtitles for videos you will be able to generate these using a linked AI.
The AI can take up to 24 hours to generate the subtitles which can then be edited. Make sure that you allow plenty of time to generate captions for your videos and to adjust them as required afterwards.
First you will need to have a video uploaded in either the VIDEO REPOSITORY/GALLERY section, or under the VIDEO PRESENTATION section of your iPoster editor. Both of these buttons are located on the main menu.
These instructions are in 2 parts:
Generating subtitles for videos in VIDEO PRESENTATION
Generating subtitles for videos in the VIDEO REPOSITORY
Generating subtitles for videos in VIDEO PRESENTATION
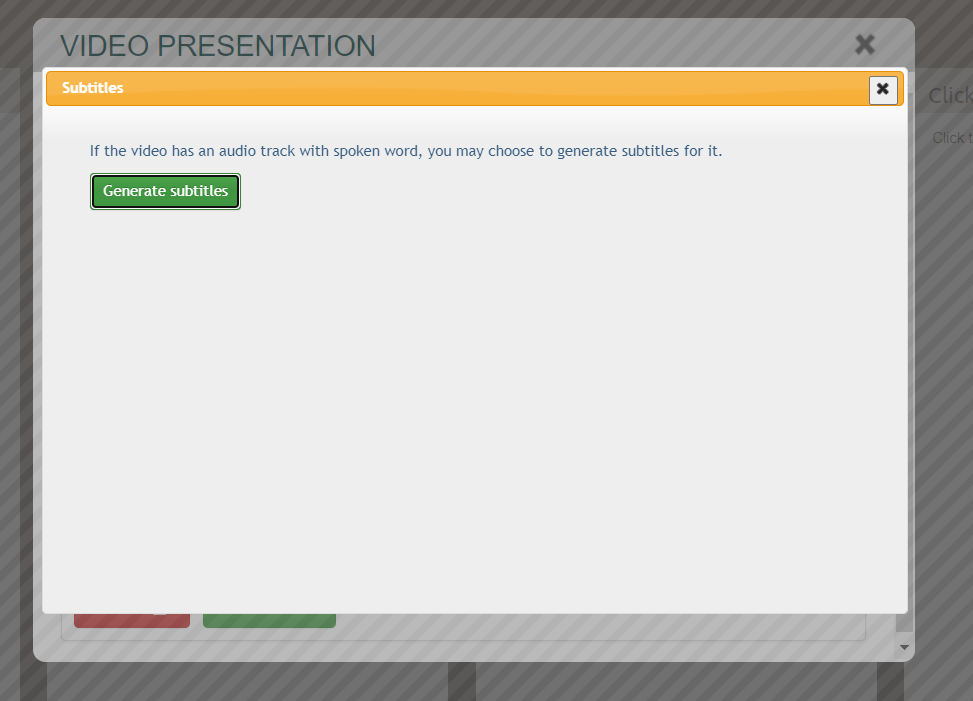
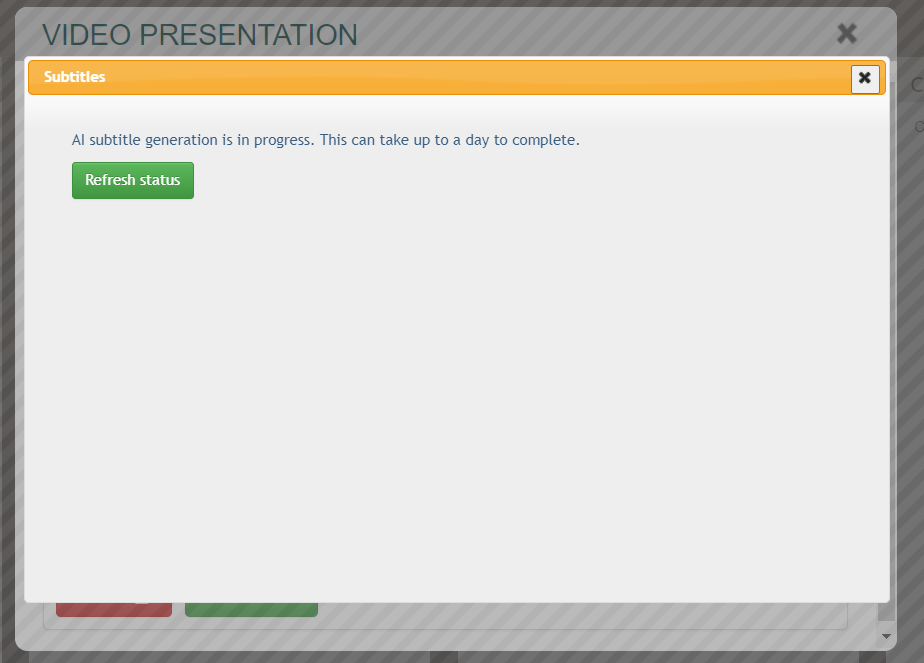
1. Upload your video in VIDEO PRESENTATION then click on the green ‘Subtitles’ button
2. The following screen will pop up – click the ‘Generate Subtitles’ button.
3. This screen will then be shown advising that the subtitle generation is in progress and to wait up to a day. Check back after 24 hours.
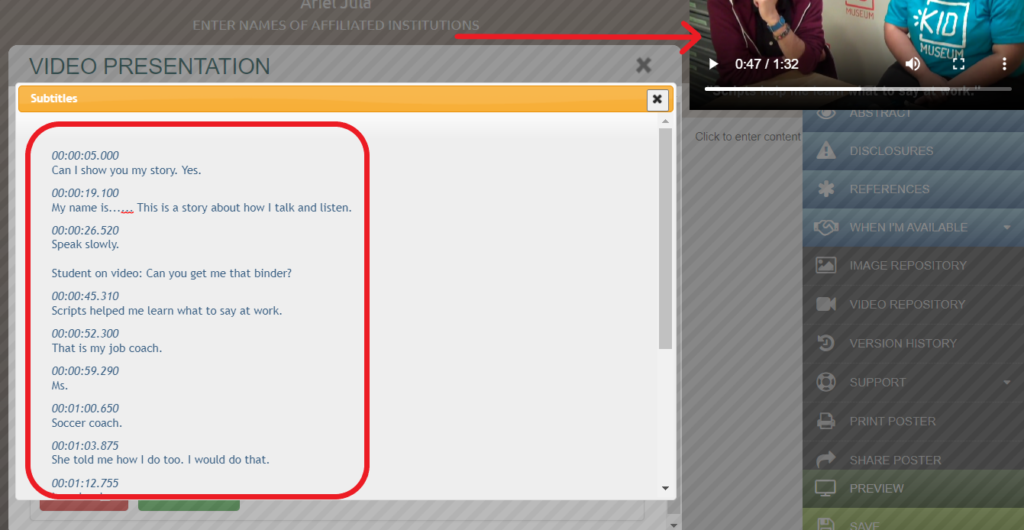
4. After 24 hours log back into your iPoster editor and open the VIDEO PRESENTATION screen. Click on Refresh status. The generated subtitles will open in a box where the text can be edited. A preview of the video will be available to the top right of the screen so you can run through it whilst you make edits.
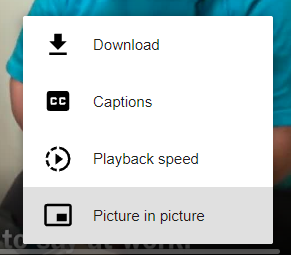
5. Once you have completed your edits check your subtitles in preview mode. Click on Preview on the main menu then click on the Video Presentation button.
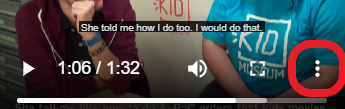
6. Click on the 3 vertical dots and select Captions to toggle the subtitles on and off.
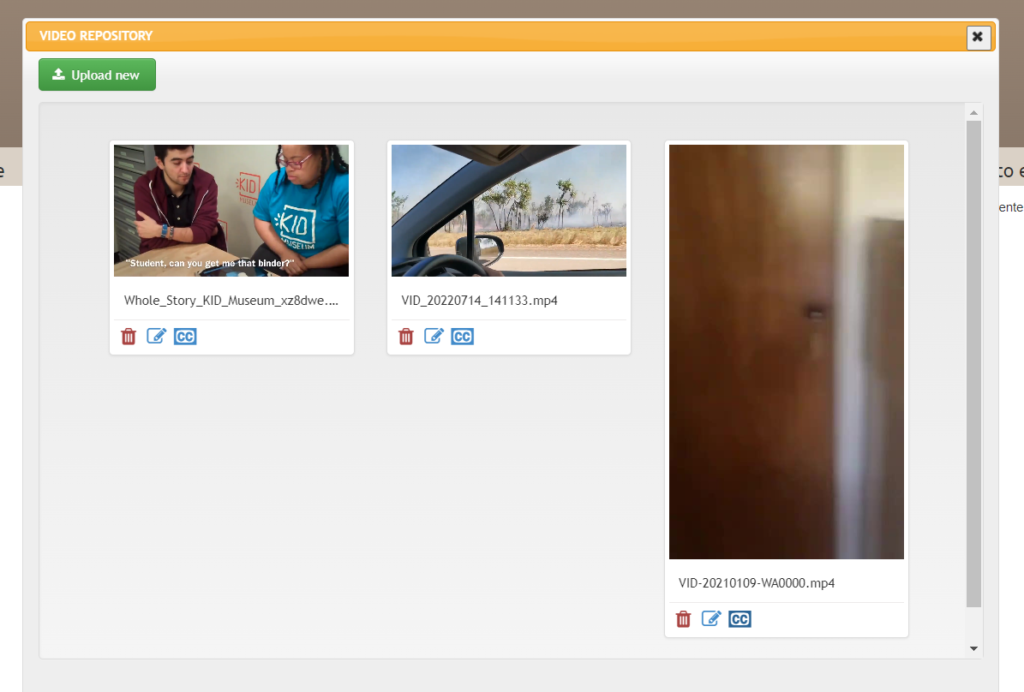
Generating subtitles for videos in VIDEO REPOSITORY
1. In the VIDEO REPOSITORY you will see a preview of your uploaded videos. If you haven’t uploaded any videos yet you will see a blank screen with an ‘Upload New’ button.
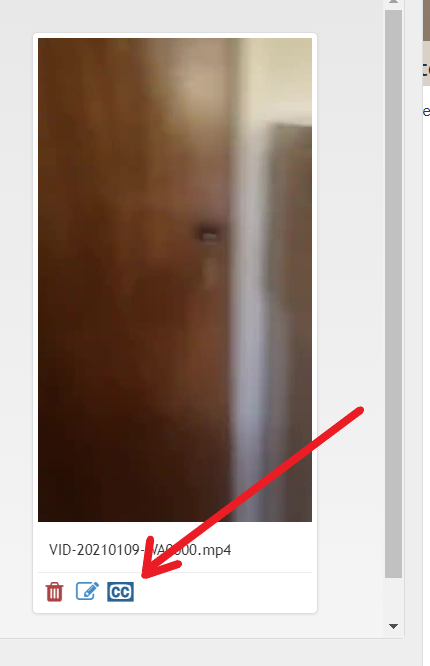
2. Click on the CC symbol below the video that you want to generate the subtitles for.
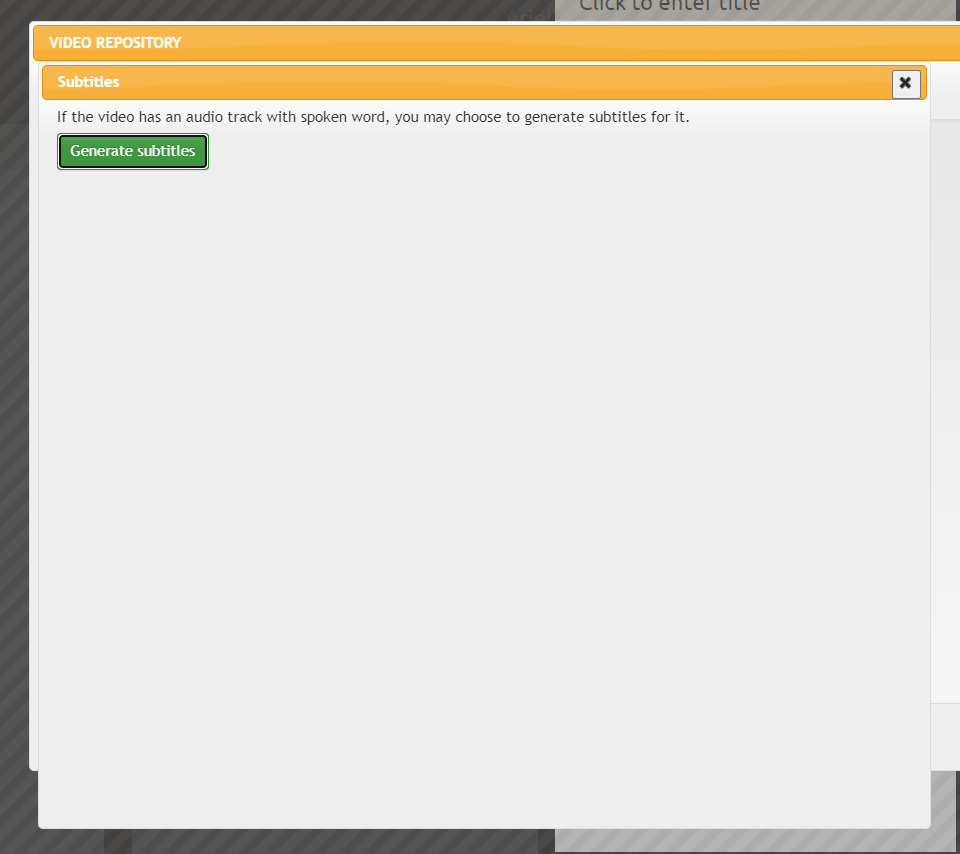
3.The below window will pop up. Click on ‘Generate subtitles’. Then wait up to 24 hours for the AI to complete the task. Continue to follow the instructions from step 4. in section 1 above.
Settings and other tools
How can I change my template?
Switch to or from a PDF template:
Save a copy of your texts and any uploaded audio files. Delete your current poster by clicking on the DELETE button. This will return you to the Choose Template page. Previously uploaded images and videos will remain in the respective repositories.
Switch between interactive templates:
use the Switch Template button on the main menu. If you switch to an interactive template with fewer content boxes than the one you have currently, the content from the extra content boxes will be found under Residual Content on the Main Menu. Follow the guide below for detailed instructions and screenshots.
1. Click on the yellow SWITCH TEMPLATE button on the main menu.
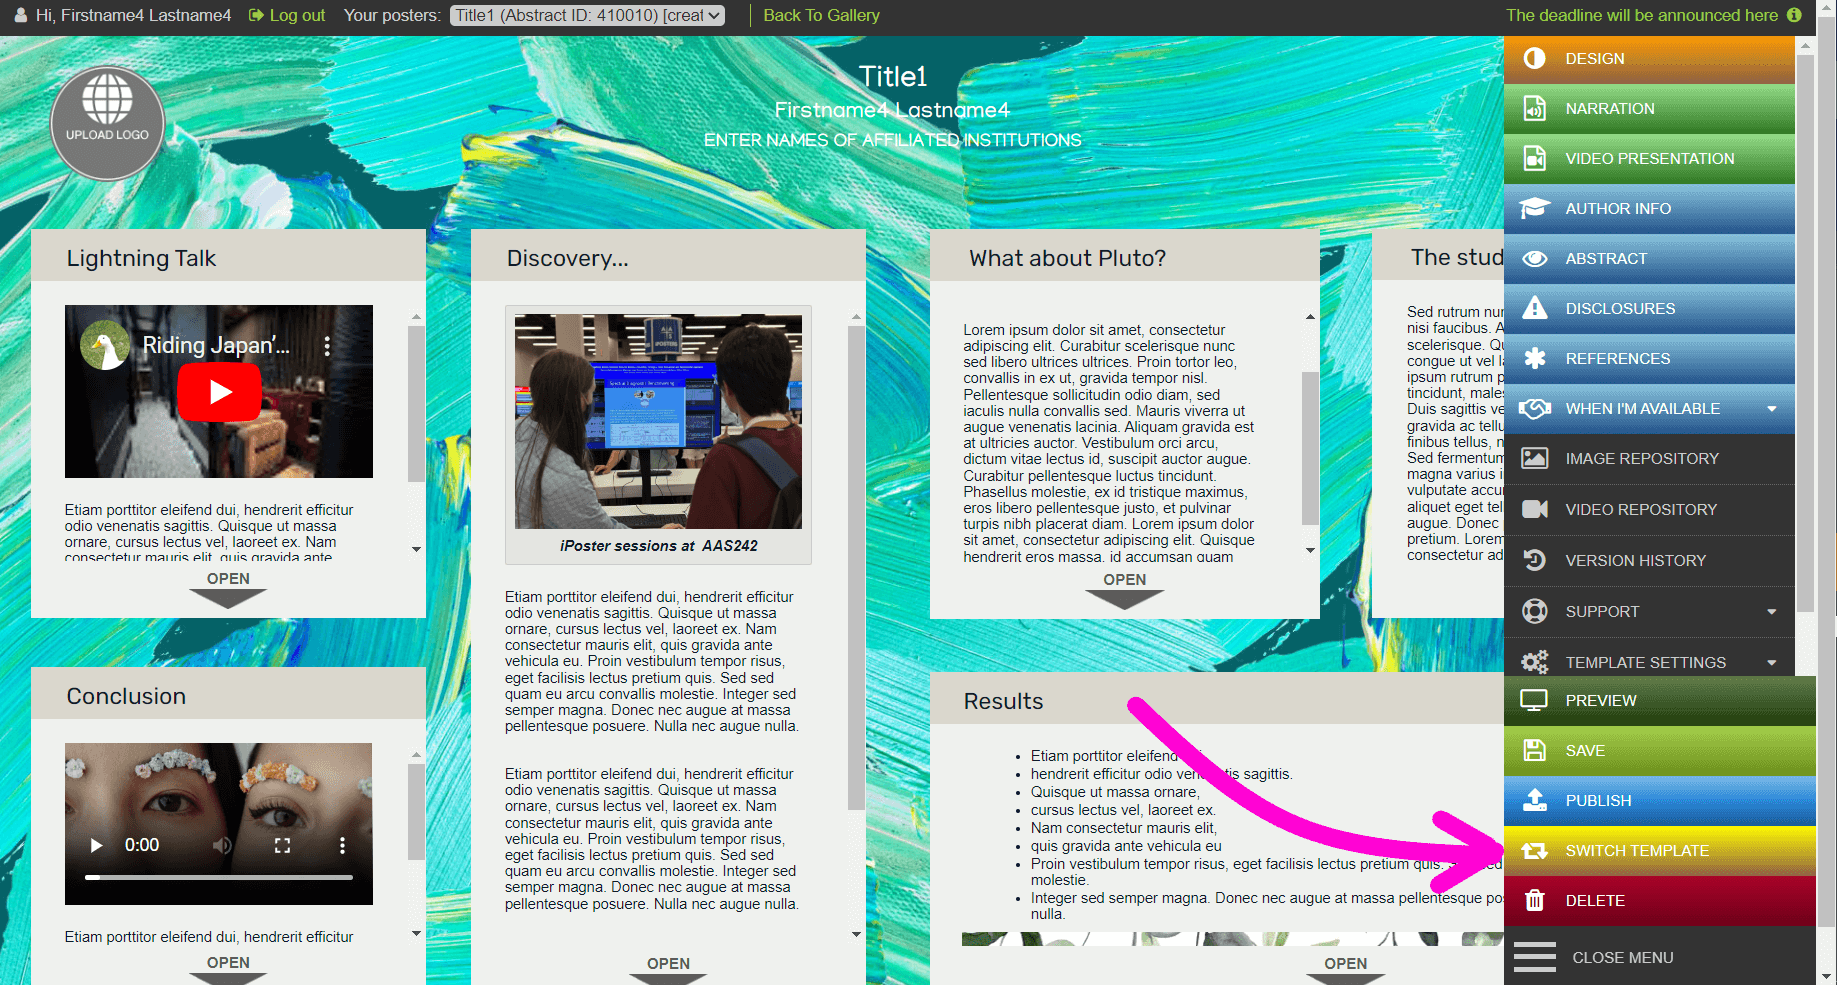
2. The following Switch Template screen will pop up. Select the template you want to change to. Note that the template you currently have will be grayed out.
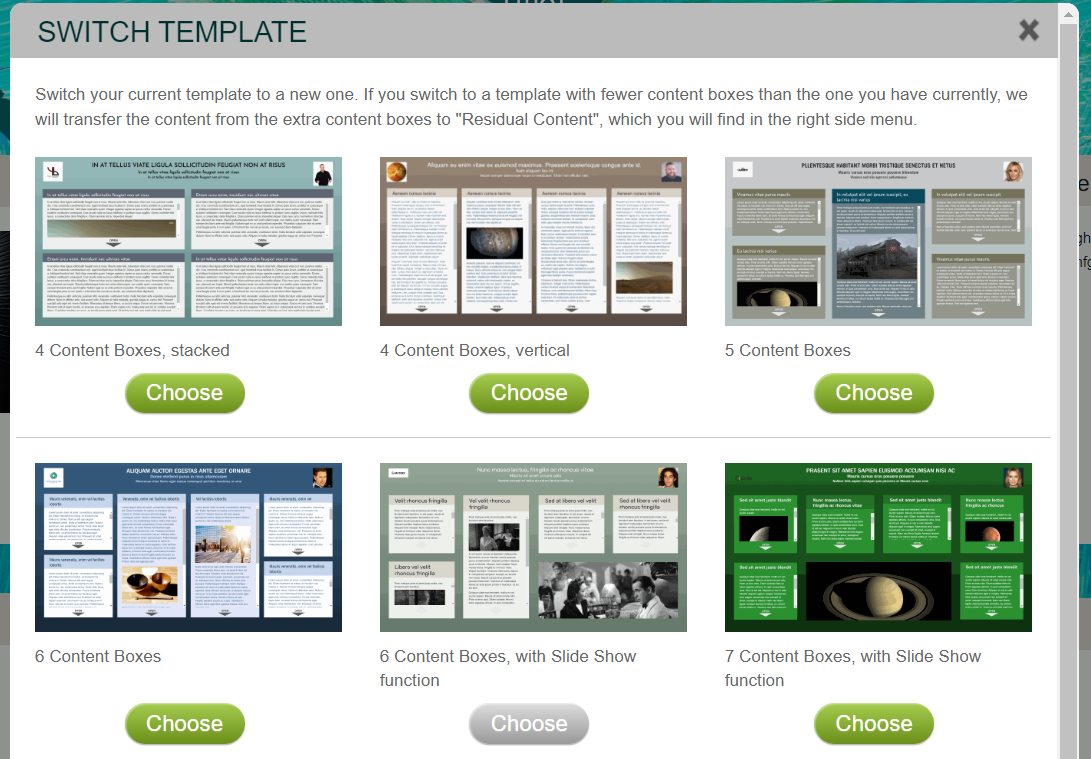
3. I chose the template with 4 vertical content boxes.
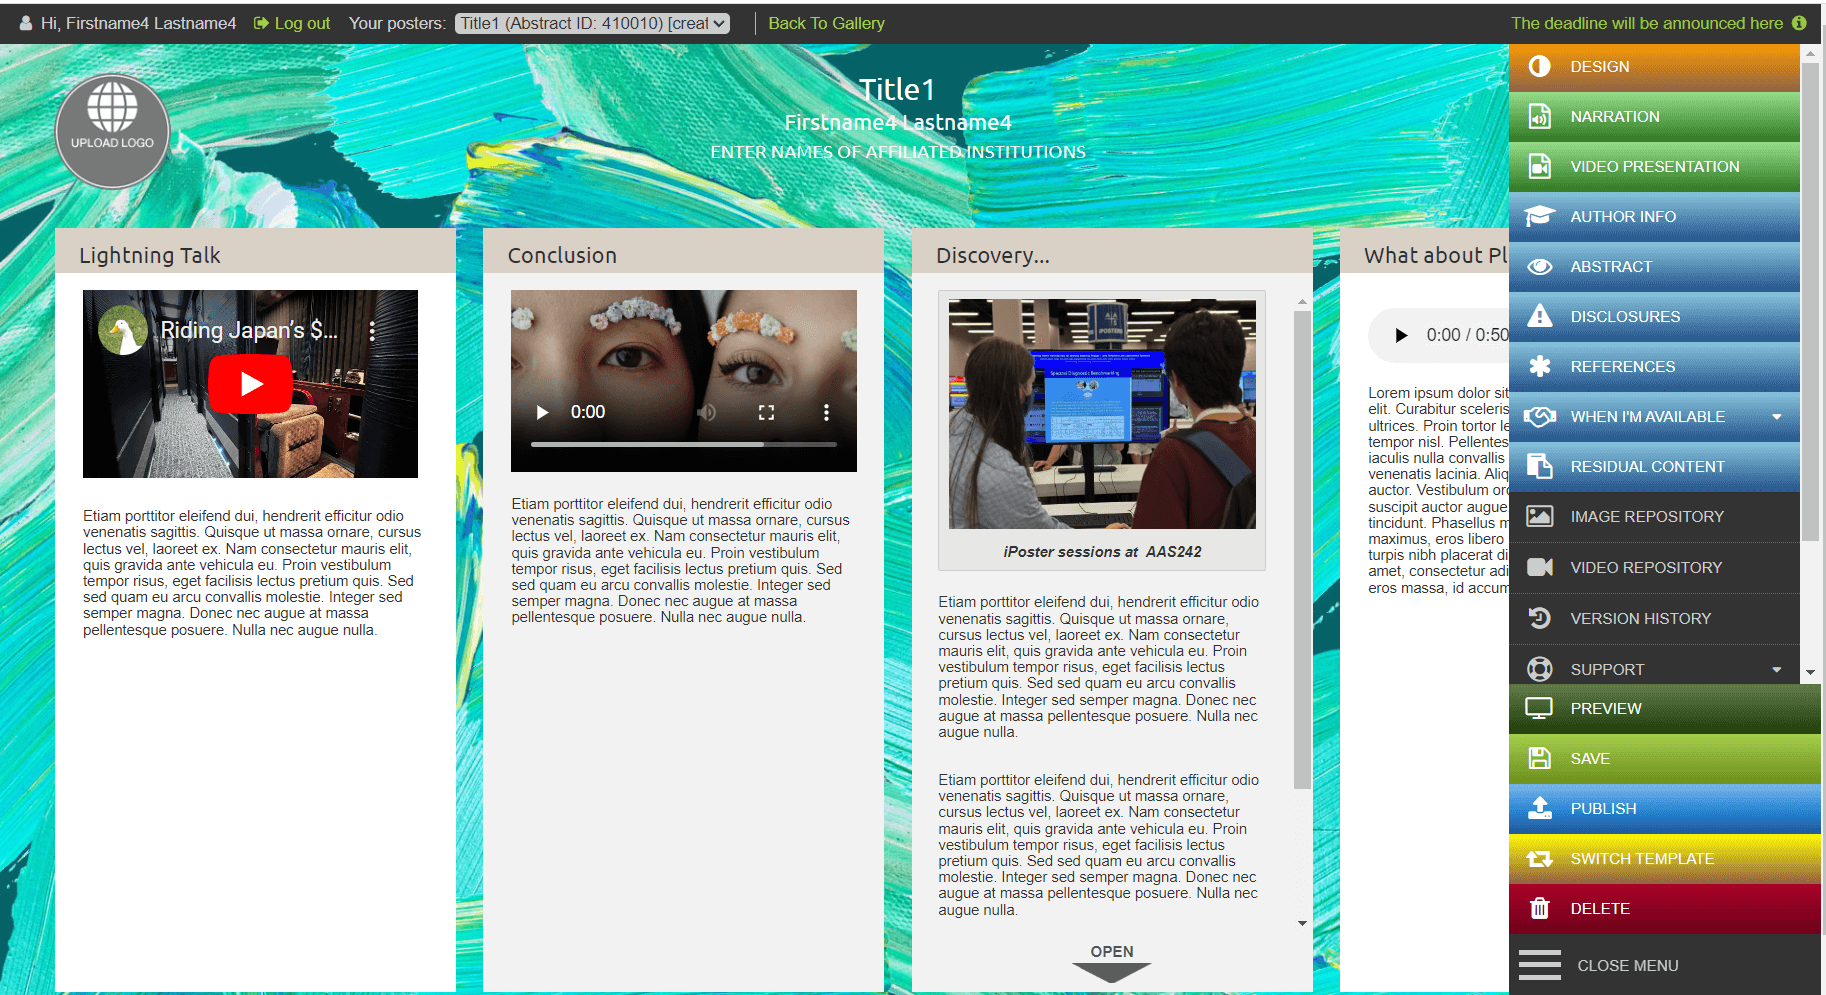
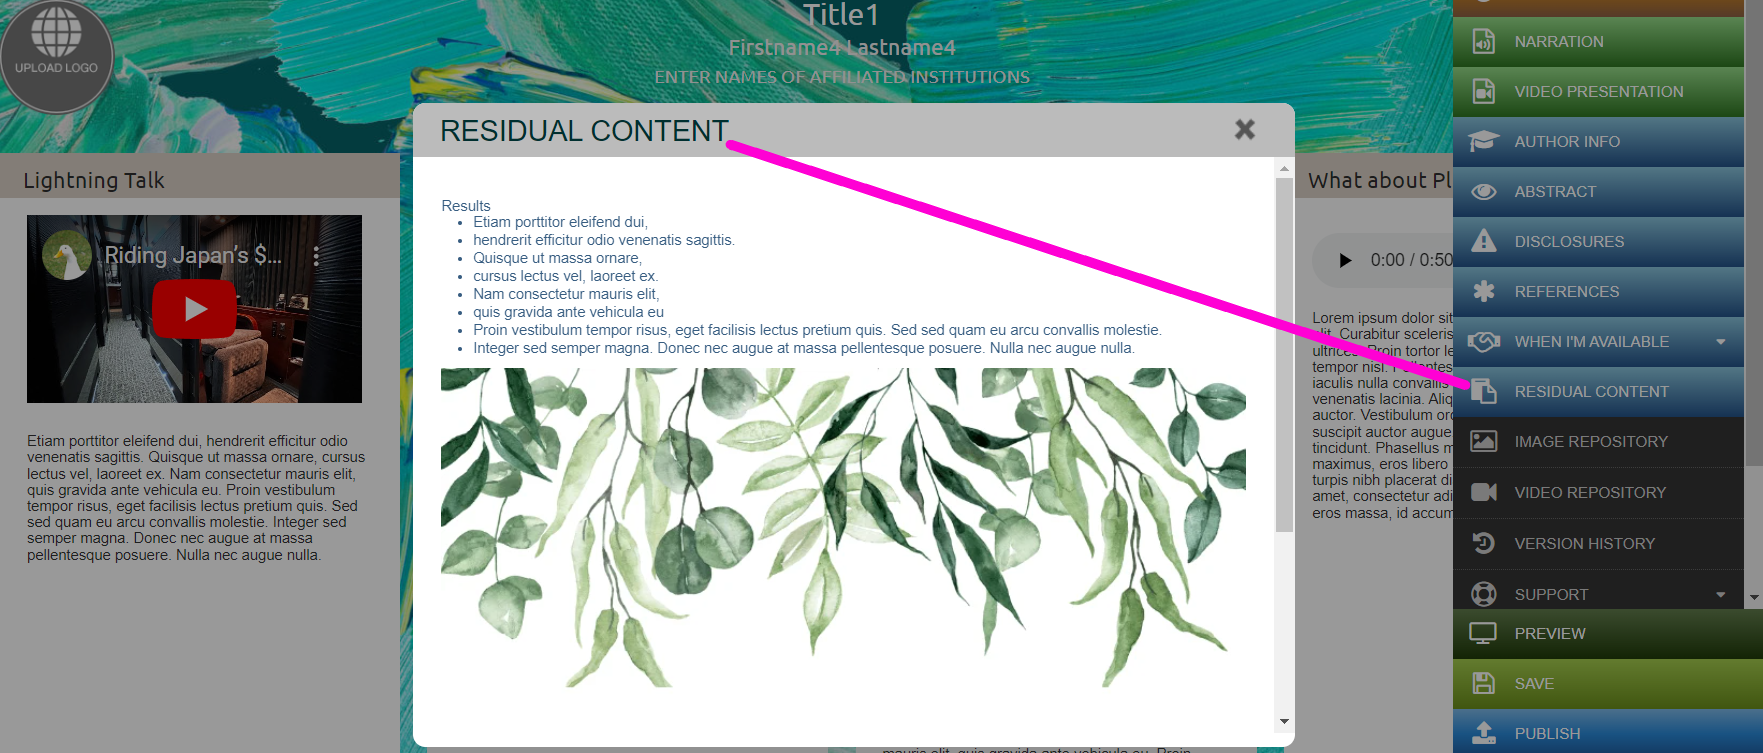
4. Because I had more content boxes in my original template, any residual content can be found in the RESIDUAL CONTENT tab on the Main menu. Simply copy/paste the material as needed into the new template.
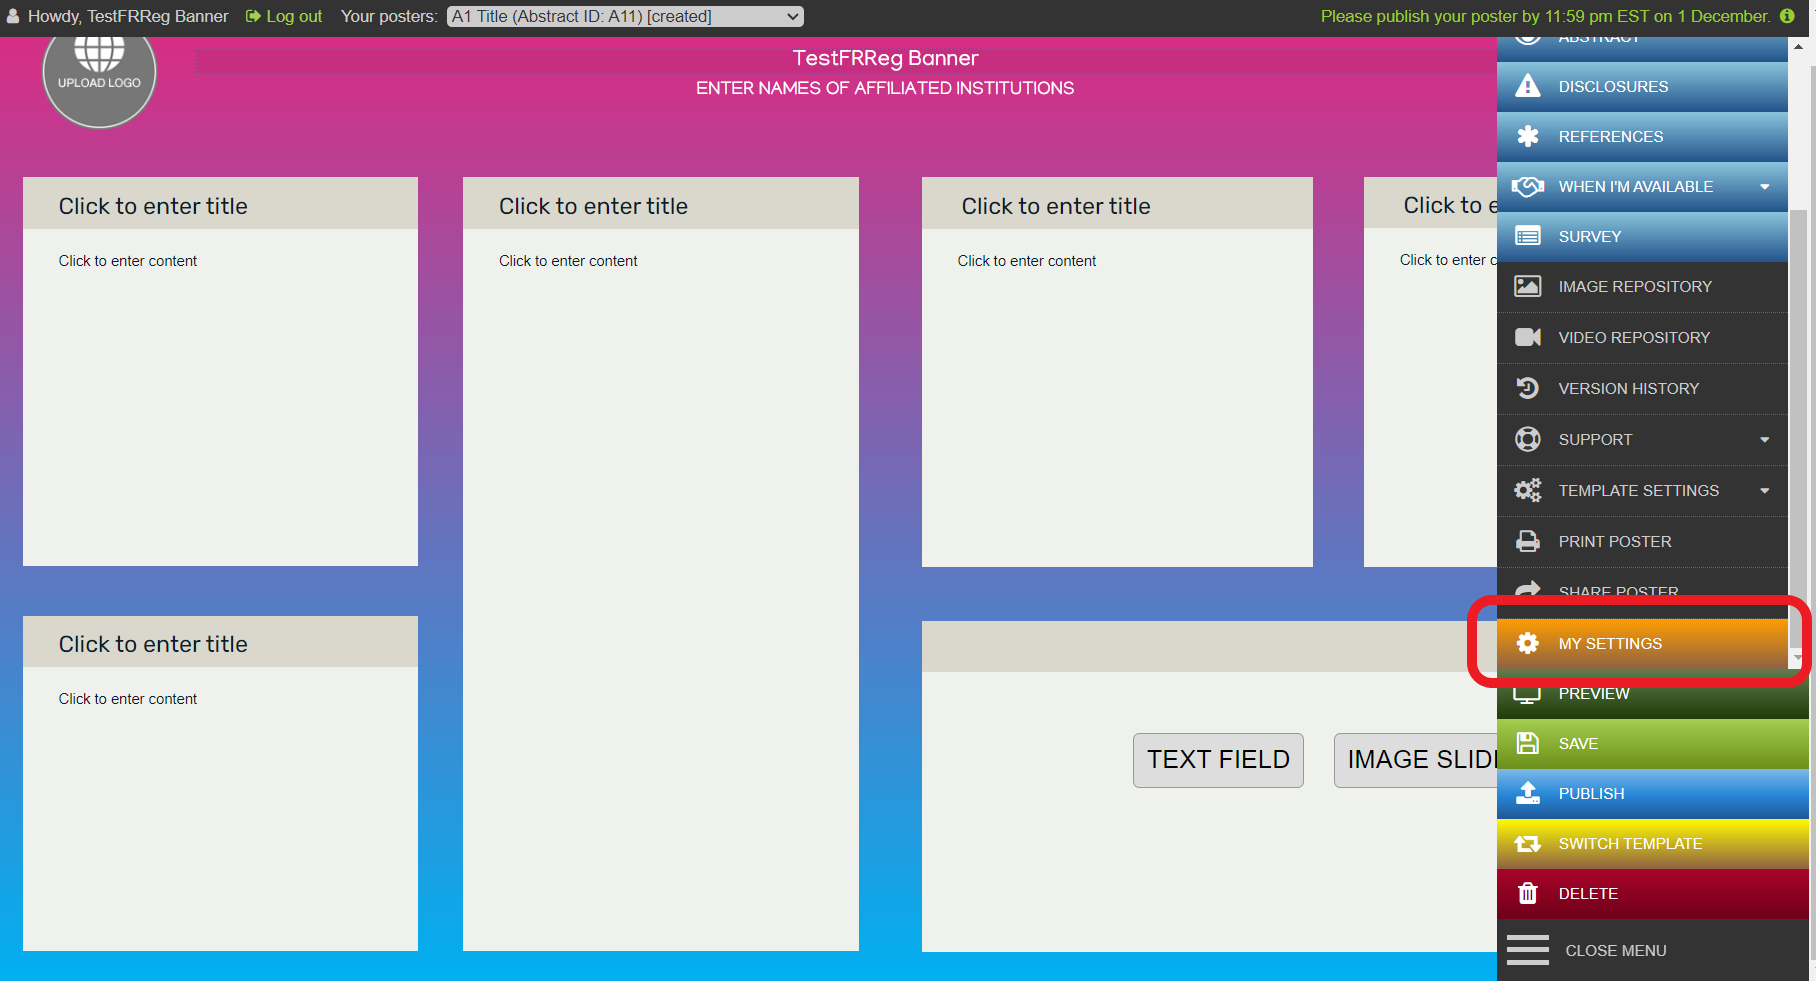
What are the options in ‘My Settings’?
Use the MY SETTINGS button to manage and measure access to your iPoster presentation, both before and after your event.
You will see the MY SETTINGS button on your Main Menu. You may need to scroll down in the menu to see it.
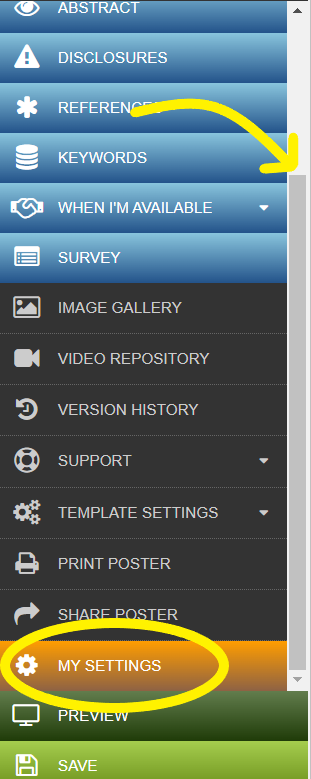
There are a number of tabs available with different settings. Here is an overall look at each of these tabs.
- Manage Co-authors – Send an invitation to your co-authors. They will receive an email with their own unique credentials and editing access. For view only access copy and send the link from the ‘SHARE POSTER’ button. See the FAQ called How can I add a Co-author to my iPoster? for detailed instructions.
- Contact Info – Change your contact email address
- iPoster Display Control – Choose whether your iPoster is visible in the conference’s online gallery after publishing.
- Share iPoster – Choose whether to allow meeting attendees or online visitors to get a link to your iPoster
- Statistics – View the following statistics on you iPoster:
- how many views online
- who has requested a share
- who has requested contact
- Comments – Update your preferences for public commenting on your poster. You can also read, respond to, or delete any comments here.
- Notifications Archive – An archive for any pop-up notifications. I.e. planned site maintenance
I deleted my presentation by mistake, is there some way I can retrieve it?
If you have accidentally deleted your presentation we MAY still have the ability to restore your iPoster. Please contact iPoster Support and we will do our best to help you bring your content back.
It’s not always possible to restore a deleted iPoster. If that is the case you will have to input and format your information again. Any previously uploaded images or videos will still be in your media repositories, so you don’t need to reload them from your computer. Place your cursor where you want to insert the image and use the Insert Image tool in the editor. Choose “Image repository” rather than “Upload”. Mark the image you want to Insert and click on OK.
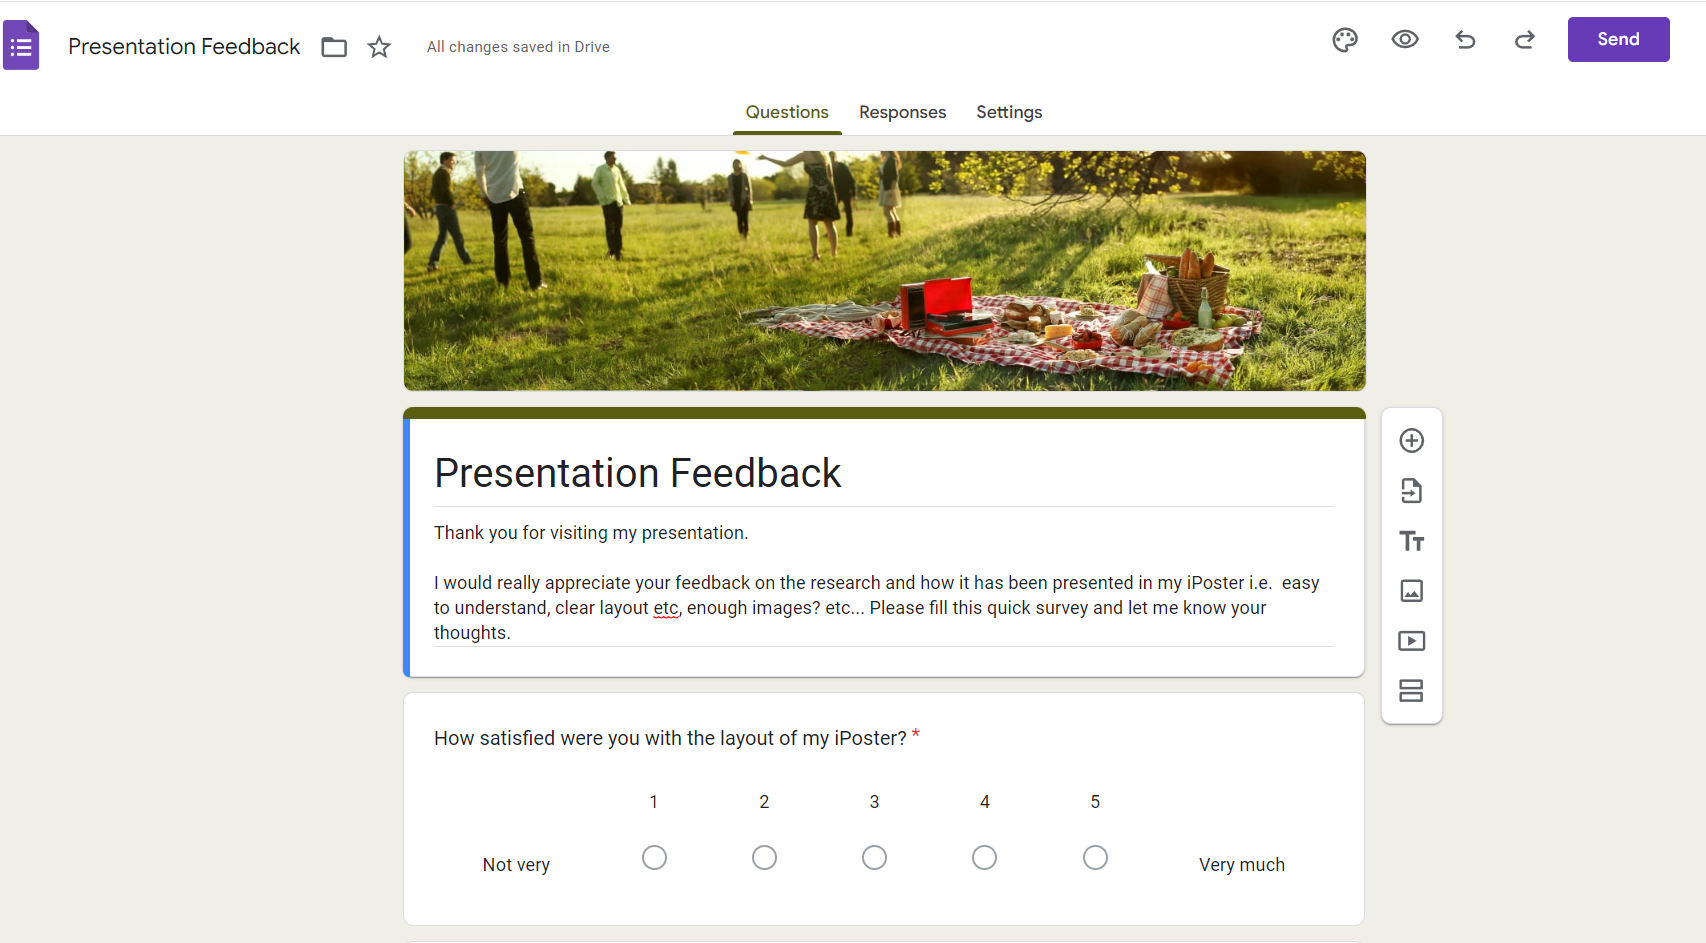
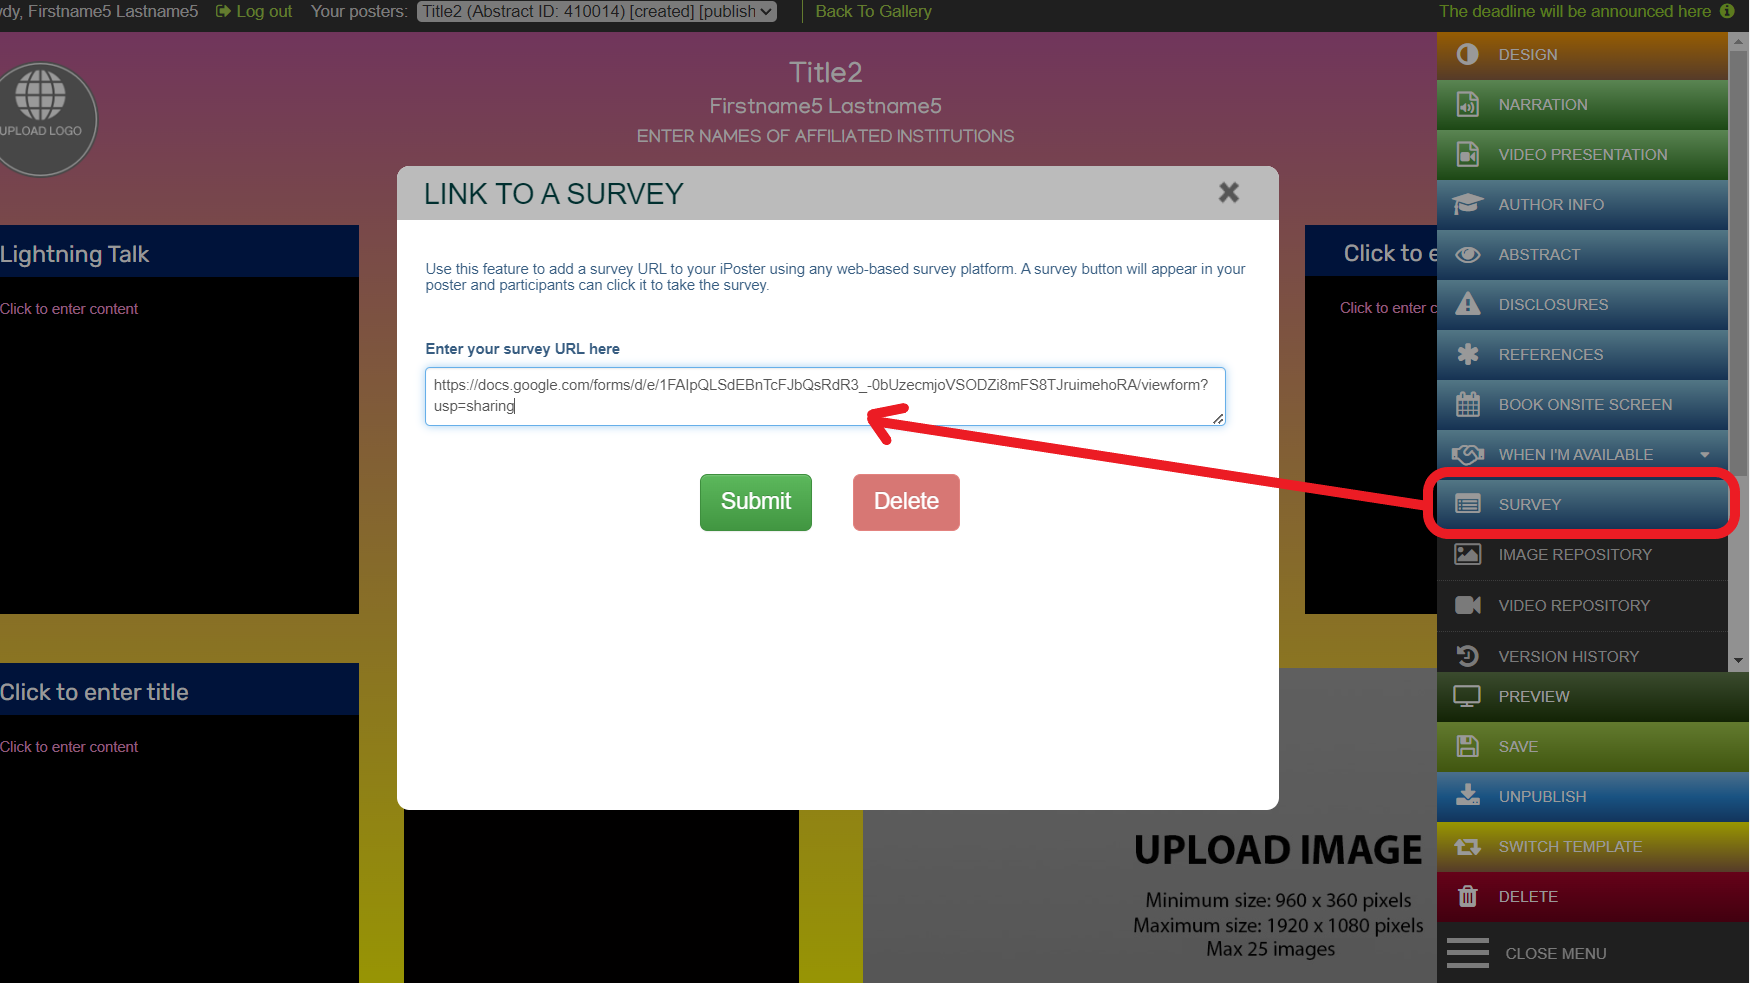
How can I create a survey on my iPoster?
You can embed a link to a survey created on a platform like, Google Forms. Participants will see a button at the bottom of the poster which they can click on to complete the survey. Follow to the below steps to see how this link can be added to your presentation.
1. Choose a platform in which to create your survey. This example uses Google Forms, but you can use any platform that you prefer. Most of them offer a free basic survey creation tool and you will need to create an account with them to access this.
Here are some that we’ve tested:
Survey Monkey
Survey Sparrow
Google Forms
2. Create your questionnaire in your chosen platform. You can include as many or as few questions as you like.
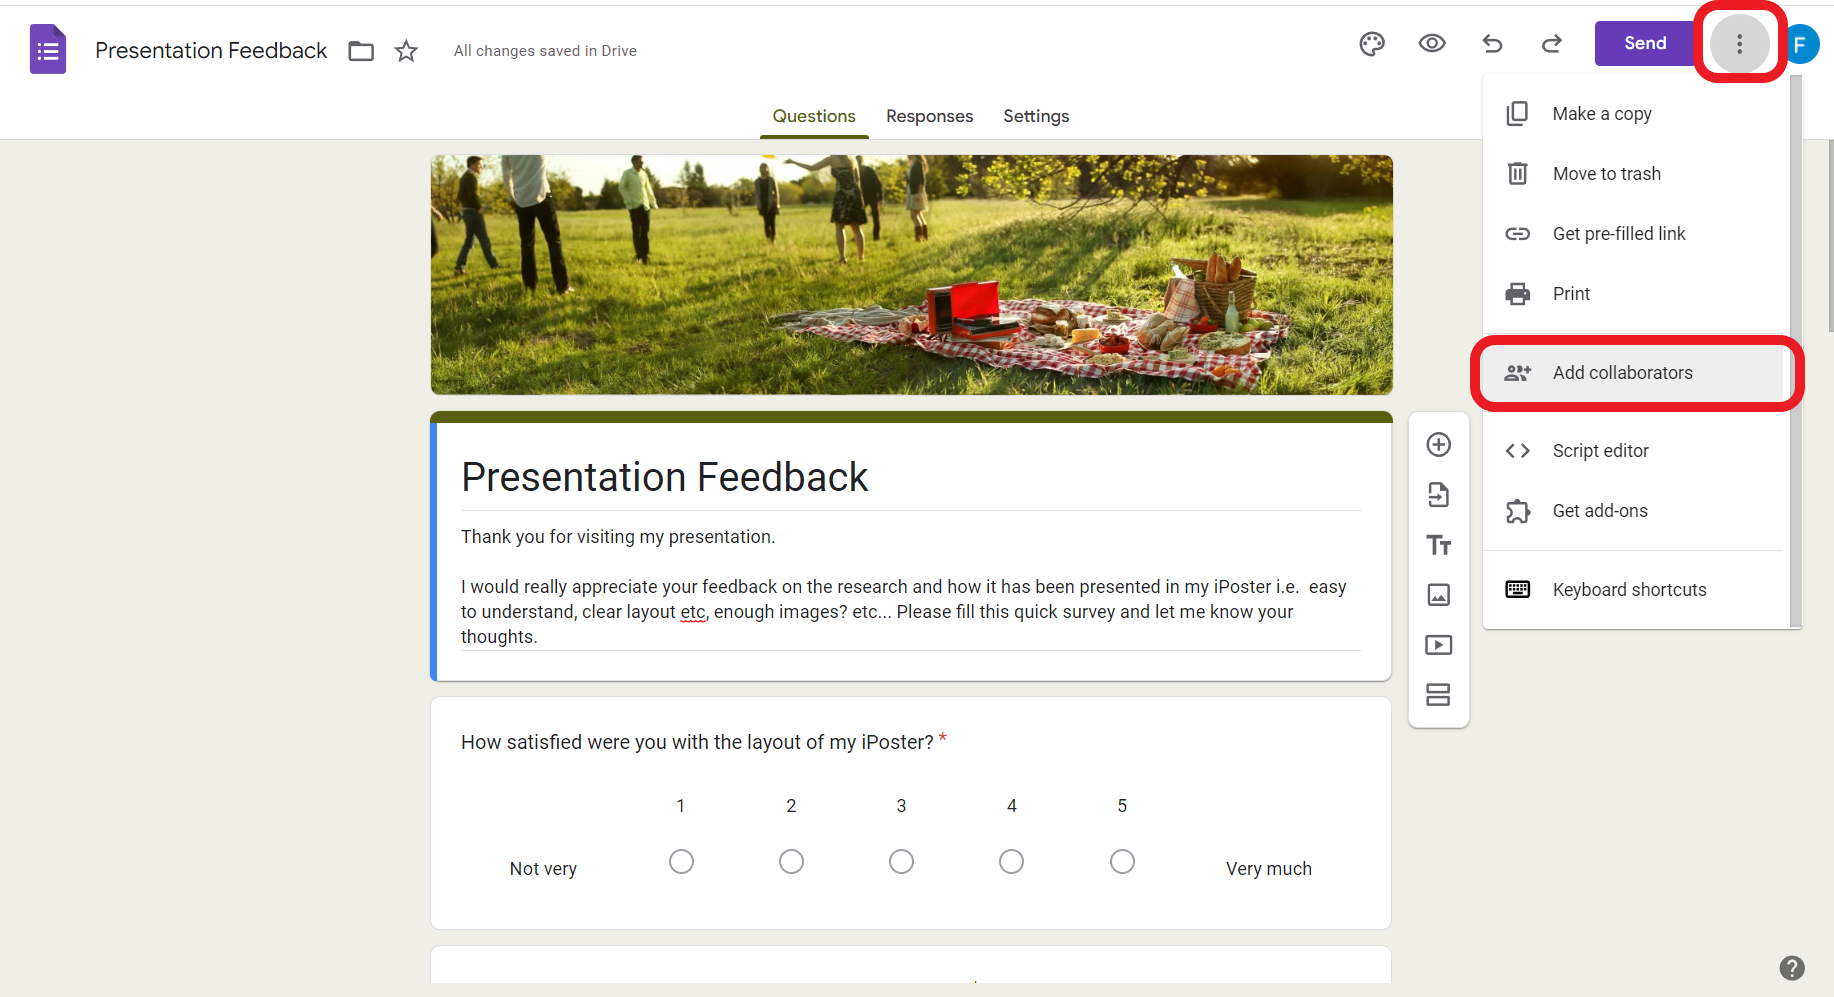
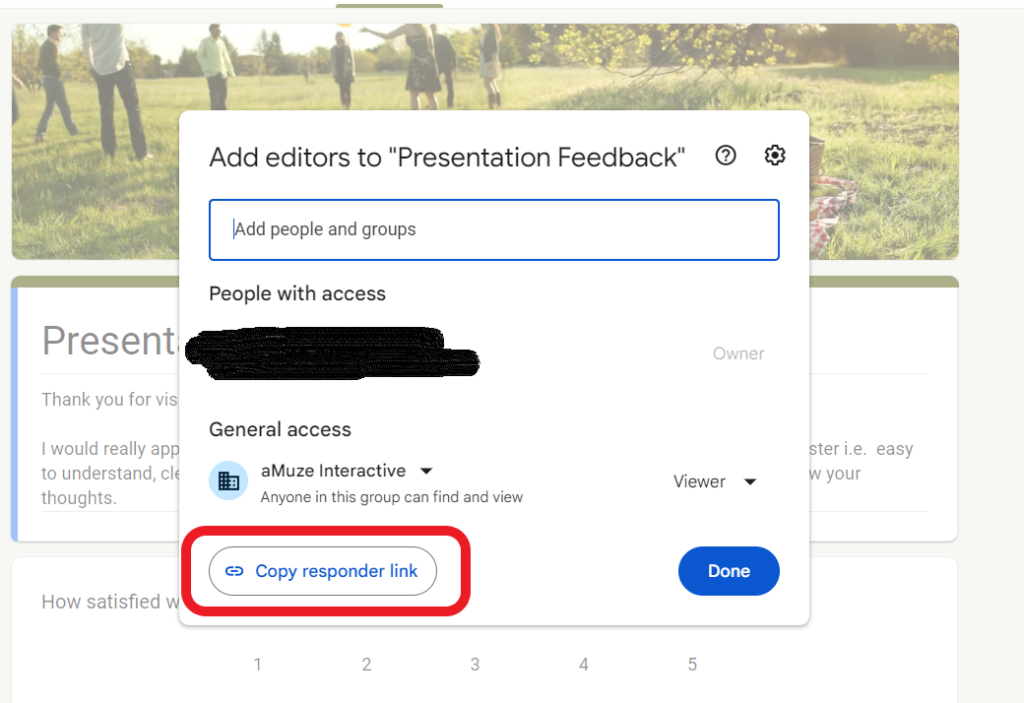
3. Copy the URL . To find the URL in Google Docs click on the 3 vertical dots at the top right of the screen>click on Add Collaborators>Click on ‘Copy Responder Link’ – the link is now copied.
4. Login to the iPoster editor and click on the SURVEY button in the Main Menu. Paste your survey URL into the box and click ‘Submit’.
5. Check that the button appears in Preview Mode. Close the dialogue box and click on the ‘Preview’ button.

6. Click on the ‘Take the survey’ button. Check that it opens in the window and can be filled in as expected.
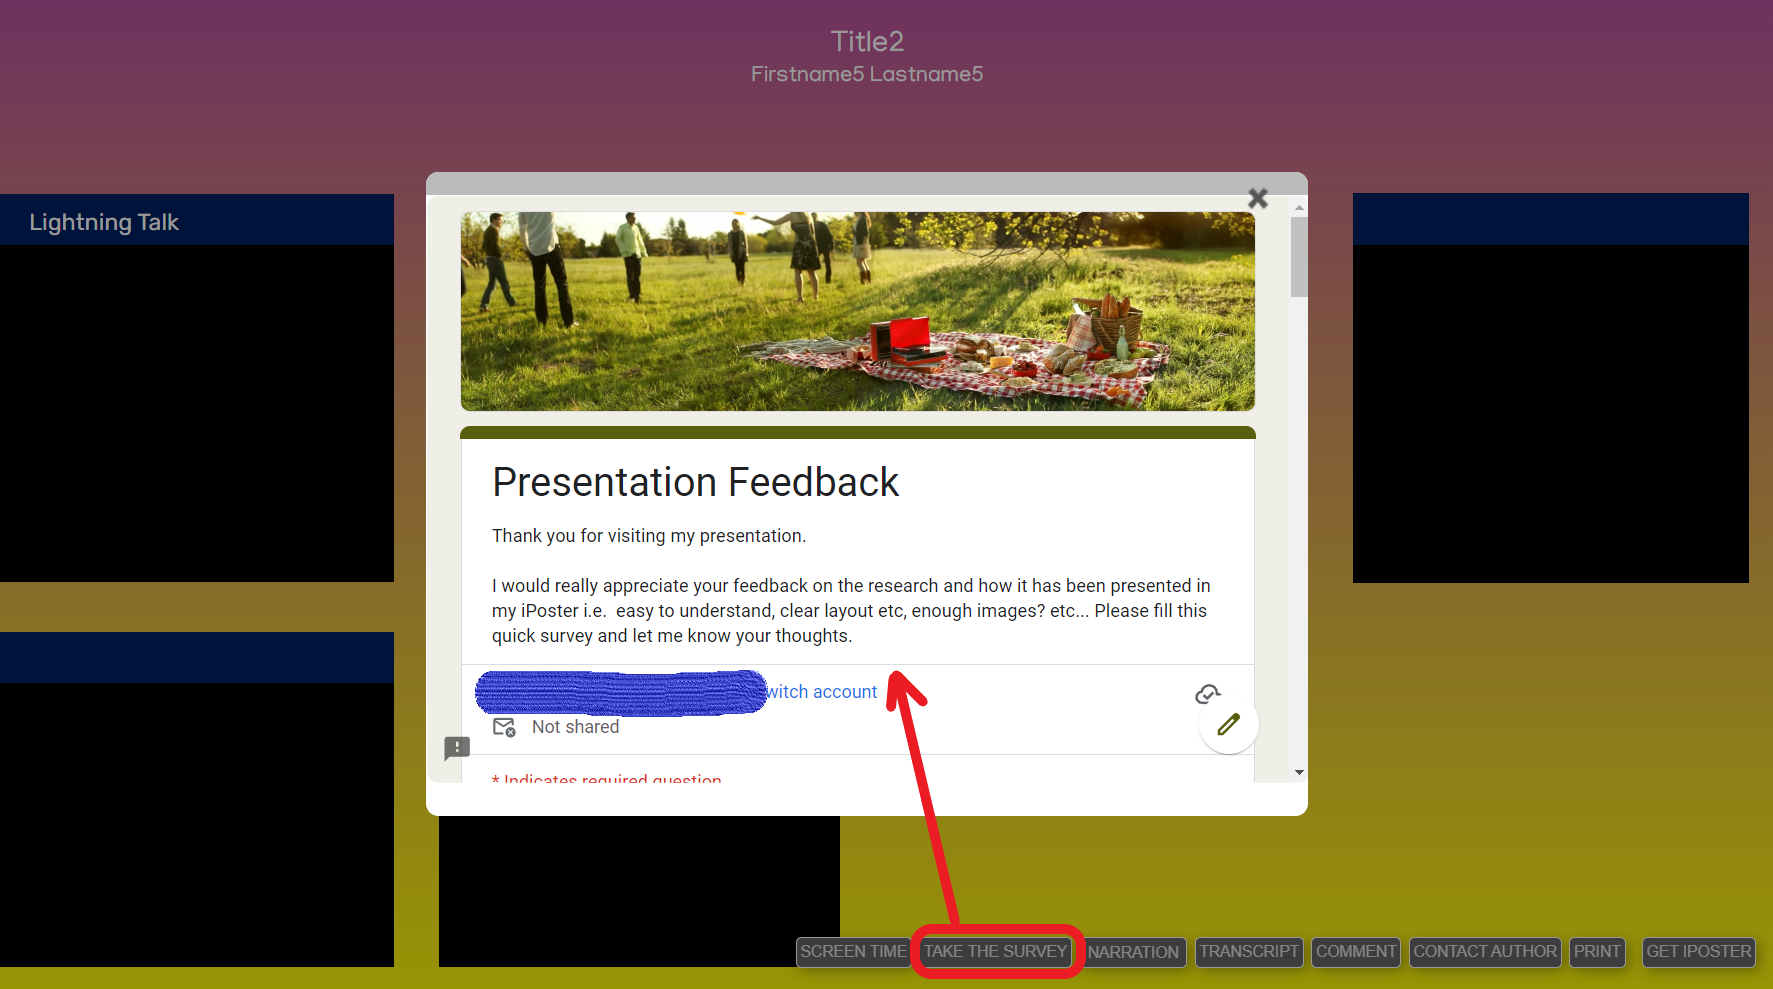
How do I manage public comments?
Public comments are enabled by default on both iPosters and PDF+. This means that participants will be able to click on a button on your poster and leave a comment that other participants can read.
You have the option to turn this feature off, and also respond to, flag and delete comments from your editor. Here’s how.
1. From your Editor page navigate to the Settings button on the main menu. You may need to scroll down in the menu to see this button.
2.In My Settings , navigate to the tab called ‘Comments’. You can see any comments listed below the settings. To reply to a comment, simply click on ‘Reply’.
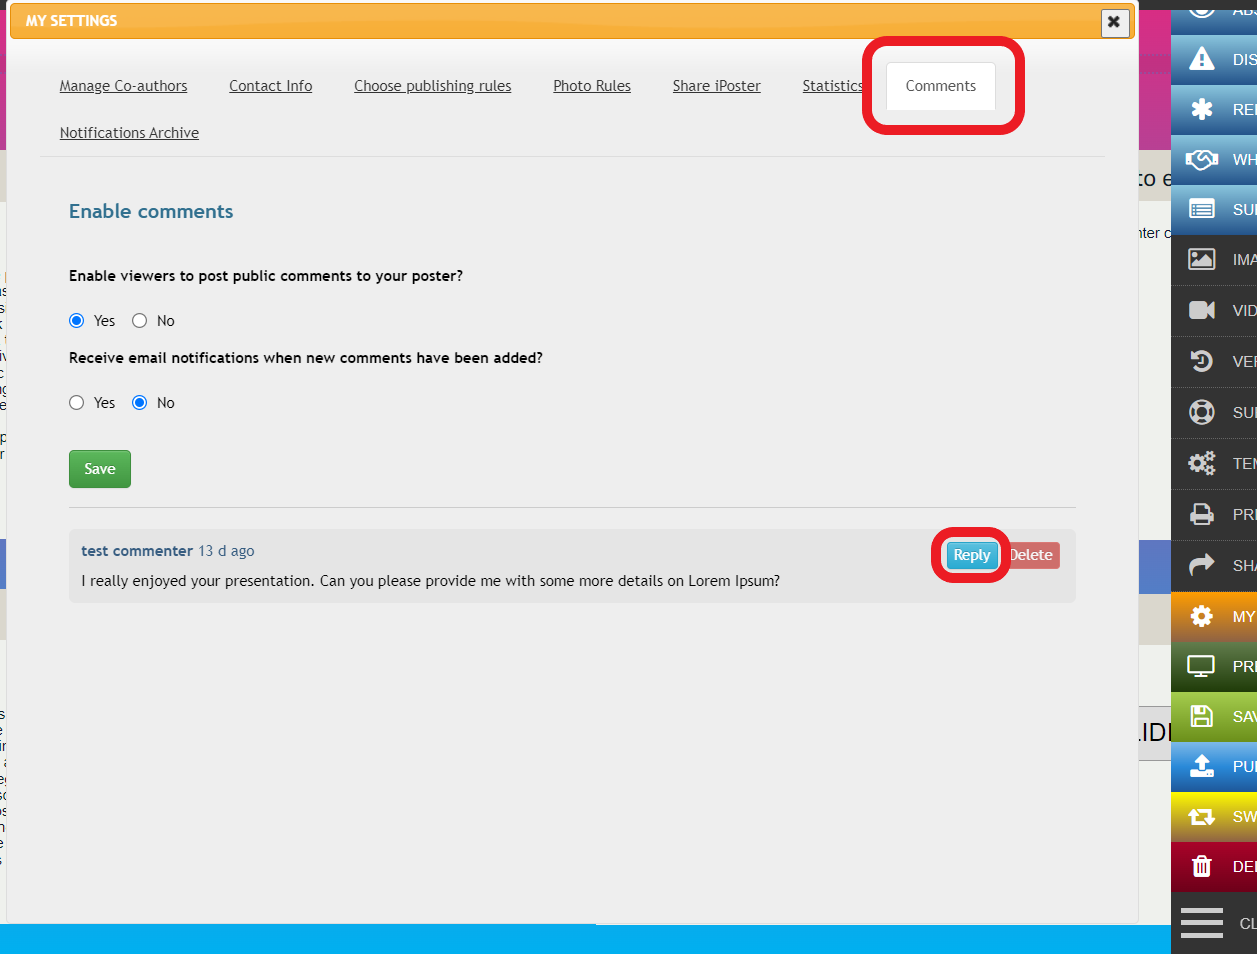
3.You can also update your comment settings on this page. If you would like to receive an email every time you receive a comment please toggle this setting to ‘Yes’.
4. To flag a comment open your poster’s URL in another browser. You’ll be able to interact with it as if you were a visitor rather than an editor. Click on the comment button at the bottom of your poster, then click on ‘Flag’.
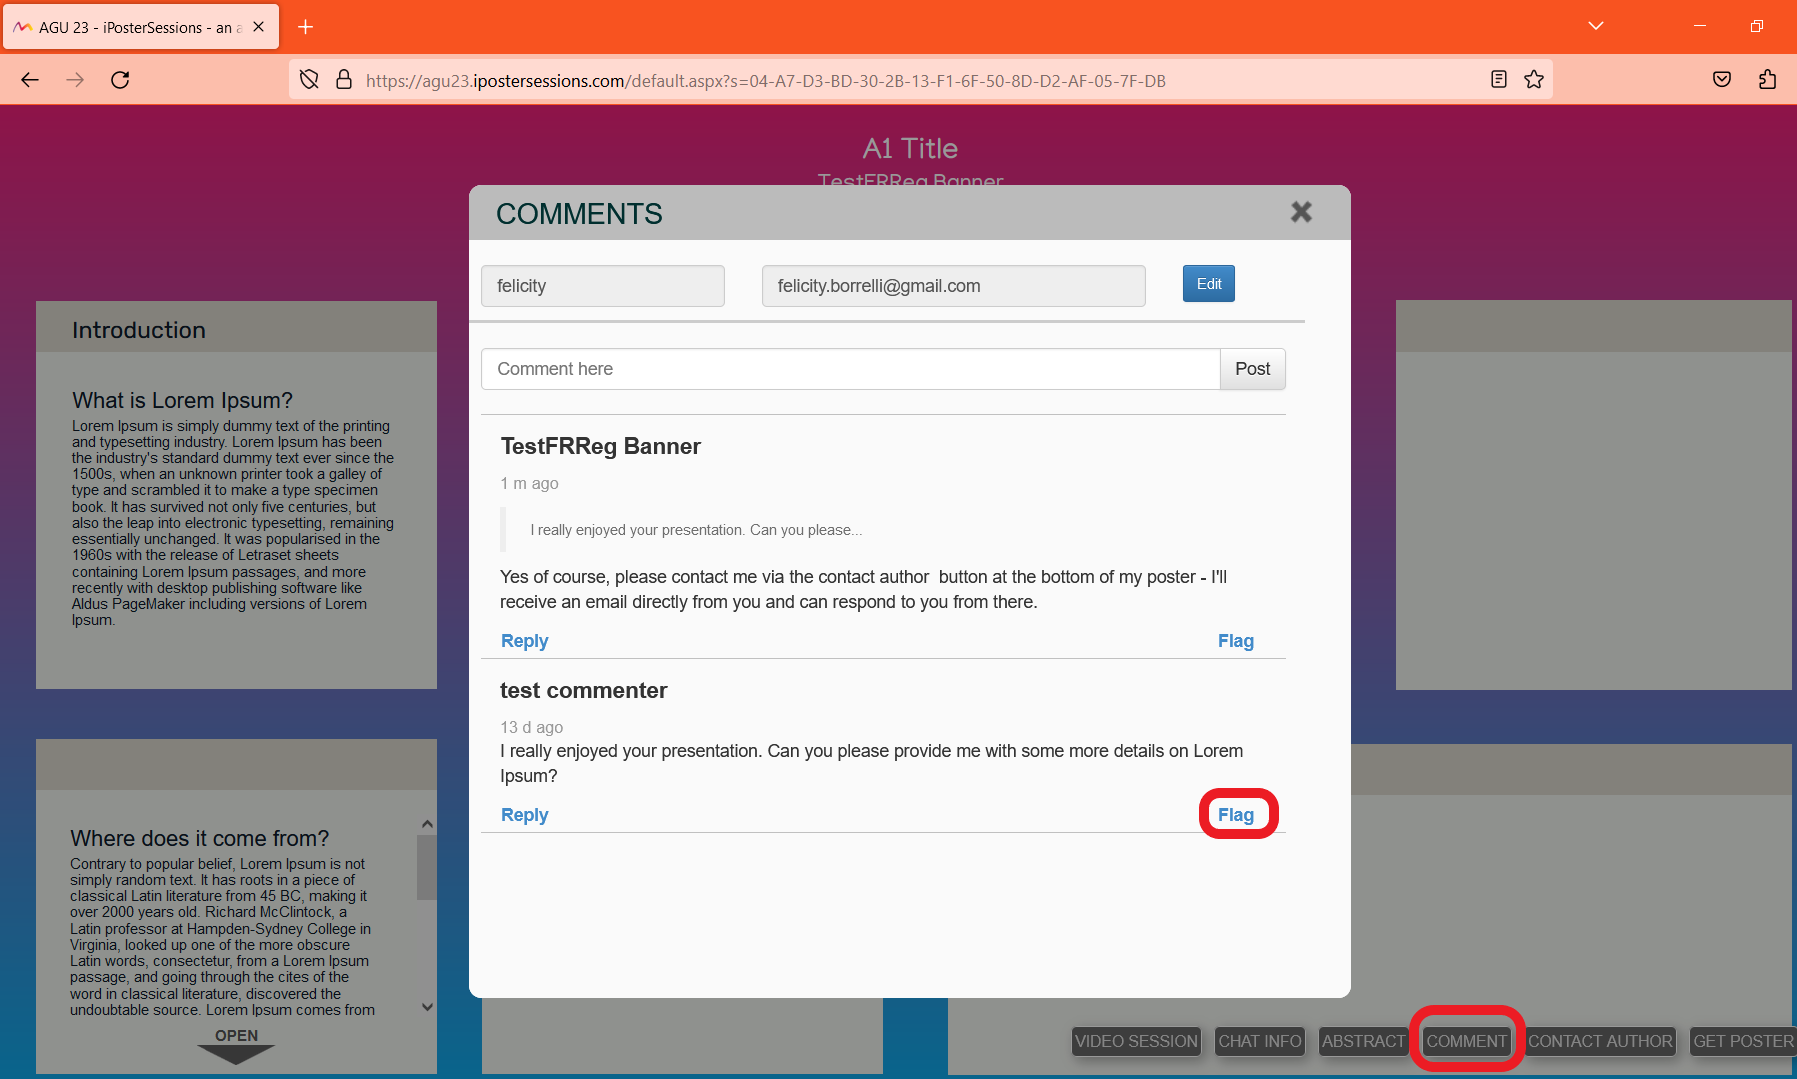
5. Return to your previous browser with the editor screen open on it and refresh the page. Open up the comments section again and the flagged comment should now be highlighted in red and you’ll be able to delete it.
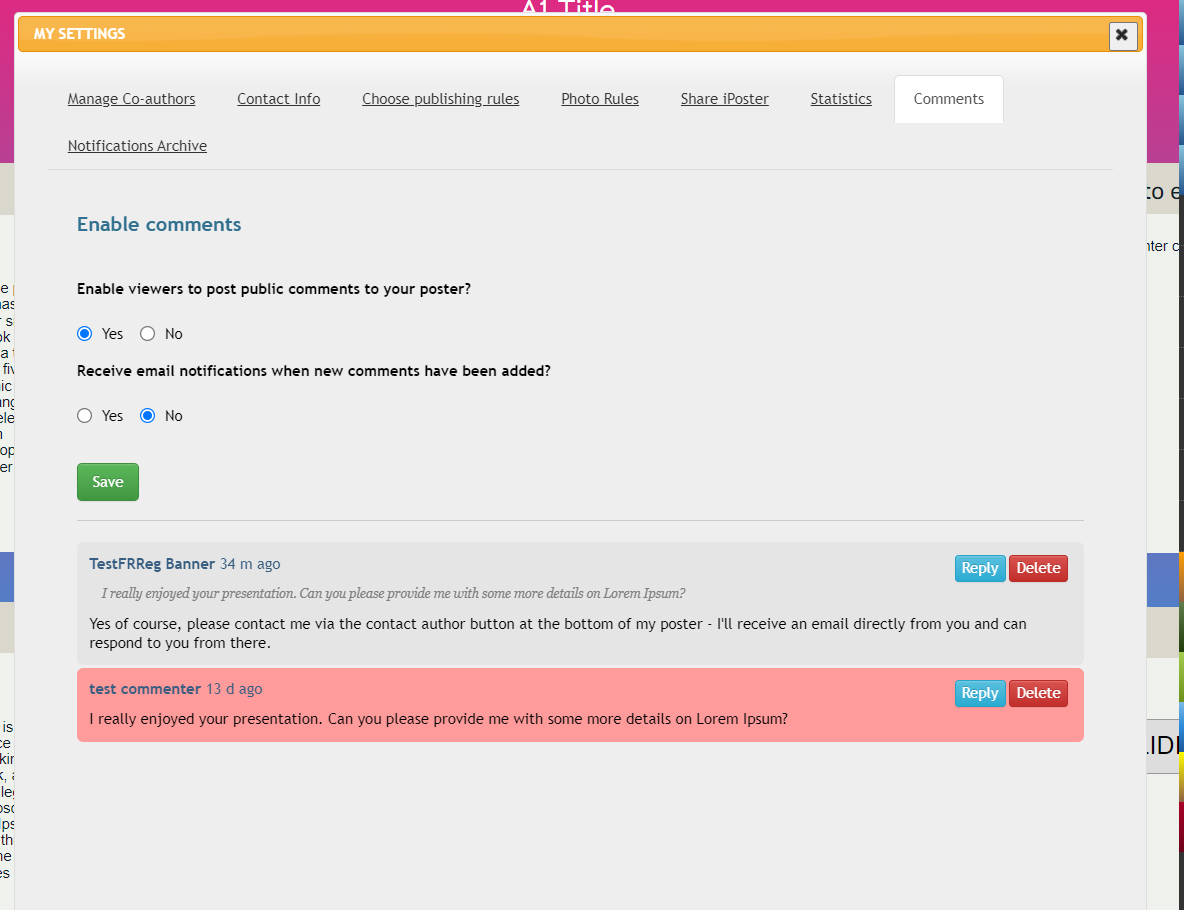
6. Any time a comment is flagged you will receive an email notification of this, so that you can log in and review it.
Saving, sharing and publishing
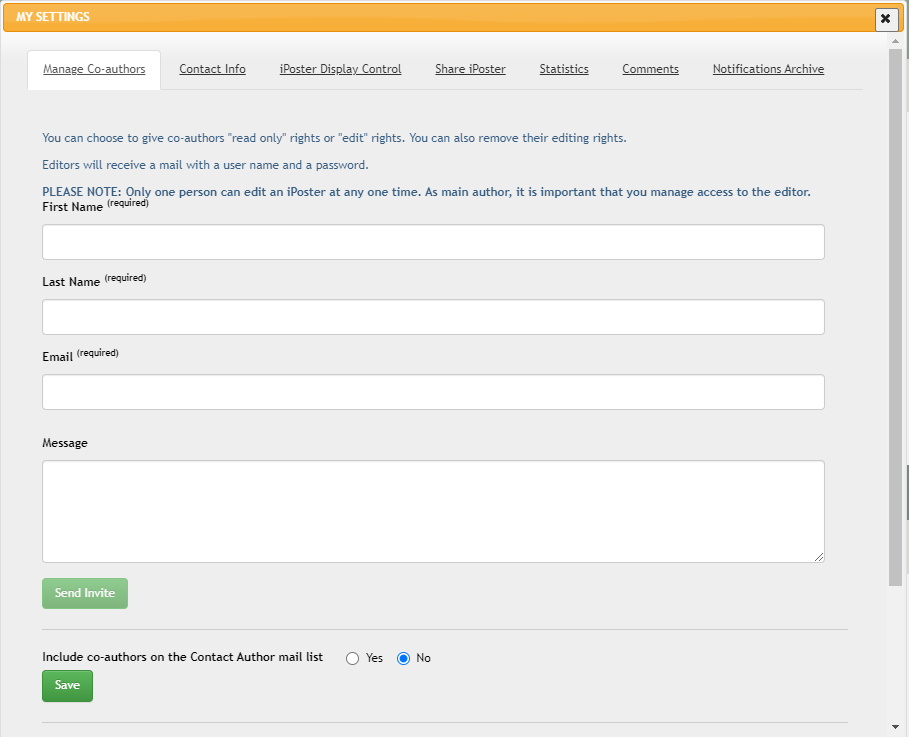
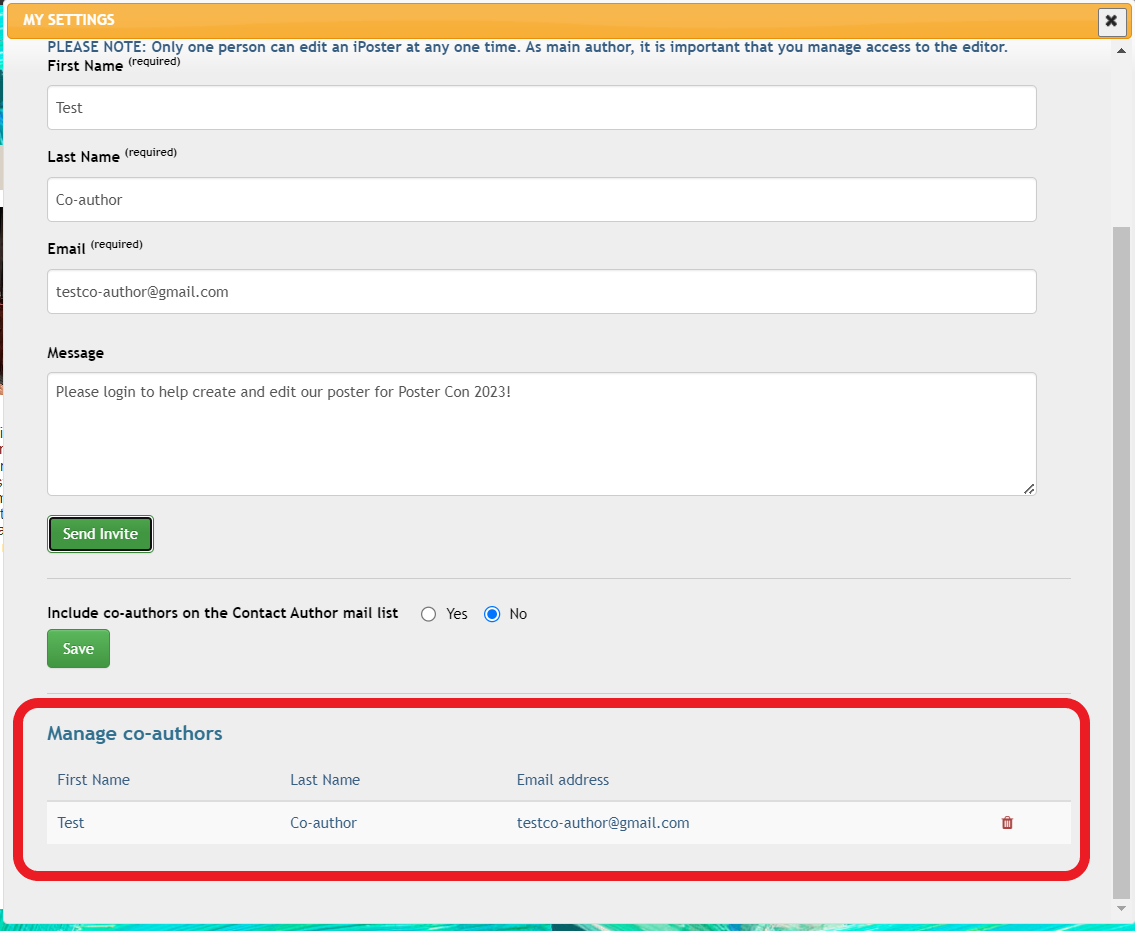
How can I add a co-author to my iPoster?
You can invite one or more co-authors to help create or edit your iPoster. Added co-authors will have most of the same editing accesses that the main author does, however they will not be able to delete a poster or add /delete other co-authors. Once invited they will receive a separate email with their own individual login instructions.
1. Click on My Settings in the main toolbar

2. The first tab displayed when opened is Manage Co-Authors. Fill in your co-author’s details (first name, last name and email) then click the green send invite button. You can add a message if you want to. You may also choose, at any time, to include your co-authors in the Contact Author email list. This will mean that participants can contact authors individually when clicking on the contact author button as they view your poster.
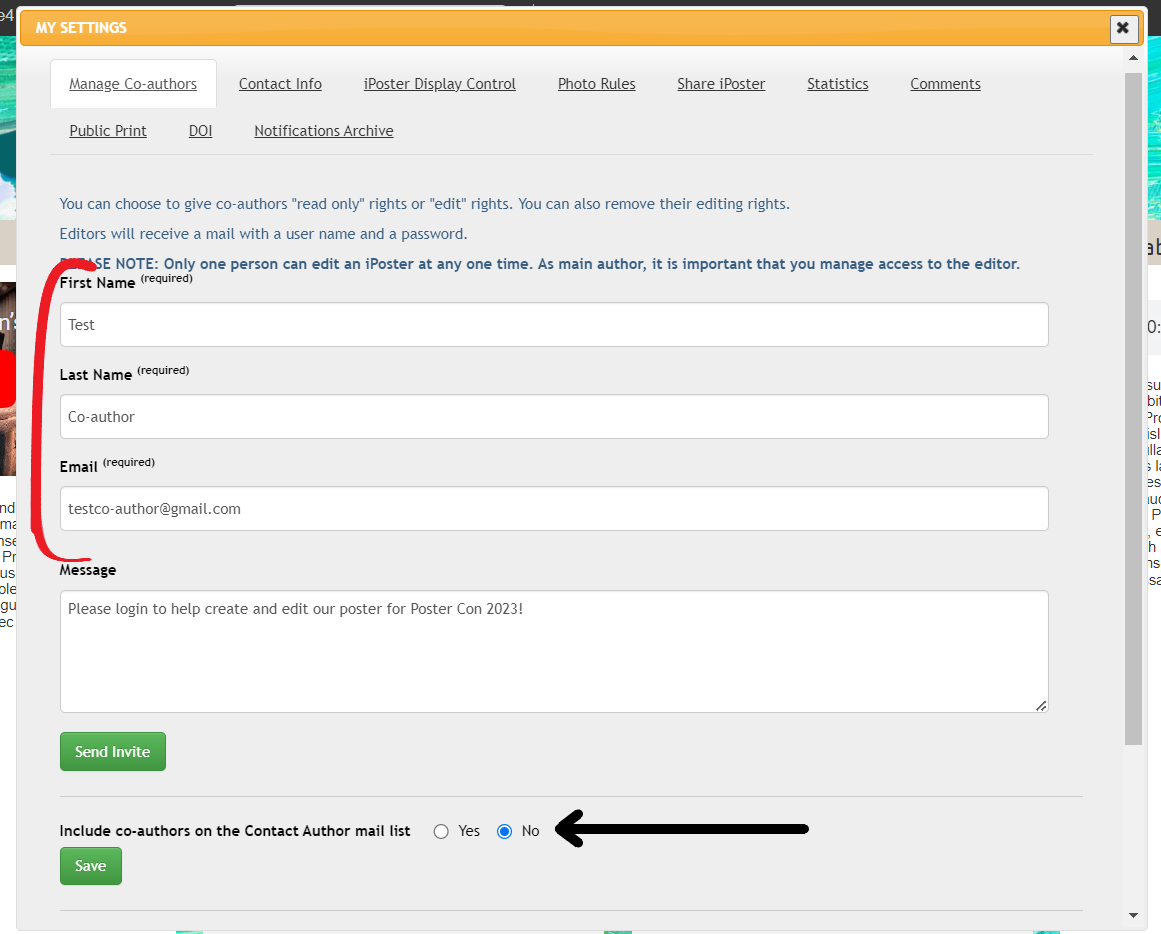
3. Scroll down on this page to see your invited co-authors as shown below. If you need to delete a co-author and remove their access you can click on the trashcan symbol next to their details.
4. Your invited co-author will receive an email with a URL to access the iPoster system and their own unique login. To invite more co-authors repeat the above steps. Below is an example of the email they will receive.
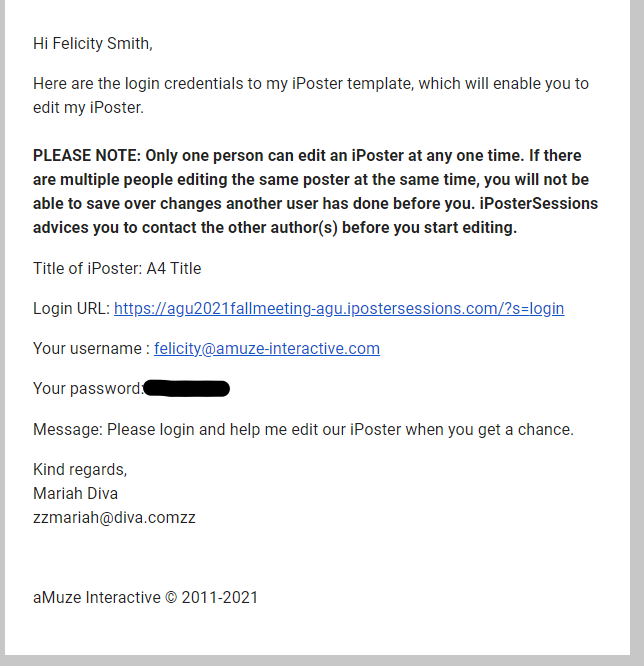
Important: Only one person can edit an iPoster at any one time. If there are multiple people editing the same poster at the same time, you will not be able to save over changes another user has made before you.
How do I share my presentation with read only access?
You can share your iPoster online by clicking on the SHARE POSTER button in the Main Toolbar and copying the URL. Anybody with this URL will be able to view and interact with your poster as a participant at an onsite conference would. You can also use the available social media share buttons.
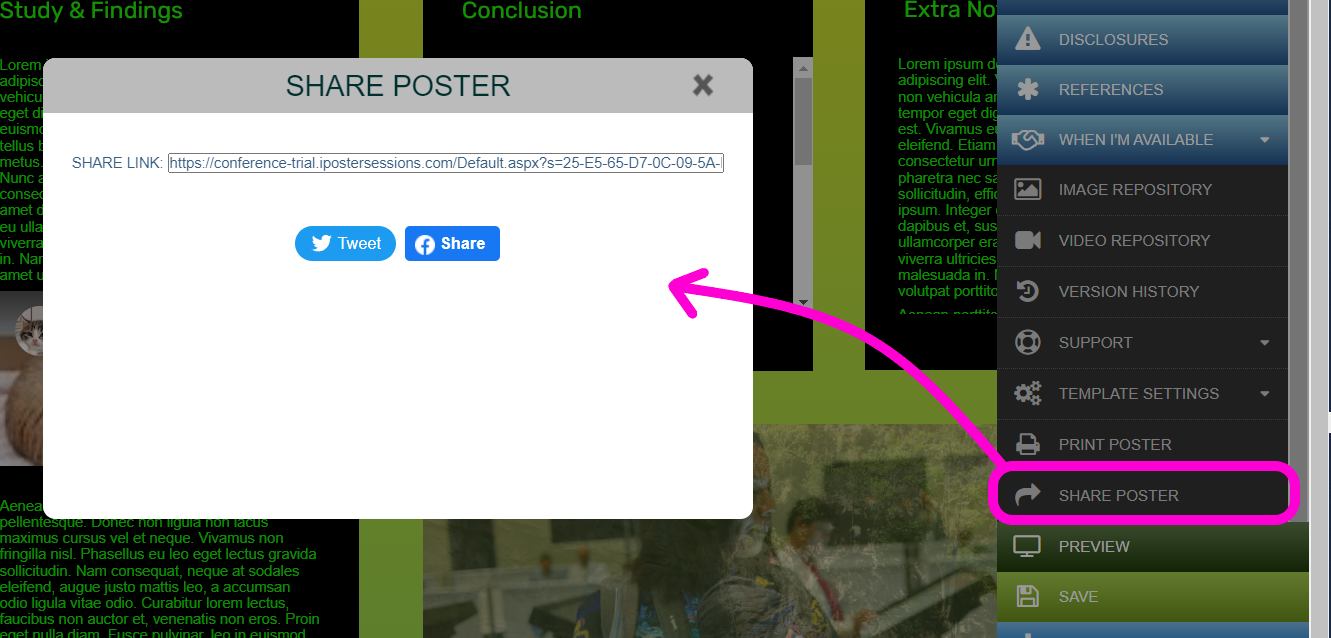
If you are going to share your screen during an online presentation we recommend that you either access your poster from the conference gallery or that you click on the Preview button to put into presentation mode.
If I publish my presentation, can I still work on it?
Yes, you can continue to edit your interactive presentation after publishing. You do not need to unpublish it, just save your changes before logging out.
If you have created a PDF+ poster using the PDF template and you would like to upload a new file, simply click on the ‘Upload new PDF’ button on the main menu. You do not need to un-publish your poster first.
How can I re-instate a previously saved version of my iPoster?
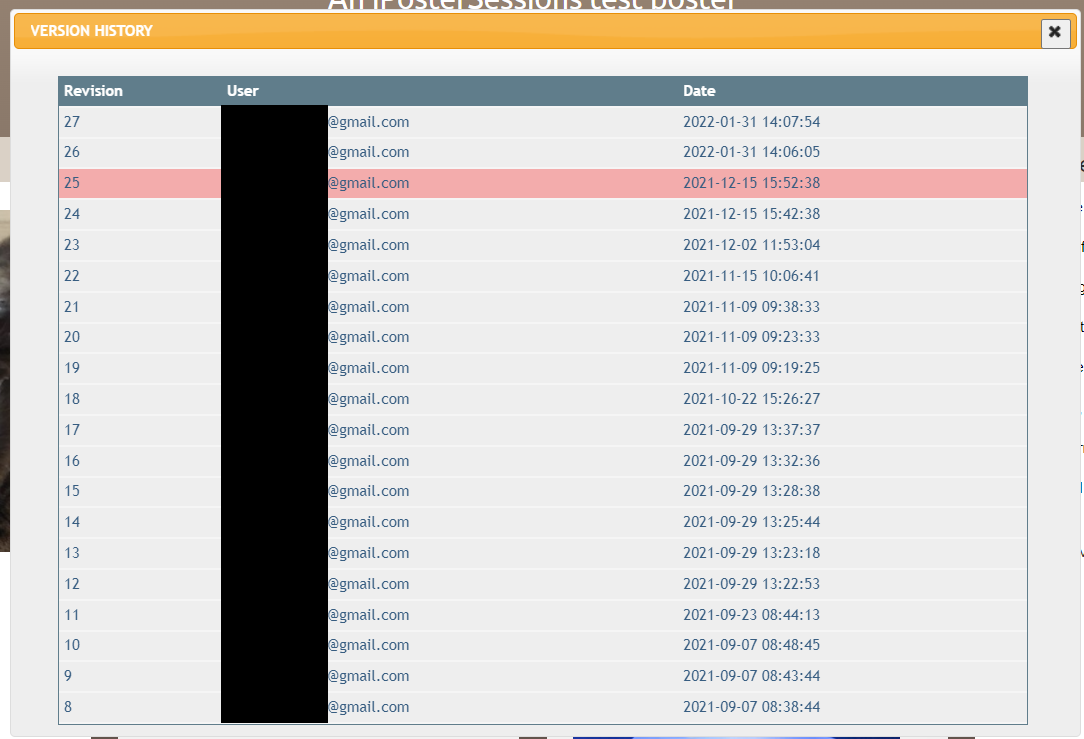
To revert back to a previously saved version of your iPoster click on the VERSION HISTORY button in the Main Menu of your editor screen.

The last 20 versions of your iPoster will be visible (or up to 20 if you have less than that). The current version will be highlighted. e.g. this version is #27 from 31st Jan at 2:07 PM.
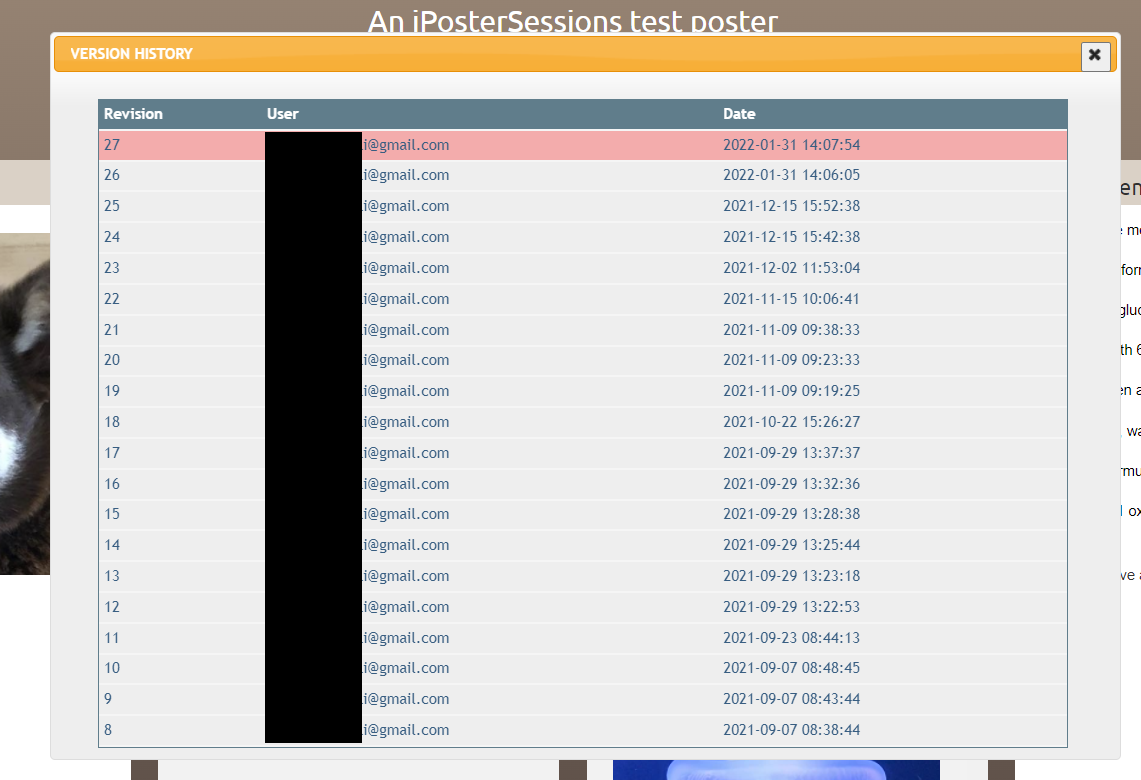
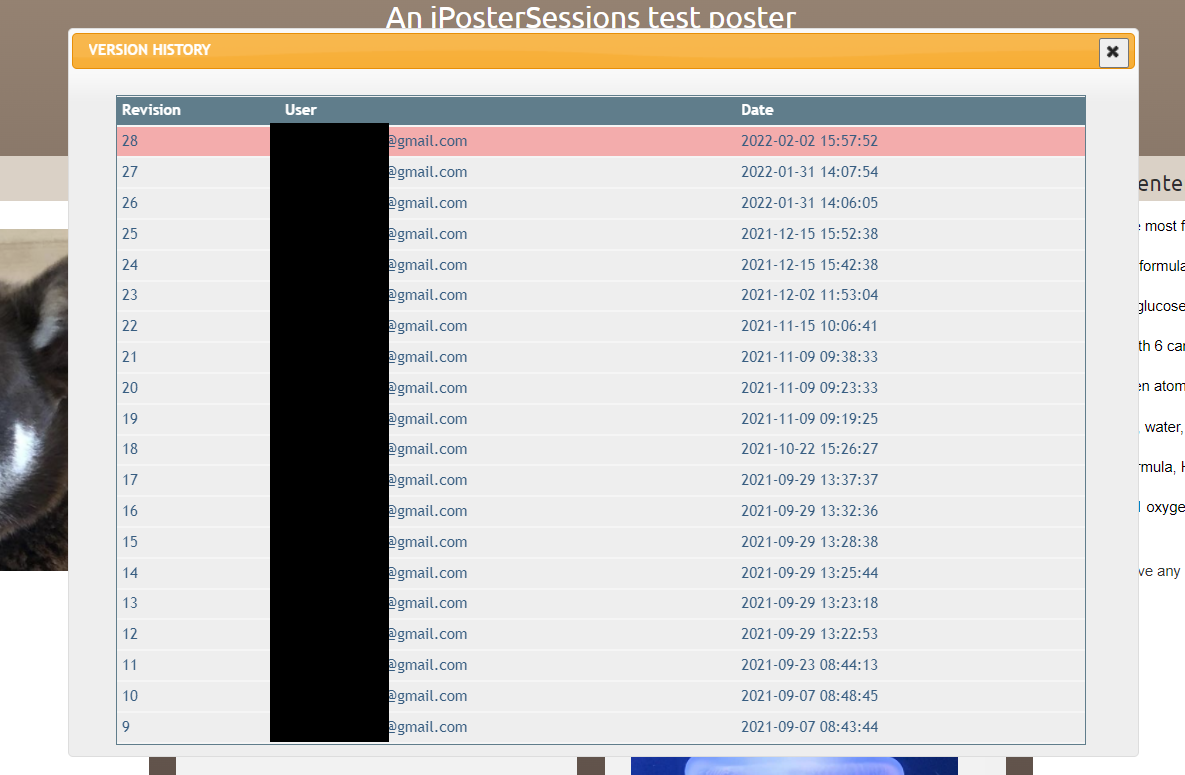
To load a previously saved version simply click on the one that you want. This version of your poster will be loaded.

You can check which version is currently loaded (the version that is currently showing), by clicking on the VERSION HISTORY button again. e.g. The active version is now #25 from 15th December at 3:52 PM.
After making a change and saving the iPoster you will see a new version has been created (in this example #28). It is the active version that you are now in.
How can I open and save a PDF copy of my poster contents?
Windows 10/11 and MacOS
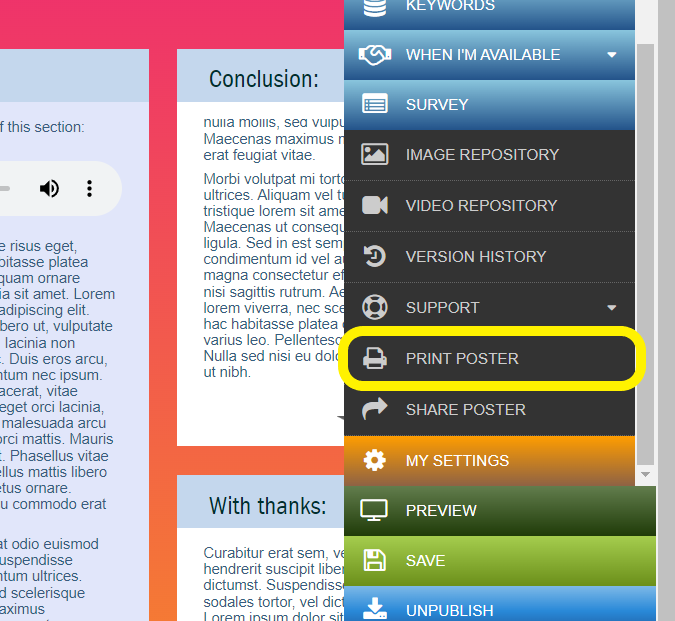
1. Click on the ‘Print Poster’ button on the main menu.
2. Your poster content will open in a new webpage. This webpage can be saved as a PDF and printed as needed. Just right click on the page then click on ‘Print’.
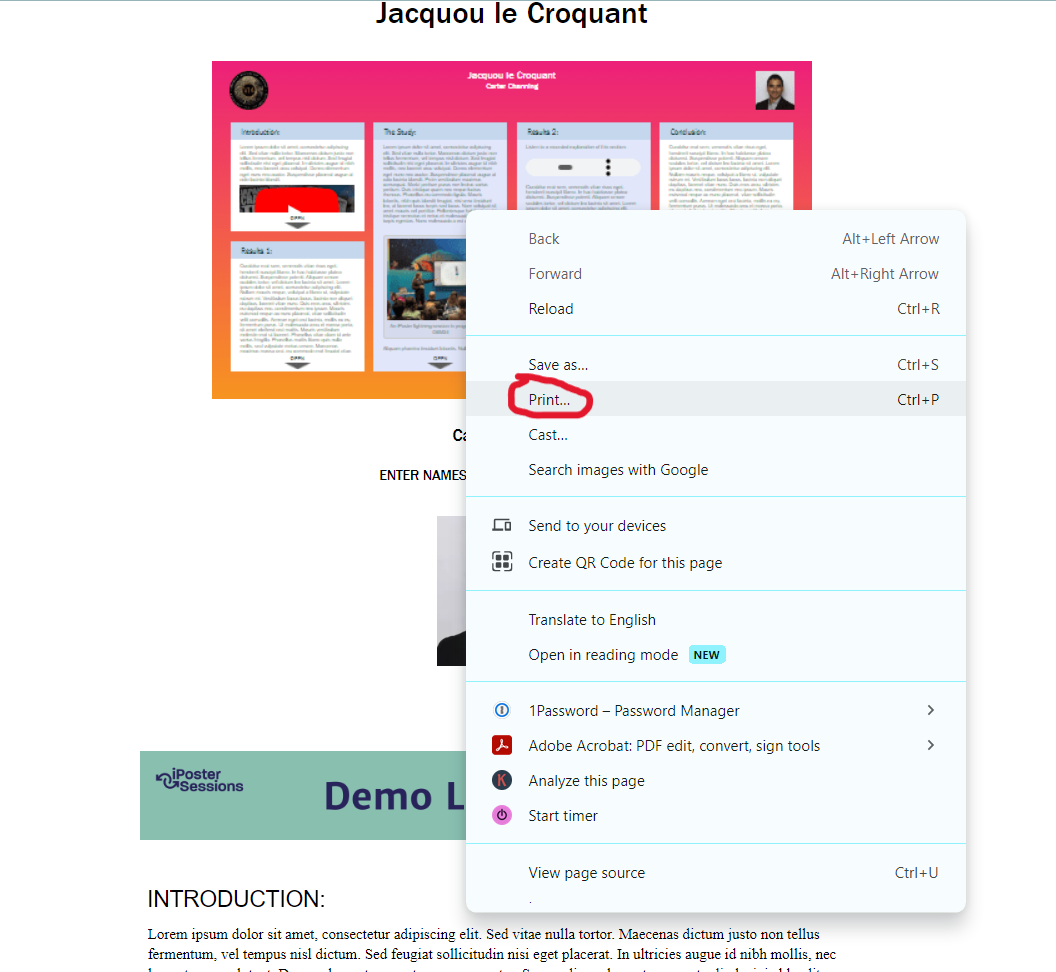
3. Make sure that the Destination is ‘Save as PDF’, then click ‘Save’.

Windows 8
In Windows 8 there’s no built-in print-to-PDF functionality. Follow the below directions if you’re using Windows 8.
- Using Google Chrome: there’s a built-in PDF print. Select Print, under Destination, click Change and select Save to PDF.
- Using Firefox: To save as PDF, install an extension, e.g. Print Edit or PrintPDF
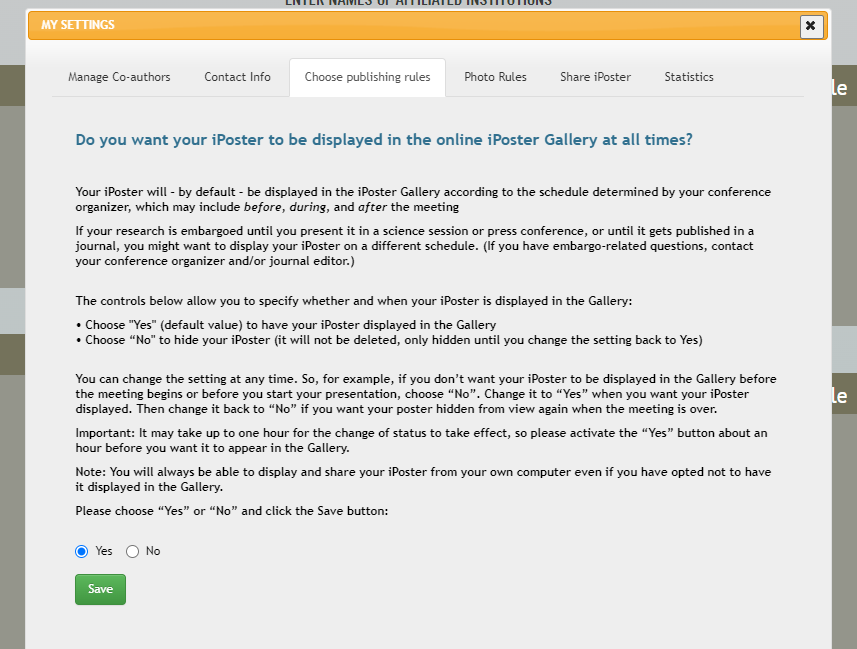
Why can’t I see my iPoster in the conference gallery?
Can’t seeyour iPoster in the conference gallery? It may still be un-published or it has been less than an hour since you clicked the publish button in your editor. The other reason may be that the iPoster display setting is set to ‘No’.
To publish your iPoster click on the blue PUBLISH button in the Main Menu of your editor screen. Wait up to 1 hr.
![]()
If you have already published your iPoster over an hour ago, and it’s still not visible in the gallery, then click on My Settings in the main toolbar and navigate to the tab called Choose Publishing Rules.
Toggle the option to Yes and click save. Wait for up to an hour, then check the gallery again.
Presenting virtually
How do I schedule and start a chat session?
Schedule a chat session to chat with event participants at your convenience. You can schedule any number of sessions via the iPoster editor. The chat screen can be activated up to 15 mins before the scheduled time. You must log in to your iPoster editor screen and navigate to the scheduled chat in order to activate it. This document is broken into the following two sections:
- Scheduling a chat session
- Activating a chat session
Scheduling a session:
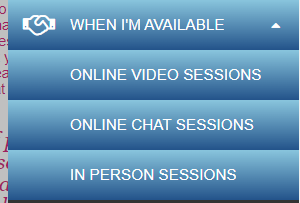
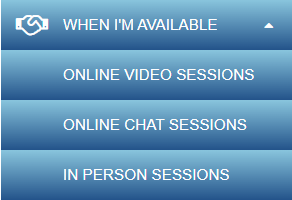
1. Click on the ‘When I’m Available’/’Meeting Times’ button on the control panel in the editor screen. Three options will open below. Click on the ‘Online Chat Sessions’ button.
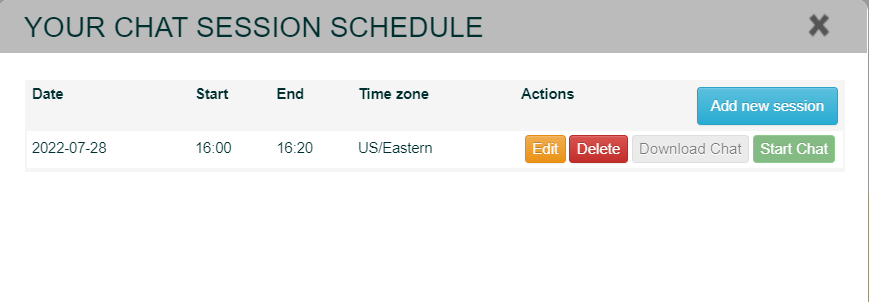
A Chat Session Schedule screen will open. Click on the green ‘Add New Session’ button. This will open up ‘Chat Settings’.
2. Set the correct Time zone. Upon opening this window for the first time it will be set to your current time zone by default. You can use the drop down to set for another Time Zone (e.g. the Time Zone that the event is using)

3.Set the chat times. Please note these times use a 24 hour clock setting. E.g. If your chat needs to be scheduled for 4:00 PM to 4:20 PM you will need to set the times as 16:00 to 16:20.
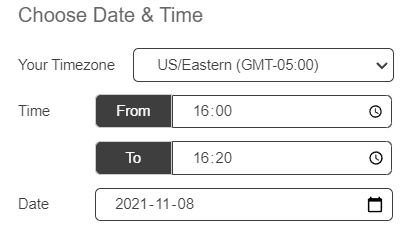
Important: If you’re setting your chat time over the midnight hour i.e. from 11:30 PM on 12th Dec to 12:30 AM on the 13th Dec ensure that your date is set to the start time date (12th Dec).
Event attendees will see the date and times according to their own Time Zones.
You can reschedule, delete or add new chat times at any point. The chat time information will be displayed on the Gallery Screen so that meeting attendees and visitors will know when to join.
4. Personalize your Chat Information message.
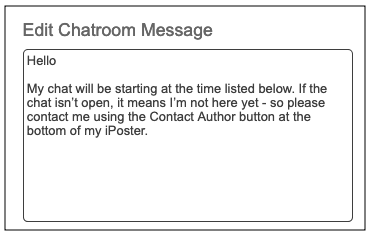
The Edit Message field contains a default message which will be displayed when visitors click on the CHAT INFO button on your iPoster. You can edit your message here. Be sure to save! You can always go back and change your message.
5. Save your settings before closing the Chat Settings window.

6. To schedule additional chat sessions repeat steps 1-4. You can schedule as many chat sessions as required and edit or delete them as needed.
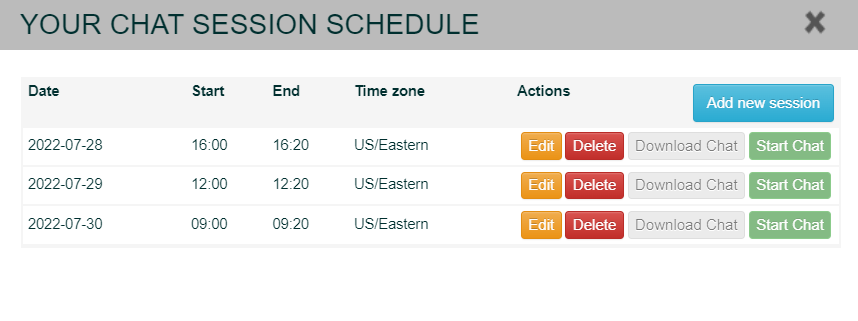
If you’ve set up and saved your chat times and you’re ready to start your chat with visitors, follow the below steps.
Activating a session
*IMPORTANT. The Chat will not start automatically. You have to start it by clicking on the START CHAT button.
1. Click on the ‘Start Chat’ button of the chat that you want to activate.

Please note: you can start your chat up to 15 mins before the scheduled start time. You can not activate a chat before this or if the scheduled times are in the past. If this is the case then the chat will not be activated.
When you start your chat… visitors will see a JOIN CHAT button on your poster. Once they’ve entered their name and email address, they can enter the chat.
IMPORTANT INFORMATION
You will not be able to view other iPosters if you open the Gallery in the same browser that you are using to run your Chat. Please do one of the following:
- Use “Incognito” or “Private” mode to open the Gallery to view other iPosters
- Open the Gallery in a different browser than the one you have used to log in to your iPoster.
How do I schedule a video session?
When presenting virtually you have the option to run your own iPoster video presentation and discussion, using any of the common web-based meeting services like Zoom, WebEx, Microsoft Teams, and others. Many of them have free plans with certain limits to the length of the meeting (often 45-60min) and a maximum number of attendees (usually up to 100). Check them out to find one that fits your needs.
To schedule a video session:
1. Set up a meeting on the meeting platform of your choice, following their specific instructions. Note the URL and password, which you will need to set up the Video Session in your template. Acquaint yourself with the presentation tools that are available.
2. Publish your iPoster. You can still continue to edit it and make any changes and additions you want.
3. Click on the button called ‘When I’m Available’/’Meeting Times’ on the main menu in the editor screen. Three options will open below. Click on the ‘Online Video Sessions’ button.
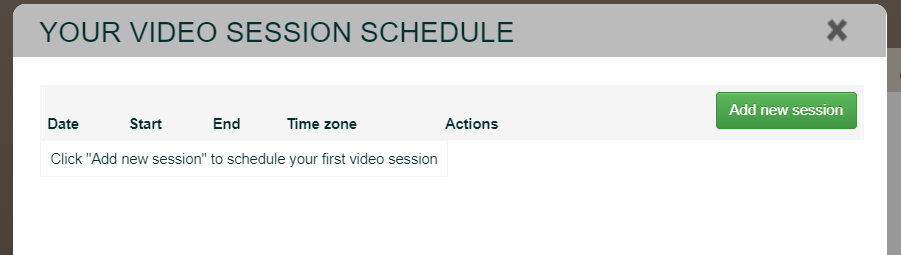
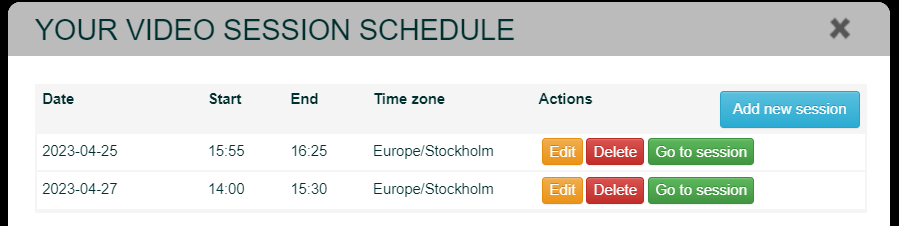
A Video Session Schedule screen will open. Click on the green ‘Add New Session’ button. This will open up ‘Video Session Settings’.
4.Set the correct Time zone. Upon opening this window for the first time it will be set to your current time zone by default. You can use the drop down to set for another Time Zone (e.g. the Time Zone that the event is using)
5.Set the video session times. Please note these times use a 24 hour clock setting. E.g. If your session needs to be scheduled for 4:00 PM to 4:20 PM you will need to set the times as 16:00 to 16:20.
Important: If you’re setting your video session time over the midnight hour, i.e. from 11:30 PM on 12th Dec to 12:30 AM on the 13th Dec, ensure that your date is set to the start time date (12th Dec).
Event attendees will see the date and times according to their own Time Zones.
6. Fill in the meeting URL and password.
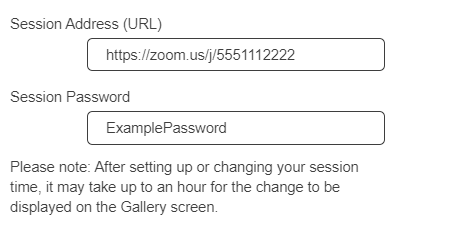
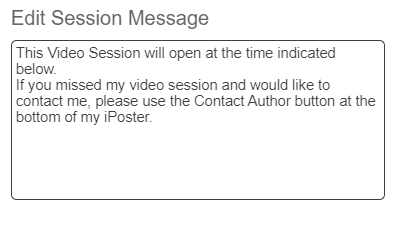
7. Personalize your video session information message. You’ll see that there is a default text in the Session Message box. You can edit this and add a personal message or you can leave it as is.
8. Save your settings before closing the window.
9. To schedule additional video sessions repeat the above steps. You can schedule as many video sessions as required and edit or delete them as needed.

10. Check the video session times. Click on the PREVIEW button on your Main Toolbar. You should see the VIDEO SESSION button at the bottom of your iPoster. Click on the button to see how it will display for visitors.

You can reschedule, delete or add new video sessions at any point. The video session times will be displayed on the Gallery Screen so that meeting attendees and visitors will know when to join.
When you’re ready start your video session:
Give yourself time to prepare before the session starts. We suggest you open the Meeting at least ten or so minutes before the official time so that you can get your screen ready to share and your iPoster in full screen view. Test your microphone and speakers to make sure that you can hear and be heard. Use a headset if possible which will help keep out any background noise.
1.Open the Video Session Schedule. Click on the Go to session button of the session that you want to start. The meeting link will open in a new window.
On site presentations
How can I book an informal session for my on-site poster?
If you are presenting an iPoster in-person at a conference you may have the option to book in a casual poster session at one of the available screens during any free browsing times. A button will be shown on your poster with a time that you are planning to stand by your poster. Please note that this feature won’t be available for all conferences.
1. Click on the ‘When I’m Available’ button on the main menu. Then select ‘In Person Sessions’
2. An ‘In-Person Session Schedule’ screen will open. Click on the green ‘Add New Session’ button.
3. Set the meeting times and personalize your message for the scheduled time.
4. Save your settings before closing the window.
5. To schedule additional meeting time repeat steps 1-4. You can schedule as many times as required and edit or delete them as needed.
6. Click on the Preview button on the main menu to check that the
How do I enable/disable public comments on my poster?
Public comments are enabled by default on both iPosters and PDF+. This means that participants will be able to click on a button on your poster and leave a comment that other participants can read.
You have the option to turn this feature off, and also respond to, flag and delete comments from your editor. Here’s how.
1. From your Editor page navigate to the Settings button on the main menu. You may need to scroll down in the menu to see this button.
2.In My Settings , navigate to the tab called ‘Comments’. You can see any comments listed below the settings. To reply to a comment, simply click on ‘Reply’.
3.You can also update your comment settings on this page. If you would like to receive an email every time you receive a comment please toggle this setting to ‘Yes’.
4. To flag a comment open your poster’s URL in another browser. You’ll be able to interact with it as if you were a visitor rather than an editor. Click on the comment button at the bottom of your poster, then click on ‘Flag’.
4. Return to your previous browser with the editor screen open on it and refresh the page. Open up the comments section again and the flagged comment should now be highlighted in red and you’ll be able to delete it.
5. Any time a comment is flagged you will receive an email notification of this, so that you can log in and review it.
But if none of our author resources help, contact our online support desk and we’ll get back to you as soon as possible.