This is the iPoster Editor Quick Guide. Everything you need to know in order for you to create an iPoster that is just as stimulating as your content! Please keep in mind that this is a general guide used by iPoster authors across many different conferences. There may be some features that your conference organizer has decided not to use and so they may not be available to you in your editor. Don’t forget to also check out our video tutorials for an overview of the system and multimedia tools.
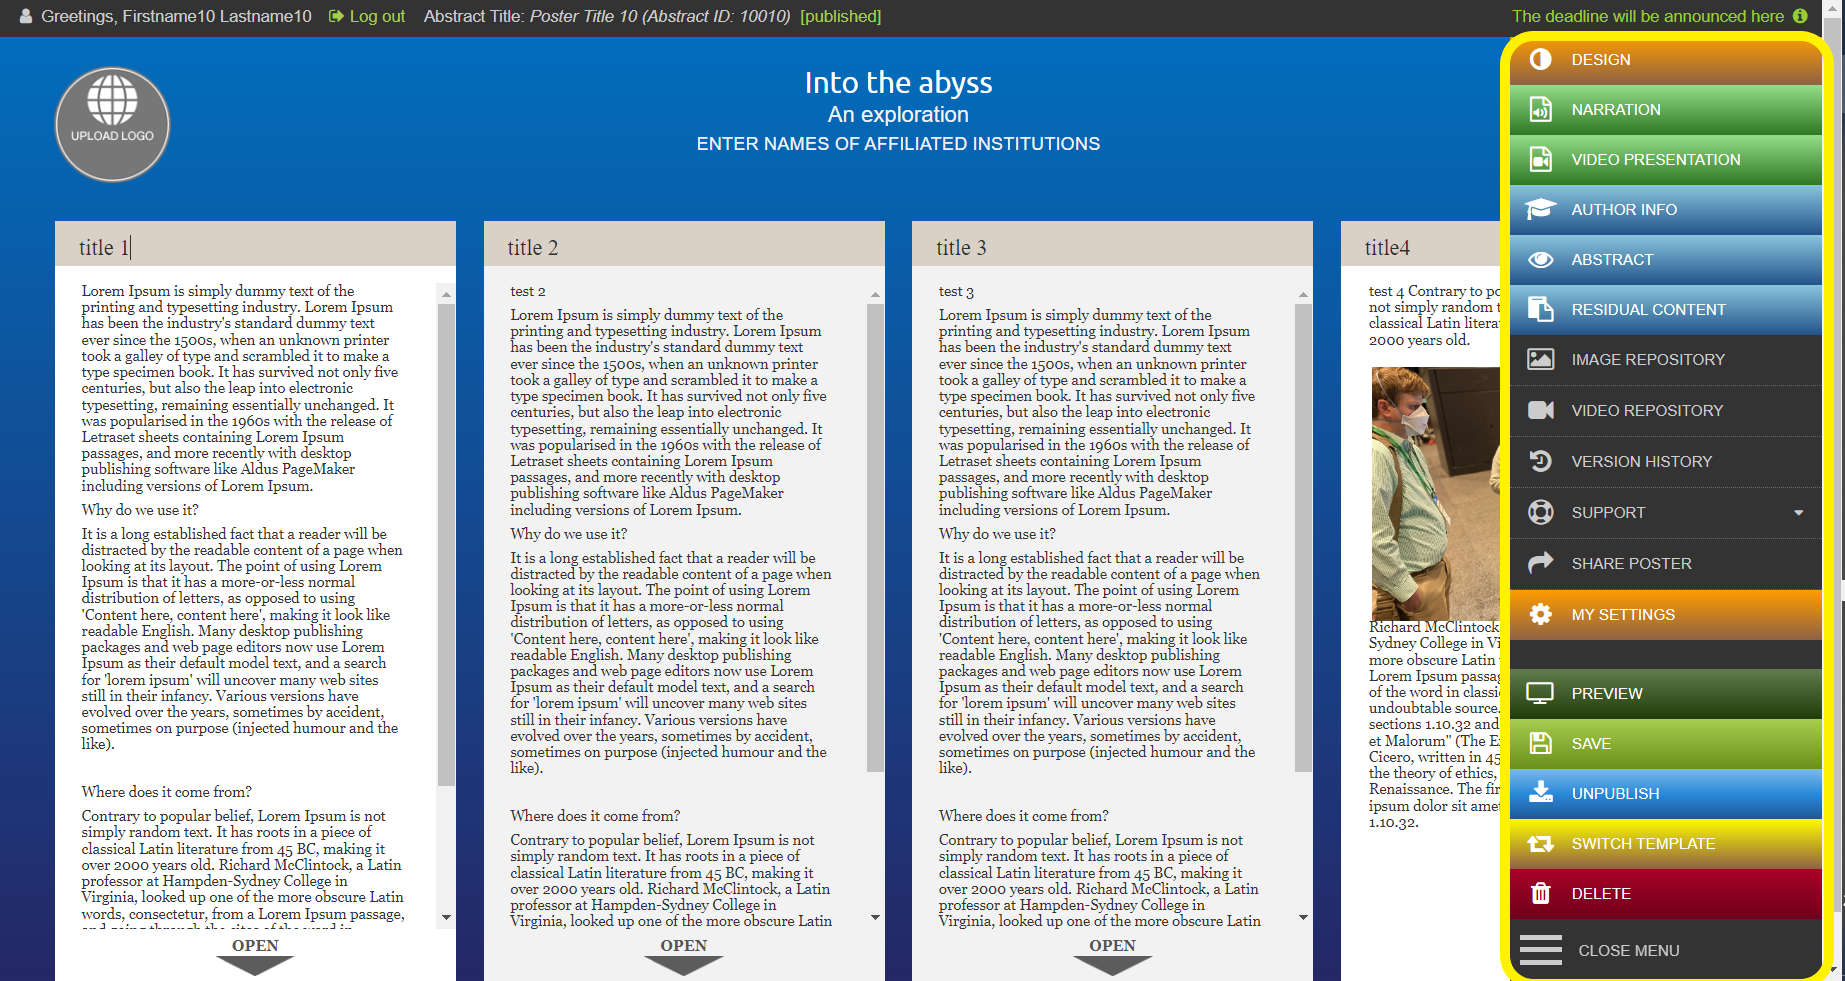
Main Toolbar
This is where you can make updates to the overall look of your iPoster, like background color and title fonts. Audio narration, references, abstract and author information can be added via this menu. You can also schedule any video, chat or live poster hall sessions from here, as well as publishing, saving and previewing your iPoster. And, you can access your iPoster Settings to add co-authors or manage your contact info, publish rules and view statistics. We’ll go through some of the features in more detail below:
DESIGN YOUR iPoster:
Use the DESIGN-button on the Main Toolbar to customize the look of your iPoster. You can add colors, color gradients, and images to your background; change the colors of your content boxes; and adjust the fonts of your titles and texts.
NARRATION: Add a Narration to your iPoster that allows visitors to follow your explanation of your research. They can open Content boxes and scroll through your presentation as you speak.
VIDEO PRESENTATION: Add a Video Presentation to your iPoster so that virtual participants can view your presentation anytime and anywhere.
PRINT: Click on the PRINT Button to create a PDF of your iPoster . You can then print out the PDF. Please note that the PDF will include all of your texts and images from each of your Content Boxes, so it will be a multi-page document – the number of pages will depend upon how much content you have created.
SURVEY: Use this feature to add a survey URL to your iPoster using any web-based survey platform. A survey button will appear in your poster and participants can click it to take the survey.
VERSION HISTORY: Shows 30 previous save points. If you need to return to a previous version of your poster you can do so using this feature.
MY SETTINGS: Here you can change your contact email address, invite co-authors, modify when your presentation is displayed on the Gallery Screen, manage public comments, view statistics, and more.
PREVIEW: You can see what your iPoster will look like at the conference, and test the multi-media functionality by clicking on the PREVIEW button on the Main Toolbar. It’s also a good tool to use for rehearsing your presentation.
SAVE: don’t forget to Save your Work!
PUBLISH/UNPUBLISH: click the PUBLISH Button when you’re ready for your work to be reviewed for technical quality. You can continue to work on your iPoster even when it’s been published. Once your iPoster is published this button will turn into the UNPUBLISH button. You can click this to unpublish your iPoster from the gallery after publishing.
SWITCH TEMPLATE: If you want to switch to another iPoster template use this button. If you switch to a template with fewer content boxes than the current one, your excess data will be available in RESIDUAL CONTENT, simply copy and paste it into your poster from here.
DELETE: This will delete your poster completely and return you to the Choose Template page. Most likely the only time you will need to use this button is if you decide to switch from an iPoster template to a PDF template or vice versa. If you delete your poster your uploaded media will remain in the respective repositories, but your texts will be lost. Please ensure you have a copy of them before hand.
Title and subtitle fields
If you have a very long abstract title, try to make the title of your iPoster as short as possible so that it doesn’t take up too much room. Your full abstract title will be displayed automatically on the search screen at the conference.
Likewise, keep your list of co-author names and affiliations (institutions) brief. If you have a long list, use the Author Info Button on the Main Toolbar. There’s lots of space there. Visitors will be able to read this information by clicking on the Author Info Button on your iPoster.
If you want to add superscripts or subscripts to your title fields, we recommend the following online generator. Or you can copy them from this FAQ.
Adding Content
TEXTS: You can paste text directly into you iPoster. If you’re copying texts directly from highly formatted files, like a PDF, you will need to use the right click function on the mouse rather than the keyboard short cut controls. An external box will pop up and you can paste your text in here. Doing so will strip any formatting from the text and allow it to be pasted into a content box. If your data is already in plain text format then you can copy/paste using the keyboard controls directly into the poster. For more details on TEXTS, scroll down to the Content Box Toolbar guide.
IMAGES: Always use the INSERT IMAGE button in the editor to add images. iPosters will only accept images in JPG, PNG, or GIF file formats.
TABLES & CHARTS: Please export your diagram, chart or table to an image file (jpg or png), or take a screenshot of it, and then import the image using the INSERT IMAGE button. This will look much better on your iPoster and allow visitors to expand the image for easier reading.
MP4 VIDEO: Use the INSERT HTML5 VIDEO button in the content box editor to add MP4 video files. Either drag and drop your video file into the marked box or click Choose File to upload from your files.
VIDEO LINK: Use the INSERT VIDEO LINK button in the content box editor to embed a video from either YouTube or Vimeo. Paste the video’s URL into the pop-up box.
SOUND FILES: Use the INSERT AUDIO button in the editor to add sound files. Create your sound file in MP3 format – any other formats will need to be converted. (Click here for more information on sound files)
AUTHOR PHOTOS & INSTITUTION LOGOS: In the upper right and left corners of your iPoster you can insert images of yourself and your co-authors and your institutions’ logos. You can add up to 10 images in each field.
Content Box Toolbar
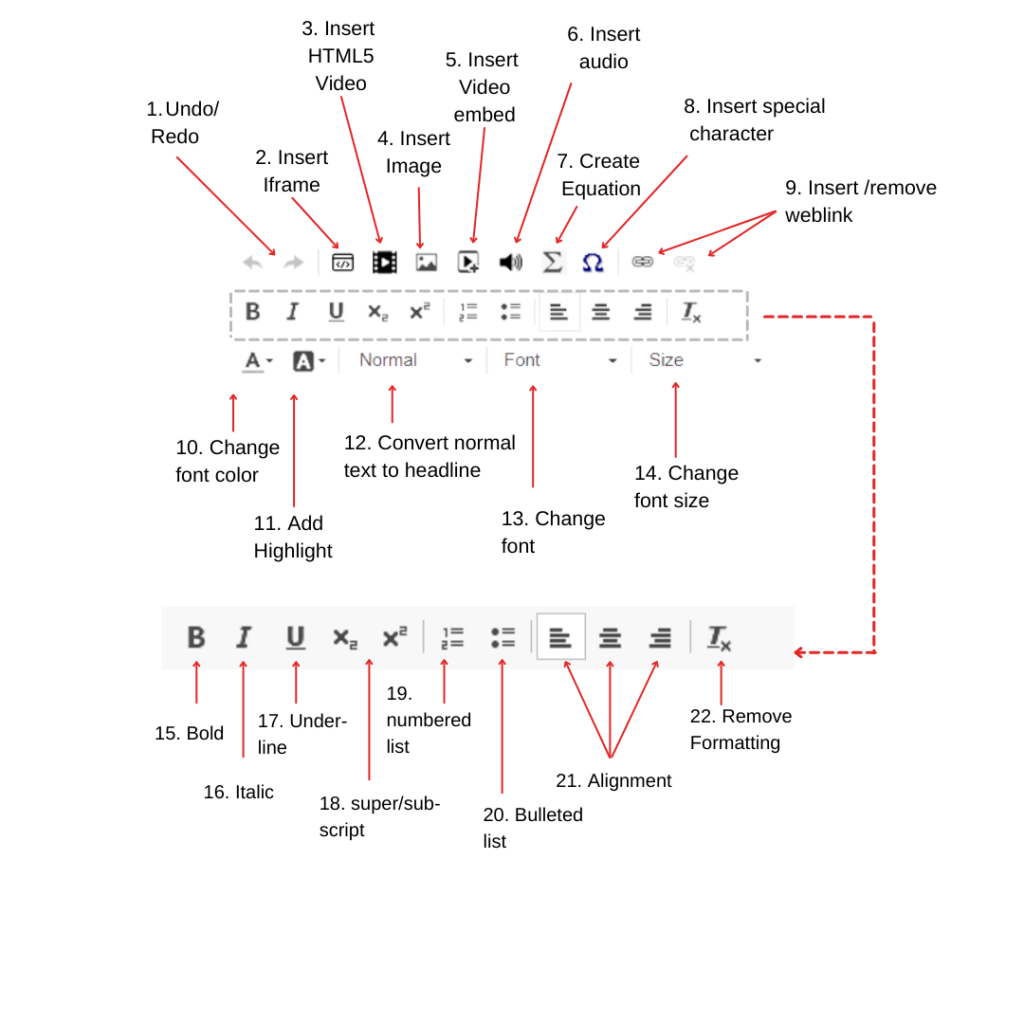
1. UNDO/REDO: With this tool, you can undo or redo changes that you’ve made in your current content box.
2. INSERT IFRAME: With this feature you can embed an inline frame. iframes can only be embedded from approved websites. You must use the URL from the embed code. Tested and approved domains should show up in the iframe tool when clicked on.
If you have interactive content that you would like to display (e.g. 3D visualizations) located on domains other than on the list in your editor, get in touch with our support team here so that we can test and approve the quality of the material.
3. INSERT HTML5 VIDEO Use the INSERT HTML5 VIDEO button in the content box editor to upload MP4 video files from your computer. Either drag and drop your video file into the marked box or click Browse to search through your files.
4. INSERT IMAGE You must use this tool to insert images into your presentation. Do not try to copy and paste images directly into the content boxes. iPosters only accept images in the following formats PNG, JPG, GIF. If you have an image in any other format, you must convert it to PNG or JPG.
Your iPoster will be displayed on high definition screens at an in-person or hybrid event. When visitors tap on, or click your images, they will expand to their full size. This is why it is important to insert images that are as large as possible (up to 1920px x 1080px).
If you have created charts, graphs, diagrams or other graphic representations in other programs (like Excel or Numbers) we suggest that you take a screen shot of the page and then insert it into your iPoster as a PNG or JPG image. Make sure that the image is as large as possible so the details are easy to read when it is expanded.
5. EMBED YOUTUBE/VIMEO VIDEO Use the INSERT VIDEO LINK button in the content box editor to embed a Youtube or Vimeo URL video into your iPoster. Simply add the URL link to the field in the pop-up box.
6. INSERT AUDIO Insert audio files using this tool. You can add narrations, comments, audio documentations, interviews, etc. You must first record your audio on another device – most people use their mobile phones – and then send it to your computer for uploading.
iPosters accept audio files in the MP3 format. If your sound recorder doesn’t support MP3, there are numerous free online converters that you can use. Here’s one we recommend: https://www.freeconvert.com/mp3-converter
7. CREATE EQUATION This tool enables you to create advanced equations using plain text with LaTeX. It will insert the equation in-line into your content box.
If you want the equation to act like an image and expand when clicked on by a visitor, we suggest that you create your equation in a free-standing version of LaTeX/Mathmatics or similar program. Make it as large as possible on your computer screen, take a screen shot of it, and then import it as an image.
8. INSERT SPECIAL CHARACTER Here you can find a vast array of individual symbol and language characters. Scroll through the list to find the type of character you need.
9. INSERT / REMOVE WEB LINK Use this tool to link to an external website in order to display online data sets or other online dynamic information. You can make a link out of a bit of text or an image simply by marking it and then clicking on the Link icon. Copy and paste the full web address into the URL field. If you want to remove the link, just mark the text or image and click on the Unlink icon.
When visitors to your presentation at your event click on the link, the web page will open in a special browser window within your iPoster. Be aware that if you have other links on the target web page, visitors will be able to navigate there, but they will not be able to download any files or fill in any forms.
When viewed online, outside of the iPoster area, the link will open in a new tab.
PLEASE NOTE the following restrictions: • Content other than images and texts will not accept links. You cannot add links to videos or sound files, or to special content created in the editor, such as TeX equations, symbols, or charts. • You cannot turn email addresses into links. You can include an email address as text, but it will not link out.
10. CHANGE FONT COLOR Mark the text you want to change and pick your color from the palette.
11. ADD TEXT HIGHLIGHT If you want to have a color other than the Content Box’s general color behind a text, mark the text and choose a color from the palette.
12. NORMAL Convert normal text to Headlines using this tool. Choose between different Headline sizes.
13. FONT TYPE Choose alternative typefaces for marked sections of text.
14. FONT SIZE Change font size. Note: default font size is 14. This is the recommended size for body text. Use 10-12 for Captions. Use larger for emphasis or sub-heads
15 – 17. BOLD, ITALIC, UNDERLINE Change the basic format of a marked text.
18. SUBSCRIPT/SUPERSCRIPT click the curser where you want to add super or subscript click the required button and begin typing. (NOTE: if you wish to use subscript or superscript in the Title, Author or Institution fields at the top of your template, you can copy-paste from this FAQ.)
19 – 20. NUMBERED LIST, BULLETED LIST Change to list format
21. ALIGNMENT Align your texts to left, center, or right.
Note: the system does not allow for fully justified (left/right) text. Since your iPoster will be viewed on devices with different screen resolutions – from mobile phones to large format screens, the fixed margins on each side of a column would make the word spacing difficult on many devices. This is also a recommendation of the W3C standards committee:
“Many people with cognitive disabilities have a great deal of trouble with blocks of text that are justified (aligned to both the left and the right margins). The spaces between words create “rivers of white” running down the page, which can make the text difficult for some people to read. “
22. REMOVE FORMATTING Revert all formatting changes in the Content Box back to default. This can also be useful if you have copied and pasted text from a Word document, a PDF, or another formatted file and you see that it’s not displaying properly in Preview. Highlight the text and click on the Remove Formatting icon.
There are lots of different way to present your research using multimedia content. Take a look at some sample iPosters . If you have any questions or problems, check out our FAQ page. If you need further help, don’t hesitate to email our support desk, [email protected]
Good luck with your iPoster presentation!